


English
- 10 -
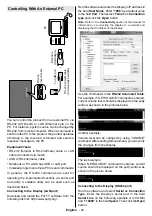
First Time Installation
When turned on for the first time, the language
selection screen will be displayed. Select the desired
language and press
OK
.
On the next screen, set your country preference and
press
OK
to continue.
You will be asked to set and confirm a PIN at this point.
For some
Country
options, the PIN cannot be set to
0000
, in this case you need to enter another 4-digit
number combination. You have to enter this PIN if you
are asked to enter a PIN for any menu operation later.
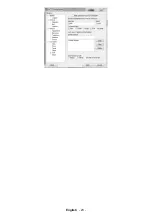
The
Signage Settings
menu will be displayed next.
Set ID
,
OSD Orientation(*)
,
Auto software update
options can be configured using this menu.
Model
name
,
Serial number
and
Software version
options
are for information only. They will be grayed out and
not selectable. Refer to the
Signage Settings Menu
Contents
section for more information on the options
of this menu. While this menu is displayed on the
screen you can copy
database files from a connected
USB device to the Display by pressing the
Yellow
button. You can also save the model information data
of the Display to a connected USB device by pressing
the
Blue
button. After the settings are completed,
press
OK
to continue.
(*)
This option may not appear depending on the model
On the next screen, the
Network/Internet Settings
menu will be displayed. Please refer to
Connectivity
section to configure a wired or a wireless connection.
After the settings are completed press
OK
button
to continue. To skip to the next step without doing
anything press the
Rapid advance
button.
The
First Time Installation
is completed.
To repeat this process and reset the Display's settings
to the factory defaults enter the
Signage Settings
menu, highlight
First time installation
and press
OK
. You will be asked to enter the PIN that you have
defined in the
First Time Installation
. If the correct PIN
is entered a confirmation message will be displayed
asking whether you want to delete all settings and
reset the Display. Select
Yes
and press
OK
to confirm.
Note:
Do not turn off the Display while initializing first time
installation. Note that, some options may not be available
depending on the country selection.
Media Playback via USB Input
Note:
If internal USB device
(*)
is inserted and external device
is also inserted, media player will use the external device only.
You can connect 2.5” and 3.5” inch (hdd with external
power supply) external hard disk drives or USB
memory stick to your Display by using the USB input/s
of the Display.
IMPORTANT!
Back up the files on your storage
devices before connecting them to the Display.
Manufacturer will not be responsible for any file
damage or data loss. Certain types of USB devices
(e.g. MP3 Players) or USB hard disk drives/memory
sticks may not be compatible with this Display. The
Display supports FAT32 and NTFS disk formatting.
Wait a little while before each plugging and unplugging
as the player may still be reading files. Failure to do
so may cause physical damage to the USB player
and the USB device itself. Do not pull out your drive
while playing a file.
You can use USB hubs with your Display’s USB
input/s. External power supplied USB hubs are
recommended in such a case.
It is recommended to use the Display’s USB input/s
directly, if you are going to connect a USB hard disk.
Note:
When viewing image files the
Media Browser
menu
can only display 1000 image files stored on the connected
USB device.
Media Browser Menu
You can play photo, music and movie files stored on
a USB disk by connecting it to your Display. Connect
a USB disk to one of the USB inputs located on the
side of the Display. Pressing the
Menu
button while
in the
Media Browser
mode will access the
Picture
,
Sound
and
Settings
menu options. Pressing the
Menu
button again will exit from this screen.
You
can set your
Media
Browser
preferences by using
the
Settings
menu.
Loop/Shuffle Mode Operation
Start playback with the
Play
button and activate
All files in the list will be contin
-
uously played in original order
Start playback with the
OK
but-
ton and activate
The same file will be played
continuously (repeat)
Start playback with the
Play
button and activate
All files in the list will be played
once in random order
Start playback with the
Play
button and activate
,
All files in the list will be con
-
tinuously played in the same
random order.
USB Auto Play Feature
USB AutoPlay feature is to start playing the media
content in removable device, automatically. It uses
the
Media Browser
. The media content types have
different priorities in order to be played. The reducing
priority order is as Photo, Video and Audio. That
means, if there is Photo content in the root directory
of the removable device, MediaBrower will play the
Photos in a sequence (in file name order) instead of
Video or Audio files. If not, it will be checked for Video
content and as last Audio.
This feature will only work if all of the following cir-
cumstances occur:
• The USB device is plugged in.