English
- 10 -
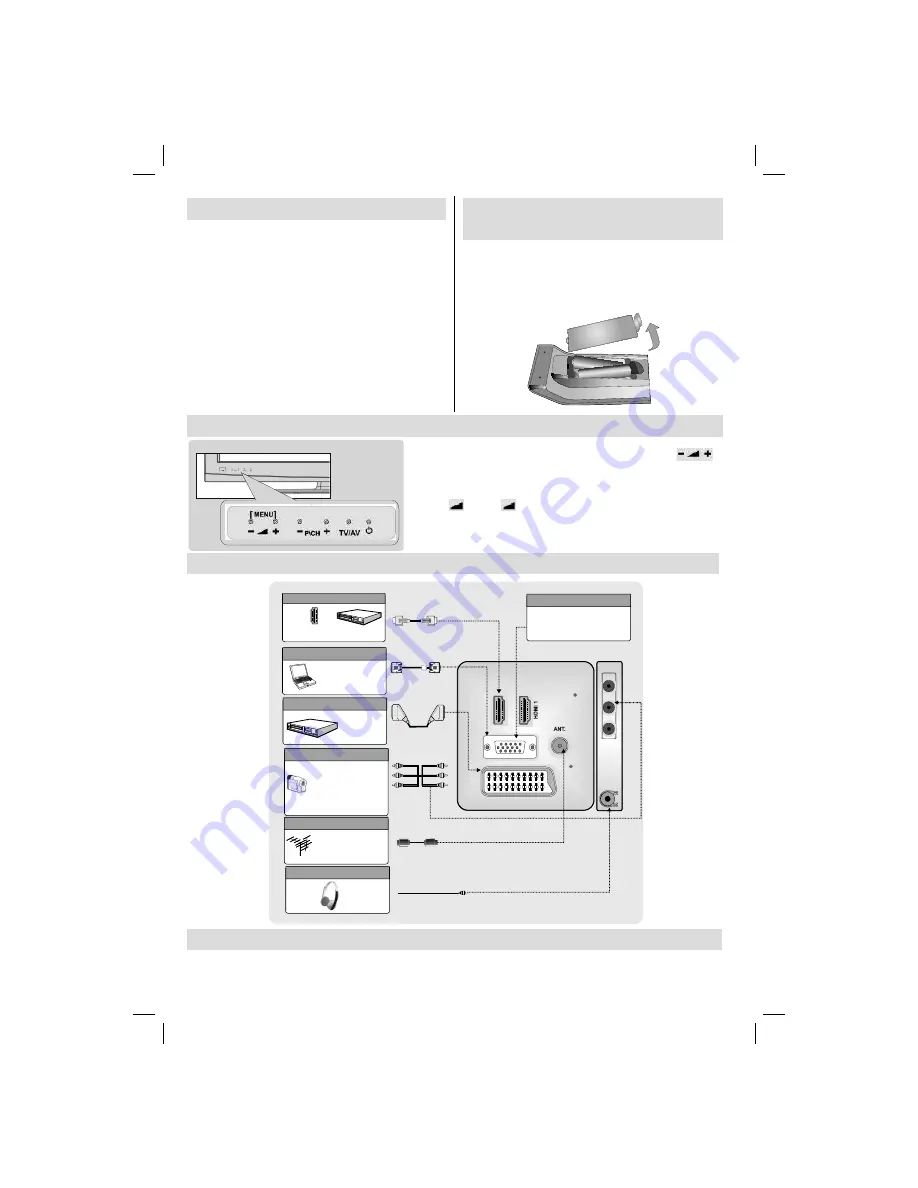
Step 1 - Installing the Batteries to the
Remote
1.
Lift the cover on the back of the remote upward as
shown in the
fi
gure to the right.
2.
Install two AAA batteries. Make sure to match the
+ and - ends of the batteries to the diagram in the battery
compartment.
3.
Replace the cover.
+
+
-
-
HDMI
2
DVD / Cable Box /
Satellite receiver
etc.
Using Scart Connection
Using HDMI Connection
DVD / Cable Box / Satellite receiver etc.
Video camera, DVD player, etc.
Yellow:
Video connection
Red & White
: Audio connection
(Use to enable audio when
connectiong a PC).
Using AV Connection
Laptop PC, Desktop
PC. Use Side AV Audio
inputs to enable audio.
Using VGA Connection
Headphone Connection
Antenna Connection
Use to connect antenna.
HDMI Cable
VGA Cable
SCART Cable
RCA Cable
RF Cable
Headphone Cable
Using YPbPr to VGA Connection
You can use YPbPr to VGA cable for
enabling YPbPr connection. Note
that this cable is not supplied.
SCART
VGA
Step 2 - Control Touch Buttons
You can adjust the volume or change channels using
and
P/CH
buttons on your TV.
Use
TV/AV
button to change sources.
Press
+
and
-
buttons at the same time to view the
main menu.
Supported PC Input Typical Display Modes
The display has a maximum resolution of 1920 X 1080 . Your TV may not support different resolutions. If you switch your
PC to an unsupported mode, a warning OSD will appear on the screen.
Speci
fi
cations
RF AERIAL INPUT
75 Ohm (unbalanced)
OPERATING VOLTAGE
220-240V AC, 50 Hz.
AUDIO OUTPUT POWER (W
RMS.
) (10% THD):
2 x 6
POWER CONSUMPTION (W):
150 W (max) < 1 W
(Standby)
PANEL
16:9 display, 32” Screen Size
DxLxH (With foot): 187 x 783 x 556 Weight (Kg): 12,3
DxLxH (Without foot): 94,5 x 783 x 513,5 Weight (Kg): 11,6
Transmission Standards:
VHF (BAND I/III) UHF (BAND
U) HYPERBAND
Step 3 - Connecting External Devices
02_MB48_[GB]_ANALOG_NICKEL19_3902UK_32930W_10076256_50203731.indd 10
02_MB48_[GB]_ANALOG_NICKEL19_3902UK_32930W_10076256_50203731.indd 10
15.11.2011 09:49:51
15.11.2011 09:49:51


