Broken glass indicator
1. Safety precautions
·
Please note that the
Vestamatic
broken glass indicator must only
be used with one of the Vestamatic control units listed below:
Quattro S50
article-no. 01813000
Quattro S50 ZE article-no. 01813200
Quattro Nero
article-no. 01813110
·
Any other unintended use is not permissible.
·
Please note that these control units require an operating voltage
of 230 V~, 50 Hz. Make sure to contact a professional electrician
for installation and wiring of the broken glass indicator.
·
The device was designed for correct use as described in the instal-
lation and operating instructions. Any changes or modifications
thereof are not permissible and result in loss of all warranty claims.
·
Check the device for any signs of damage immediately after un-
packing. If there is any damage due to the shipping, please notify
the supplier immediately.
Do not start up the broken glass indicator in case there is
any damage!
2. Functional description
You have purchased a high-quality product. This indicator releases
a broken glass signal as soon as it detects a massive shock or
breaking of glass within the sensing range. This results in moving
down the roller shutter immediately.
The broken glass indicator has been manufactured according to the
highest quality standards, which will guarantee optimum efficiency
and reliability. Please take the time to read these operating instruc-
tions carefully before starting up. We have tried to make sure that
these are easy to understand.
3. Installation of the broken glass indicator
Make sure to contact a professional electrician for installation and
wiring of the broken glass indicator.
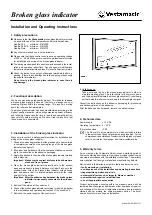
1. Choose the mounting location that the glass pane to be monitored
is completely covered by the sensing range of the broken glass
indicator (see figure 1).
2. Mix binder and hardener of the two-component adhesive accord-
ing to the instruction on the adhesive packaging.
3. Apply the adhesive to the side of the broken glass indicator marked
with a black bar.
Important: Make sure the contact surfaces to be adhered are
clean and free of grease.
4. Place the broken glass indicator carefully onto to the window
pane and make sure to keep a distance of at least 2 inches to the
window frame. Attach the broken glass indicator with adhesive
tape and ensure that it is located perpendicular with the cable
going off to the bottom.
Important: After the adhesive has hardened, the broken glass
indicator is irrevocably connected to the window-
pane!
5. Switch off the mains of the control unit.
6. Connect the broken glass indicator according to the wiring diagram
in the installation and operating instructions of the control unit.
7. Switch on the power supply of the control unit.
8. Validity check:
Take a coin and tap it on the broken glass indicator in order to
simulate breaking glass. The roller shutter will now move down
and the display will indicate the broken glass symbol. Press the
up
button to stop the roller shutter and delete the broken glass signal.
Consult the instructions on the adhesive packaging for processing
and hardening times of the adhesive.
After the adhesive has hardened, remove the adhesive tape.
4. Technical data
Power supply:
< 10 V DC
Operating temperature: 0 – 40 °C
IP protection class
IP 50
p
The CE mark is a free market mark, which exclusively refers
to the authority but does not guarantee any properties. For the
comprehensive declaration of conformity for this product, please
refer to our Internet homepage: http://www.vestamatic.de
5. Warranty terms
For new devices, the Vestamatic GmbH issues a warranty period of
24 months, starting from the date of purchase, provided the device was
mounted in accordance with the installation instructions. The warranty
extent applies to all design, material and manufacturing defects.
Not included in the warranty extent are faults and defects due to:
– faulty mounting or installation,
– non-observance of the installation and operating instructions,
– inappropriate operation and strain,
– detrimental effects such as impacts, blows or weather,
– non-authorized repairs or modifications,
– use of inappropriate accessories.
Product deficiencies occurring within the warranty period will be
remedied free-of-charge by Vestamatic, either by means of repair or
by exchange of the device. A replacement delivery due to warranty
claims does not prolong the original warranty period. The buyer
bears all costs for mounting and installation.
Artikel-Nr.: 83120111 L1
Installation and Operating Instructions


