14105
Avalon
Boulevard,
Los
Angeles,
CA
90061
|
Tel
310-353-7100
|
Fax
310-353-7109
www.VersaTables.com
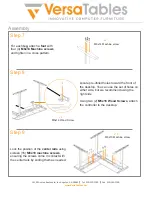
Ensure there is no gap between surfaces and that the
edges of all surfaces are flush with each other by
adjusting the
end frame with L-bracket
(Fig. D)
Attach (2)
link brackets
using (2)
1/4-20 Phillips
Bolts
for each bracket
Then, tighten the (4)
M6x10 machine screws
(Fig D.)
going through
end frame with L-bracket
from Step 4
all the way.
Tighten
x4
M6x10 Machine screw
Step 10
Assembly
Step 11
Slide the
control box
back onto the
corner
end frame
. There are two place-
ment options, we suggest placing it on
the side closest to your controller.
Ensure there is no gap between surfaces and that the
edges of both surfaces are flush with each other by
adjusting the
end frame with L-bracket
(Fig. D)
Attach (2)
link brackets
using (2)
1/4-20 Phillips
Bolts
for each bracket.
Then, tighten the bolts going through
end frame with
L-bracket
from Step 4 all the way.
fig. D
1/4-20 Phillips Bolt
x4


