background image

V500, V500 30° 

2020-09 

Using your wheelchair


EN 


NL


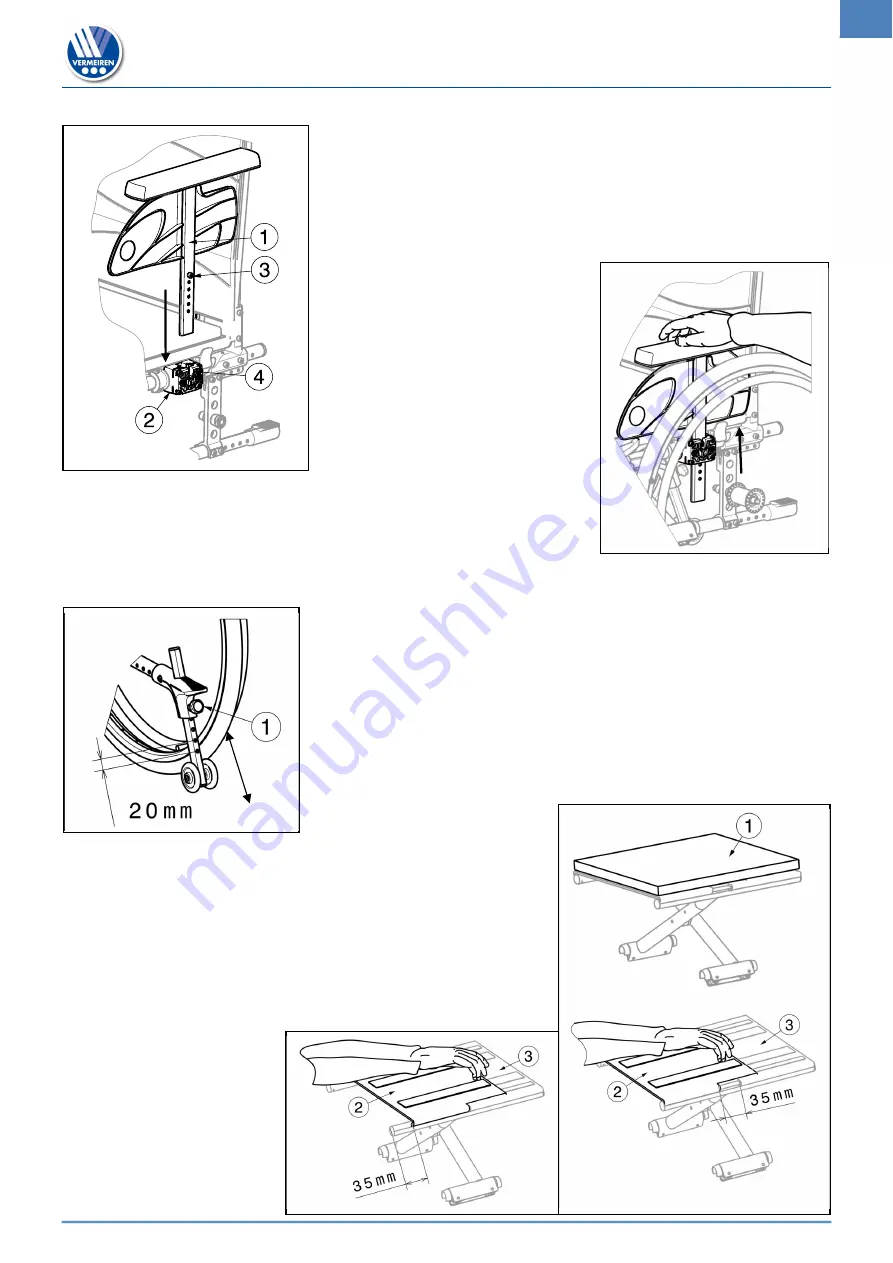
3.3  Mounting or removing the armrests 

The  armrests  of  the  wheelchair  can  be  mounted  by  following 
instructions. 

1. Mount  the  armrest 

  in  the  armrest  support 

  until  the 

screw 

 fits in the sleeve 

2. Make sure the armrest 

 is firmly fixated. 


To remove the armrest: 

1. Grasp  the  arm  pad  and  pull  the  armrest  gently  out  of  the 

armrest support. 


3.4  Adjusting anti-tipping (only mounted to the right side) 

 
Adjust the height of the anti-tipping in 7 positions (range 120 mm: 
steps 20 mm): 

1. Loosen the star knob 

 a little bit. 

2. Move the tube of the anti-tipping in the desired height. 
3. Secure the star knob 

4. Make sure that the anti-tipping is firmly secured. 


3.5  Adjusting the seat depth 

The V500, V500 30° wheelchair is adjustable in seat depth 
by adjusting the seat canvas (range 35 mm: step less).  

1. Fold up the wheelchair a little bit (see § 2.5).


2. Remove the seat cushion 

 with the velcro straps. 

3. Loosen the front canvas 

 with the velcro. 

4. Move the front canvas 

 backwards or frontwards in the 

desired seat depth. 

5. Refasten  the  front 

canvas 

  with  the 

velcro  to  the  rear 
canvas 

6. Unfold the wheelchair. 
7. Remount  the  seat 

cushion 

  with  the 

velcro  straps  to  the 
seat canvas 


Summary of Contents for V500

Page 1: ...VERMEIREN V500 V500 30 U S E R M A N U A L ...

Page 2: ......

Page 3: ...ootrests 8 3 2 Operating the brakes 8 3 3 Mounting or removing the armrests 9 3 4 Adjusting anti tipping only mounted to the right side 9 3 5 Adjusting the seat depth 9 3 6 Backrest inclination V500 30 10 3 7 Mounting or removing the push bar V500 30 10 3 8 Transfer in and out of the wheelchair 11 3 9 Riding the wheelchair 11 4 Maintenance 13 4 1 Points of maintenance 13 4 2 Maintenance instructio...

Page 4: ... on a regular basis This manual reflects the latest product developments Vermeiren has the right to implement changes to this type of product without any obligation to adapt or replace similar products previously delivered Pictures are used to clarify the instructions in this manual Details of the depicted product may deviate from your product Information available On our website http www vermeire...

Page 5: ...the V500 Anterior pelvic belt B20 The following accessories are available for the V500 30 Anterior pelvic belt B20 Drum brakes B74 1 Handgrips 2 Backrest 3 Arm pads 4 Armrests 5 Seat 6 Footrests 7 Footplates 8 Steering wheels front wheels 9 Brakes 10 Driving wheels rear wheels 11 Hand rims 12 Anti tipping 13 Tip cap 14 Cross 15 Identification plate Only for V500 30 16 Lever backrest inclination 17...

Page 6: ...ermeiren Please read all technical details and limits of your wheelchair in chapter 5 The warranty on this product is based on normal use and maintenance as described in this manual Damage to your product caused by improper use or lack of maintenance will cause the warranty to lapse 2 2 General safety instructions Risk of injuries and or damage Carefully read and follow the instructions in this ma...

Page 7: ... a motor vehicle The wheelchair s pelvic belt alone is not suited as an occupant restraint belt The wheelchair is tested using the four point strap tie system and a 3 point occupant restraint system Whenever feasible use the seat of the vehicle and store the wheelchair in the cargo area Steps to secure the wheelchair in a motor vehicle 1 Check that the vehicle is equipped with a suitable wheelchai...

Page 8: ...t 3 Attach the occupant restraint belts according to the instructions of the strap system manufacturer 4 Wear the pelvic belt low across the front of the pelvis so that the angle of the pelvic belt is within the preferred zone of 30 to 75 to the horizontal similar to that shown below 5 A steeper greater angle within the preferred zone is desirable 6 Adjust the belt tightly according to the instruc...

Page 9: ... rear wheel and push button 2 Keep the button pushed in and mount the rear wheel axle until it stops 3 Release the button 4 Check that the wheel is secured 2 5 4 Taking off the wheels 1 Make sure the brakes standing in the off position 2 Take the wheelchair to the side frame where you want to remove the wheel 3 Press the button in the center of the wheel hub 4 Pull the wheel away from the frame 2 ...

Page 10: ...loose from the guidance 3 Pull the footrest from the tube hood 3 2 Operating the brakes Risk of injuries The brakes are not used to slow down the wheelchair during movements Use the brake only to prevent the wheelchair from unintended movements Good operation of the brakes is influenced by wear and contamination of the tires water oil mud Check the condition of the tires before each use The brakes...

Page 11: ...ge 120 mm steps 20 mm 1 Loosen the star knob a little bit 2 Move the tube of the anti tipping in the desired height 3 Secure the star knob 4 Make sure that the anti tipping is firmly secured 3 5 Adjusting the seat depth The V500 V500 30 wheelchair is adjustable in seat depth by adjusting the seat canvas range 35 mm step less 1 Fold up the wheelchair a little bit see 2 5 2 Remove the seat cushion w...

Page 12: ... the attendant adjusts the backrest inclination and that the wheelchair does not tip over 1 Pull the lever on both sides towards the push handle to adjust the backrest 2 The pen Ⓐ comes out of the groove of the toothed plate Ⓑ 3 Pull both back tubes backwards to the desired position 4 different positions 5 15 25 35 4 Check that the pen Ⓐ is well fixed in the groove of the toothed plate Ⓑ If your w...

Page 13: ...e wheelchair Position your backside as close as possible to the backrest Make sure your upper legs are horizontal If needed adjust the length of the footrests see installation manual 3 9 Riding the wheelchair Risk of injuries and damage Before every usage make sure that o parking brakes are working properly o tires are in good condition see 4 Prevent your fingers from being caught by the wheel spo...

Page 14: ... on the footplate Stairs should always be negotiated with the help of two attendants Never try to use stairs that are not appropriate for wheelchairs 3 9 1 Riding your wheelchair 1 Release the brakes 2 Take both hand rims at their highest position 3 Lean forward and push the hand rims forward until your arms are straight 4 Move your hands back to the top of the hand rims and repeat the movement ...

Page 15: ... load no deformation or wear Contact your specialist dealer for possible repairs or part replacements Yearly or more often Have your wheelchair inspected and serviced by your specialist dealer at least once a year or more often The minimum maintenance frequency depends on use and should therefore be commonly agreed upon with your specialist dealer 4 2 Maintenance instructions 4 2 1 Wheels and tyre...

Page 16: ...t any of the following deviations Strange sound Uneven tread wear on one of the tyres Jerky movements Wheelchair deflects to one side Damaged or broken wheel assemblies 4 4 Expected lifespan The average lifespan of your wheelchair is 5 years Depending on the frequency of use driving circumstances and maintenance the lifespan of your wheelchair will increase or decrease 4 5 Reuse Before each reuse ...

Page 17: ...dard configuration Static stability uphill V500 V500 30 7 in standard configuration 2 Static stability sideways 18 in standard configuration Obstacle climbing 60 mm Seat plane angle 0 10 Effective seat depth 380 mm 500 mm Seat surface height at front edge 440 mm 530 mm with 200 mm front wheels Backrest angle V500 V500 30 5 5 35 Backrest height 440 mm without seat cushion Distance between footrest ...

Page 18: ......

Page 19: ... Date By stamp Kind of work I S R D Date By stamp Kind of work I S R D Date By stamp Kind of work I S R D Date By stamp Kind of work I S R D Date By stamp Kind of work I S R D Date By stamp Kind of work I S R D Date By stamp Kind of work I S R D Date By stamp Kind of work I S R D Date By stamp Kind of work I S R D Date By stamp Kind of work I S R D Date By stamp Kind of work I S R D Date By stamp ...

Page 20: ...ights reserved including translation No part of this manual may be reproduced in any form what so ever print photocopy microfilm or any other process without written permission of the publisher or processed duplicated or distributed by using electronic systems R E Vermeiren GROUP Vermeirenplein 1 15 2920 Kalmthout Belgium User manual V500 V500 30 _EN_A5_2020 09_C Basic UDI 5415174 122106V500 9Q 54...

Reviews: