background image

12

User guide

Bridge Line

The One Talk Bridge Line feature lets you use your own desk 

phone to receive and place calls on behalf of other phone 

numbers. Incoming calls to those telephone numbers will ring 

on your desk phone, and you can use those other numbers to 

place calls directly from your own desk phone.

To configure another phone number to your desk phone:

Your organization’s One Talk account administrator can 

configure bridged devices by logging into the My Business 

Verizon One Talk Admin Portal. 

Monitoring and answering a bridged line:

1.  When a call is made to a bridged line, it will appear on  

your screen

2.  Press the appropriate line key to answer the call. The 

monitored phone’s status display will now show that the line 

is busy

Once a call is answered on a bridged line, you will have access 

to the same features that are available on your own desk  

phone line.

Call Barge

Any bridged line or other device that shares a number with you 

can use the Call Barge feature to join a call in progress. Call 

Barge is especially useful for admins when it is urgent that a 

manager be reached immediately.
To use Call Barge, your account administrator must configure 

the barge function in the One Talk Admin Portal.

To barge in on a call to your One Talk number or Bridge Line:

1.  Press and hold the in-use line key for approximately  

five seconds*

2.  Press the 

Barge In

 soft key to barge in on the active call 

*The Line Key indicator will light steady green when the line is busy   

  (on an active call).

To set a warning tone during Barge In:

One Talk can be configured to notify you when another user 

barges in on a call. For more information, refer to the User 

Portal Guide or contact your systems administrator.

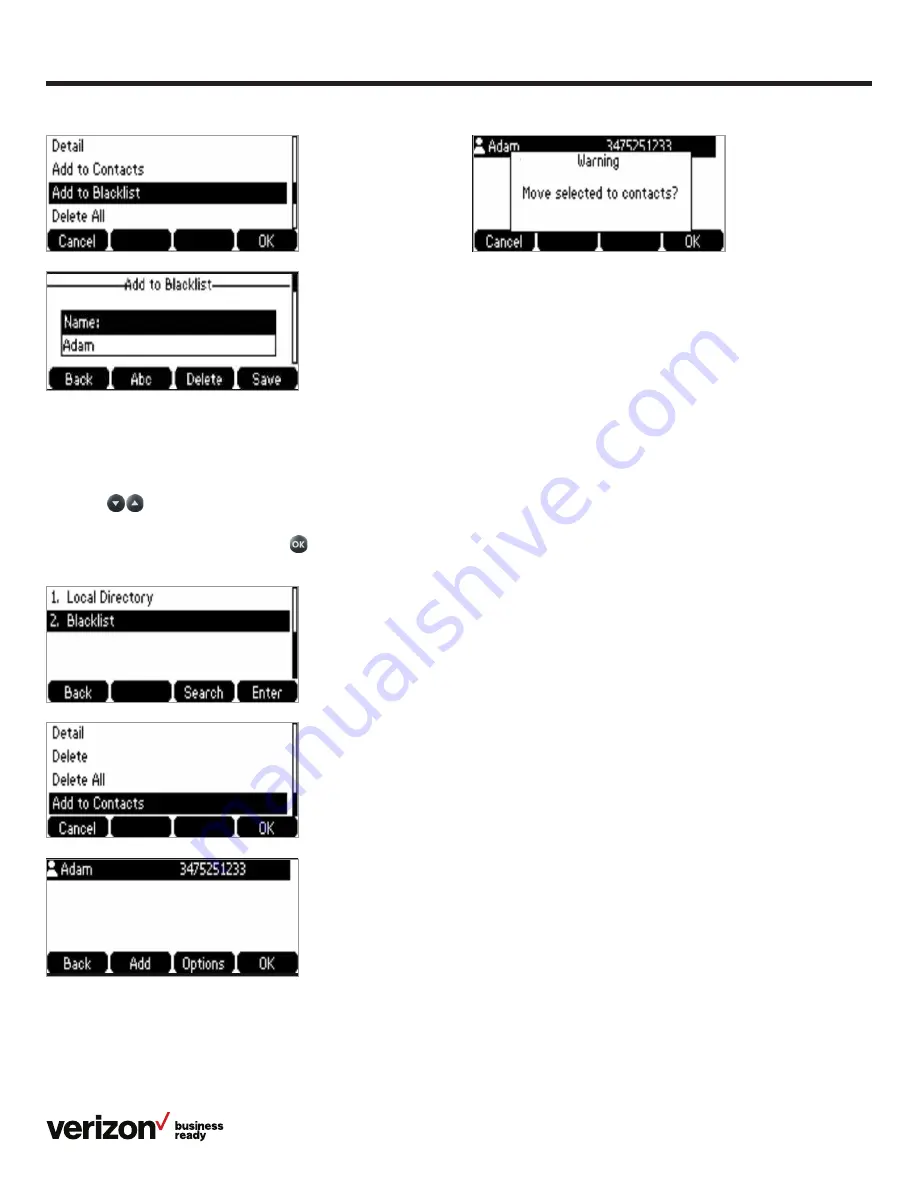
To remove a contact from a blacklist:

1.  Press the 

Menu

 soft key while the phone is idle 

2.  Press the 

Directory

 soft key, then press 

Blacklist


3.  Scroll 

 to highlight the contact you wish to unblock 

and press 

Options

4.  Select 

Add to Contacts

 and press 

 to accept  

the change 

Summary of Contents for One Talk T42S

Page 1: ...User guide vzw com support one talk One Talk T42S IP desk phone user guide...

Page 2: ...preferences 7 Time and date 8 Display settings 8 Sound settings 8 Line keys 9 Speed dial configuration of a line key 9 Intercom key setup 9 Using the Intercom key 9 Voice Mail setup 10 Basic call fea...

Page 3: ...Rebooting or resetting phone 19 Features 21 Accessibility features 21 For hearing impaired users 21 For vision impaired and blind users 22 For mobility impaired users 22 Compatible accessories 22 Imp...

Page 4: ...e internet port on the phone and the port on the wall or on your PoE capable switch hub device Startup After your phone is powered on the system boots up and performs the following steps Dynamic Host...

Page 5: ...er soft key 4 Scroll to Wi Fi and press Enter 5 Press the Switch soft key to turn Wi Fi on 6 Press the Save soft key The phone will automatically search for available wireless Wi Fi networks in your a...

Page 6: ...plays info about calls messages soft keys time date and other relevant data such as Caller ID Call duration Icons Missed call and second incoming caller information Prompt text 2 Power indicator LED I...

Page 7: ...reen The call is placed on hold from current device Off The line is inactive Customizing your desk phone About Basic settings Setup and preference options for the following can be found in the Basic s...

Page 8: ...the Time Date settings screen 1 Press the Menu soft key to open the main menu 2 Select Settings 3 Use the keys to navigate to Basic settings and press to select 4 Scroll to Time Date and press to sele...

Page 9: ...1 From the Home screen press the Intercom soft key 2 Enter the target extension for Intercom then press the Send soft key Line keys Your T42S comes with nine configurable line keys You can use them t...

Page 10: ...e to trigger your Call Forwarding preferences You can also activate Do Not Disturb mode to turn off ringing and automatically ignore calls by pressing the DND soft key Ignore a call Press Ignore durin...

Page 11: ...call on hold press or to select the desired call then press the Resume soft key Mute unmute your phone s microphone Press during a call Redial 1 Press to enter the placed call list 2 Press or to sele...

Page 12: ...Any bridged line or other device that shares a number with you can use the Call Barge feature to join a call in progress Call Barge is especially useful for admins when it is urgent that a manager be...

Page 13: ...an active call press the Park soft key The user will hear a message stating Please dial the number where you want to park your call followed by or dial to park the call against your number 2 Enter the...

Page 14: ...ll on hold 2 Press 55 then enter the 10 digit phone number or extension to which you want to transfer the call 3 Press the Direct soft key to complete the transfer To retrieve a call Press the Retriev...

Page 15: ...tact numbers in the corresponding fields 5 Use the key to enter other information work number mobile number etc 6 Press the Add soft key to accept the change Call History Call History maintains a list...

Page 16: ...em To search for a contact 1 Press the Directory soft key 2 Select All Contacts 3 Press the Search soft key 4 Use the keypad to enter name To edit a contact 1 Press the Directory soft key when the pho...

Page 17: ...irectory soft key 2 Select Add Group 3 Using the keypad enter a group name 4 Use the key to scroll to and select a ringtone to assign to the group if desired 5 Once you are finished editing select Add...

Page 18: ...2 Select the desired contact group 3 Press the Option soft key and then select Delete from the prompt list 4 Press the soft key to confirm the deletion or the Cancel soft key to cancel To assign a con...

Page 19: ...y to confirm Voice Mail To retrieve Voice Mail messages Press the message button on the desk phone console System status troubleshooting and other settings To check phone status 1 Press the Menu soft...

Page 20: ...boot and press 2 Select Reset to factory settings and press To reboot the phone 1 From Advanced Settings scroll to Reset Reboot and press to select 2 Press the OK soft key to confirm Note Alternativel...

Page 21: ...justable ringtone and volume Choice of a variety of ringtones Volume of the ringer can also be changed to suit needs Adjustable call volume While on a call raise or lower the volume of the voice on th...

Page 22: ...ated when activated providing alerts when a feature is enabled For mobility impaired users Feature Description Dedicated headset jack that enables the auto answer function Headset can be set up to tak...

Page 23: ...hnology CO LTD All rights reserved No parts of this publication may be reproduced or transmitted in any form or by any means electronic or mechanical photocopying recording or otherwise for any purpos...

Page 24: ...by Yealink Network Technology CO LTD declares that this phone is in conformity with the essential requirements and other relevant provisions of the CE FCC You can find the CE and FCC information from...

Page 25: ...ine Duration Back Edit OK Option Detail Add to Contact Add to Blacklist Delete All Cancel OK Call Detail Name Work Number Mobile Number Other Number Account Ring Group Back ABC Save Add Group Enter Na...

Page 26: ...sages Firmware More Exit Enter More Network Phone Accounts Back Enter Network IPv4 IP Mode MAC Accounts Line 1 Line 2 Phone Product Name Hardware Firmware Config Version Prod ID MAC Device Cert Basic...

Page 27: ...mous Call Rejection Forward to Voicemail Start Troubleshooting Trace Back Enter Call Forward Always Forward Busy Forward No Answer Forward Back OK Forward to Voicemail Call Forwarding Always to Voice...

Reviews: