Verint Nextiva HDR 1800 User Manual Download Page 35

comprises 16 monitors. The numbers indicate the monitor IDs.

The default layout that appears when the HDR 1800 first starts up, is set in the 
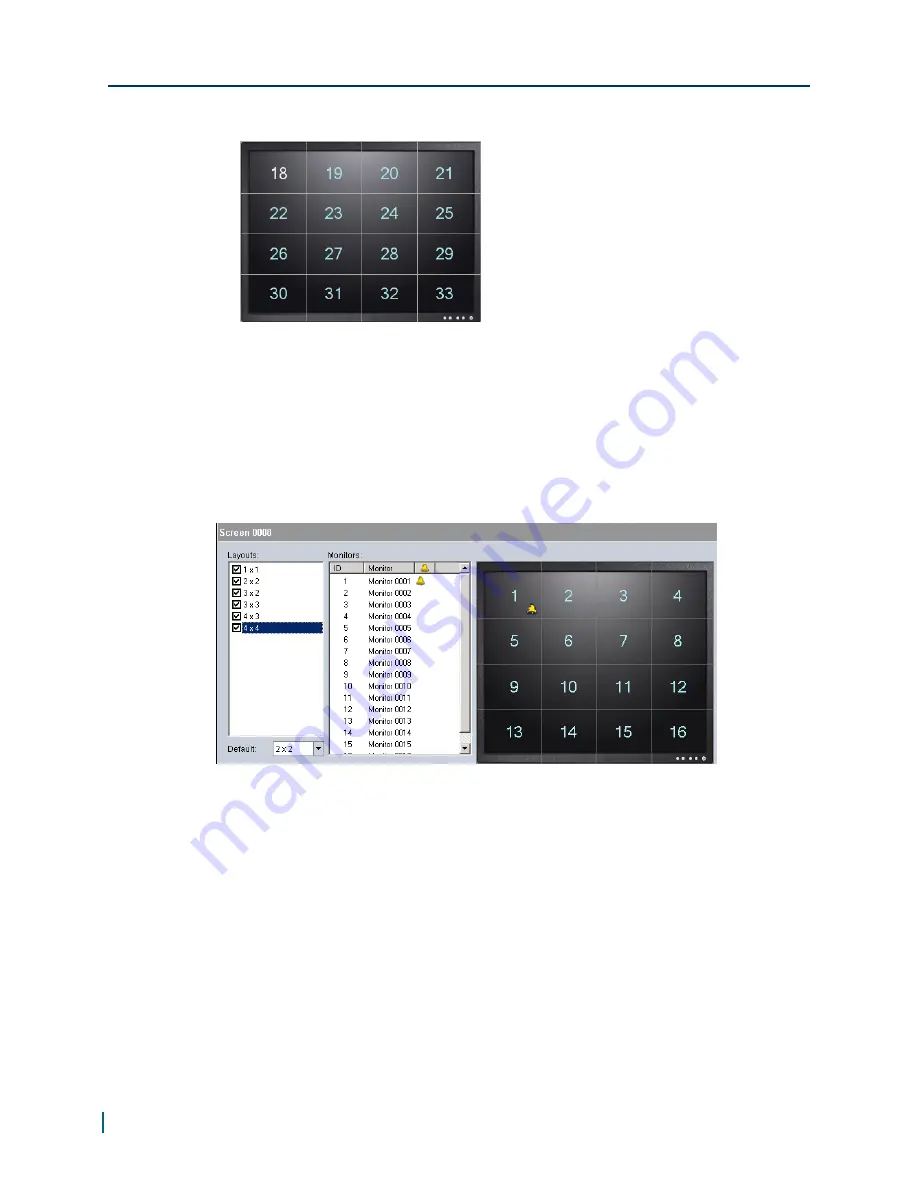
Active Layout list. Many CCTV keyboards allow the operator to toggle between 
the different layouts by using the “next or previous layout” command. If a tile is 
currently displaying alarm video, and the user toggles to the next layout, the 
VM choose the next layout that keeps the alarm video visible. 

An alarm icon indicates that the monitor is set to display camera video 
associated to an alarm. To configure a monitor to display alarm video, add the 
monitor to an alarm monitor group.

Any tile can display alarm video. If an alarm tile is hidden in the selected 
layout, then when an alarm comes in it is shown on the first available (visible) 
alarm tile. However, if no alarm tiles are visible, then the alarm video will not 
be displayed. For example, only tile 16 of a 4 × 4 grid is assigned to display 
alarms, and the layout is switched to 2 × 2, which does not display tile 16, then 
no tiles will display alarm video. For this reason, it is recommended that the 
first tile always be set to display alarms, so that even in a 1 × 1 layout alarms 
will display.

Setting Up Screens

35

© 2013 Verint Video Systems Inc.

Summary of Contents for Nextiva HDR 1800

Page 1: ...Nextiva HDR 1800 February 06 2013 User Guide...

Page 2: ...56 US 11 359 357 US 11 359 358 US 11 359 532 US 11 361 208 US 11 388 944 US 11 394 408 US 11 394 410 US 11 394 496 US 11 394 794 US 11 395 759 US 11 395 992 US 11 396 062 US 11 410 004 US 11 428 222 U...

Page 3: ...1800 10 Hardware Overview 11 Product Dimensions and Weight 12 Monitor Configuration 12 Frame Rate and Performance 13 Chapter 2 Installing the HDR 1800 14 Package Contents 15 Installing on a Flat Surf...

Page 4: ...tartup 29 Configuring On Screen Display of Analog Monitors 30 Live and Playback Video Parameters 33 Setting Up Screens 34 Defining Camera Tours 36 Defining Salvos 38 Defining Virtual Matrix General Se...

Page 5: ...Our solutions help governments and enterprises make sense of the vast information they collect in order to achieve their performance and security goals Today our solutions are used by more than 10 000...

Page 6: ...ideo situation intelligence Nextiva Service and Support index For assistance contact the customer service team Location Contact Information USA and Canada 1 888 747 6246 vissupport verint com Open 9 0...

Page 7: ...sing optional hardware The Nextiva HDR 1800 should only be operated in a clean dry environment The operating temperature is 32 to 104 F 0 to 40 C with maximum humidity at 0 to 95 relative non condensi...

Page 8: ...ourth edition of the Nextiva HDR 1800 User Guide Updates In Nextiva VMS 6 2 the configuration of Monitor types is now done in the Advanced tab of the HDR 1800 You can now select what information is sh...

Page 9: ...ency level for all EPS Revision 1 April 2010 This is the first edition of the Nextiva HDR 1800 User Guide Features High definition video decoder receiver for use with Nextiva Virtual Matrix H 264 MPEG...

Page 10: ...he HDR 1800 is ideal for video surveillance applications that call for high definition video to be displayed at multiple locations for building situational awareness and a coordinated response Compati...

Page 11: ...sed video at multiple locations simultaneously The HDR 1800 is also fully integrated with Nextiva Video Management System VMS and Nextiva intelligent edge devices including the state of the art S1800e...

Page 12: ...5D 1 7H in 280W 190D 44H mm 5 7lb 2 6Kg Monitor Configuration You can connect either one monitor Single monitor configuration or two monitors Dual monitor configuration to the HDR 1800 In a Dual moni...

Page 13: ...on monitors varies depending on the tile layout screen resolution compression mode and bitrate The following table lists performance values for the maximum frame rate The performance values listed be...

Page 14: ...onfigured in Nextiva Video Management System VMS The following topics are discussed Package Contents 15 Installing on a Flat Surface 15 Installing in a Rack 16 Installing on a Wall 16 Powering the HDR...

Page 15: ...adaptor One Nextiva HDR 1800 Quick Installation Guide Installing on a Flat Surface This section explains how to install the HDR 1800 on a desktop or flat surface To install on a flat surface 1 Remove...

Page 16: ...th the rack Installing on a Wall This section explains how to install the HDR 1800 on a wall To install on a wall 1 Align the wall mount brackets with the holes on the bottom of the HDR 1800 2 Screw t...

Page 17: ...f the HDR 1800 2 Secure the power connector to the receptacle by tightening the screws on each side of the connector 3 Plug the 19V DC 5 power cable into an outlet or surge protection device Connectin...

Page 18: ...VGA or BNC Composite TV Out To connect monitors 1 Plug the monitor cable into the corresponding video input DVI D VGA BNC Composite TV Out on the back of the HDR 1800 Note In a Dual monitor configurat...

Page 19: ...onnect the CCTV keyboard s serial cable to the corresponding serial DB9 port on the back of the HDR 1800 RS 232 DB9 Pin Number Signal on CCTV Keyboard Cable RS 422 DB9 Pin Number Signal on CCTV Keyboa...

Page 20: ...up Wizard Adding the HDR 1800 Using the System Setup Wizard 21 Adding the HDR 1800 Manually 22 Configuring the HDR 1800 Network Settings 23 Configuring Monitor Output Settings 25 Defining Video Source...

Page 21: ...bar click System Setup Wizard In the status bar click New Devices then click in the New Devices message box that appears every 60 seconds when a new device is discovered The New Devices count displays...

Page 22: ...e When adding a device manually you need to specify an IP address or range the device manufacturer and the connection settings To add the HDR 1800 manually 1 On the Physical Groups page of the System...

Page 23: ...P server the HDR 1800 automatically obtains an IP address upon initial startup from the DHCP server If a DHCP server is not available on the network the HDR 1800 assigns itself a temporary IP address...

Page 24: ...00 HDR 1800 in Partially Discovered Device state Edit the IP address Subnet Mask Gateway and Host Name as required HDR 1800 in Device belongs to foreign site state Uncheck Belongs to foreign site Edit...

Page 25: ...DVI Monitor 2 Tile layout 2 2 You can change the default settings by specifying a different Tile Layout 1 1 2 2 default 3 2 3 3 4 3 4 4 Nextiva VMS considers each tile a separate video output on the H...

Page 26: ...Expand Screen 001 Layout 2 From the Connector Type list select DVI_ HDMI default 3 Expand Screen 002 Layout 4 From the Connector Type list select Not Connected Dual monitor configuration 1 Expand Scre...

Page 27: ...e cameras that are available To add a camera to the Virtual Matrix you assign a Video Source ID to the camera To define video sources 1 Click System Components Virtual Matrix Video Sources All cameras...

Page 28: ...nitors on demand and simultaneously replay alarm based video at multiple locations for redundancy and coordinated response Note If no monitors are assigned in the virtual matrix then camera video is d...

Page 29: ...itors on Startup A monitor can be configured to display the live video from a particular camera when the monitor is turned on To assign cameras to monitors on startup 1 Click System Components Virtual...

Page 30: ...rent OSD for live video and for playback video From the OSD editor you can change the Time format Date format Live and playback video parameters Layout and color of the parameters The default settings...

Page 31: ...conds For example 15 14 00 H M S 4 From the Date Format list choose a format for the date which will appear on all monitors in both live an playback mode To Display Choose Month day year in four digit...

Page 32: ...e number in the Left and Top text boxes to a value between 0 and 100 4 Change the color of the characters that appear on the screen by clicking the Text color box then click a color 5 Change the color...

Page 33: ...sage PTZ Locked Live setting only PTZ Locked is displayed when the PTZ camera is in use and locked in live video PTZ Priority Too Low Live setting only PTZ Priority Too Low is displayed when the selec...

Page 34: ...owing concepts are used A screenrefers to the physical peripheral display device such as a CRT monitor LCD monitor or computer monitor The following image shows the screen representation in Nextiva Vi...

Page 35: ...ated to an alarm To configure a monitor to display alarm video add the monitor to an alarm monitor group Any tile can display alarm video If an alarm tile is hidden in the selected layout then when an...

Page 36: ...configuration 2 To change the current monitor grid layout from the screen list select a screen click Change Active Layout and select a grid layout option 3 The screen display refreshes to reflect the...

Page 37: ...mera tours 1 Click System Components Virtual Matrix Tours 2 Select a tour from the Tour List or click Add to create a new tour The Tour Name and ID appear at the top of the Tour Details section The To...

Page 38: ...Salvo 2 Select a Salvo from the Salvo List or click Add to create one 3 Enter a unique name for the salvo in the Salvo Name text box or use the default The Salvo ID is automatically generated by addin...

Page 39: ...r the last image Alarm Queue Lengthsets the number of alarms that can be waiting for an available monitor The minimum can be 1 alarm the maximum 100 When there are more alarms than allowed in the queu...

Page 40: ...ect what information to display on all monitors You can further customize the position of these information through the Virtual Matrix To configure the OSD 1 In Nextiva Control Center select System Co...

Page 41: ...o 255 Font Size Set the font size Foreground Transparency Set the text transparency level by typing a value from 0 to 255 Starve Mode Timeout Set the number of seconds to wait before enabling starve m...

Page 42: ...The following topics are discussed Technical Specifications 43 Appendix 4 Default Specifications and Configuration...

Page 43: ...only VGA RGB only BNC Composite only Tiles Tiles display options 1 1 1 tile 2 2 4 tiles 3 2 6 tiles 3 3 9 tiles 4 3 12 tiles 4 4 16 tiles Monitor Resolution DVI Up to 1920 1200 VGA RGB Up to 1920 1200...

Page 44: ...mount black Dimensions 11W 7 5D 1 7H in 280W 190D 44H mm Weight 5 7lb 2 6Kg Operating Temperature Operating 32 to 104 F 0 to 40 C Storage 22 to 140 F 30 C to 60 C Humidity 0 to 95 relative non conden...

Page 45: ...led Monitor Output Settings Dual Monitor extended desktop configuration enabled Monitor 1 Connector Type DVI Monitor 1 Tile layout 2 2 Monitor 2 Connector Type VGA Monitor 2 Tile layout 2 2 Audio Outp...

Page 46: ...5 F factory default configuration 45 Flat Surface Installing 15 I Installing Flat Surface 15 Installing Rack 16 Installing Wall 16 intelligent edge devices adding manually 22 discovering 21 L layout 3...

Page 47: ...t 39 reset to factory default 45 S salvos setting up 38 screen 34 startup video source 29 V virtual matrix analog monitors defining in 28 camera tours defining for 36 general setting defining 39 VM al...

Page 48: ...ituation intelligence index html Americas info verint com EMEA marketing emea verint com APAC marketing apac verint com All other trademarks and product names are the property of their respective owne...

Reviews: