background image

External | P400+ User Manual | Version 2.3 | March 22nd, 2021


P400+ User Manual


12


Step 

Instruction 

Screen Information 

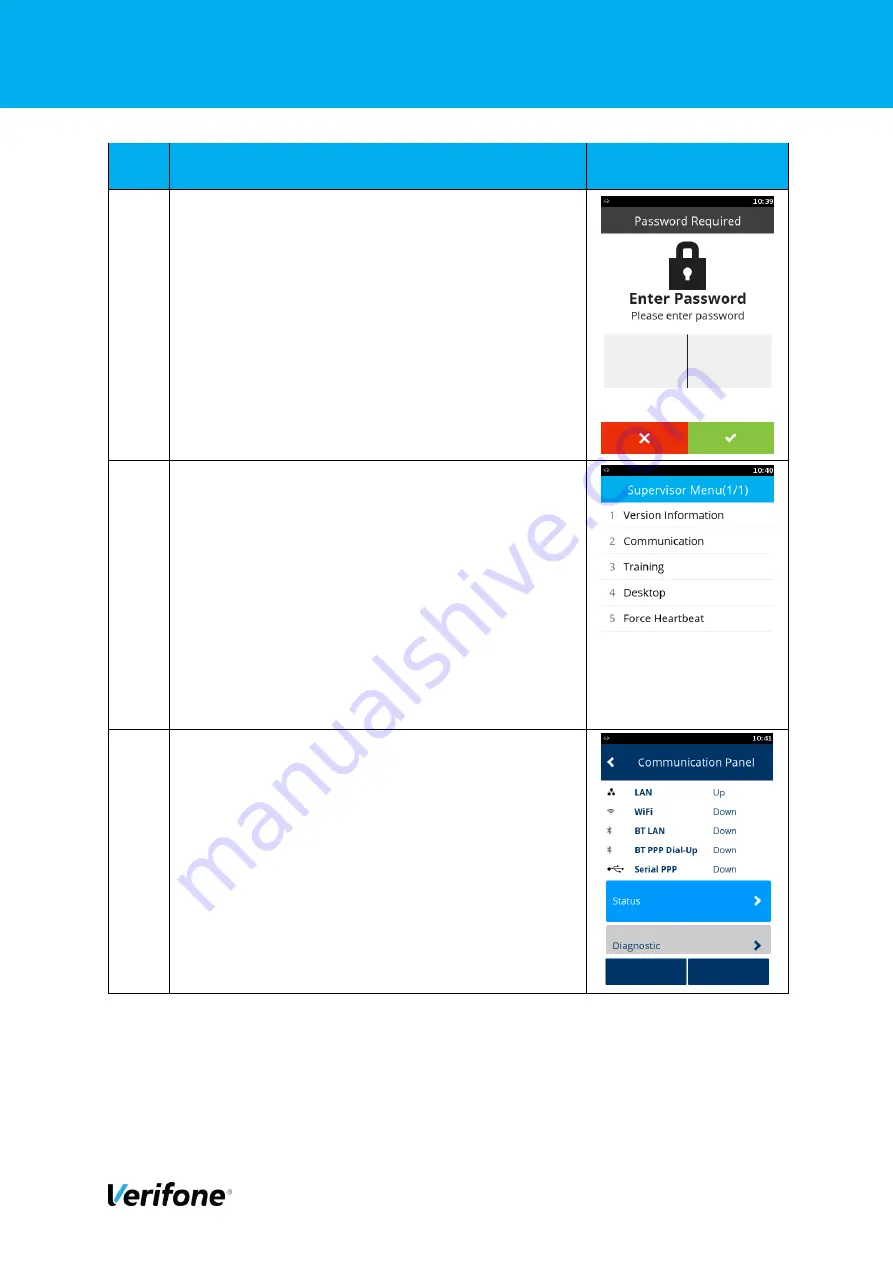
Enter the Supervisor Pin, Default 12345 


Select option 2, Communication 


Select option 3, Configuration 

The option will be off the main screen and will require 
the */# buttons to be used or press 3. 


Summary of Contents for P400 PLUS

Page 1: ...External P400 User Manual Version 2 3 March 22nd 2021 P400 External User Manual Verifone U K Ltd 3 Roundwood Avenue Stockley Park Uxbridge UB11 1AF...

Page 2: ...y of any kind either expressed or implied including the implied warranties of merchantability and fitness for a particular purpose LIMITED LIABILITY In no event shall Verifone be liable for any indire...

Page 3: ...10 05 18 First draft 1 0 MKB 29 05 18 First Version 2 0 UU 11 08 20 Second Version Addition of RNDIS Setup 2 1 MKB 10 03 21 Updated the RNDIS setup 2 2 MKB 11 03 21 Removed redundant section 2 3 MKB...

Page 4: ...ESS A CONTACTLESS CARD 10 3 HOW TO CONNECT YOUR DEVICE 11 3 1 WI FI 11 3 1 1 Visible Wi Fi Networks 11 3 1 2 Hidden Wi Fi Networks 25 3 2 ETHERNET 40 3 3 CONFIGURING THE TERMINAL FOR RNDIS PROTOCOL 49...

Page 5: ...or setting up installing and the screen messages that will be seen during transaction processing with the Verifone P400 payment device when used in conjunction with the PAYWare Ocius Gateway This guid...

Page 6: ...External P400 User Manual Version 2 3 March 22nd 2021 P400 User Manual 6 2 GET TO KNOW THE P400 DEVICE 2 1 TERMINAL FRONT LCD Display Magnetic Stripe Reader Smart Card Reader Keypad...

Page 7: ...External P400 User Manual Version 2 3 March 22nd 2021 P400 User Manual 7 2 2 TERMINAL REAR Speaker Space pole connector Space pole connector Data Cable Connector SAM Slot Micro SD Card Slot...

Page 8: ...section will explain which buttons will allow the operator to key in particular characters Key Characters 1 1 Q Z q z 2 2 A B C a b c 3 3 D E F d e f 4 4 G H I g h i 5 5 J K L j k l 6 6 M N O m n o 7...

Page 9: ...outdoors Using the terminal outside of these boundaries could cause the terminal to malfunction during operation 2 5 POWER Full Capabilities 7 12V DC 1A Reduced capabilities USB Powered 5V DC 500mA T...

Page 10: ...Insert the card into the smart card reader in until it seats firmly 2 8 HOW TO SWIPE A CARD 1 Position the card with the magnetic stripe facing the keypad 2 Swipe the card through the reader in eithe...

Page 11: ...bers in the guide To navigate up and down the menus scroll using the touchscreen 3 1 WI FI This section will cover setting up the Wi Fi connection when both the network is visible and hidden 3 1 1 Vis...

Page 12: ...1 P400 User Manual 12 Step Instruction Screen Information 4 Enter the Supervisor Pin Default 12345 5 Select option 2 Communication 6 Select option 3 Configuration The option will be off the main scree...

Page 13: ...h 22nd 2021 P400 User Manual 13 Step Instruction Screen Information 7 Select option 1 Network Interface 8 Select option 2 WiFi 9 Select option 1 WiFi Scan assuming the network is visible If the networ...

Page 14: ...021 P400 User Manual 14 Step Instruction Screen Information 10 Select your chosen network button scrolls up button scrolls down green circle button selects the highlighted option 11 Press Enter to add...

Page 15: ...case letters and numerics Once inserted press the green circle key 14 The terminal will return to the screen in step 11 however the Pre Shared Key will now show as being entered Note The number of do...

Page 16: ...Version 2 3 March 22nd 2021 P400 User Manual 16 Step Instruction Screen Information 16 Highlight No and press the green circle key 17 Press the red cross button when the results of the scan are return...

Page 17: ...nd 2021 P400 User Manual 17 Step Instruction Screen Information 19 Ensure that the chosen network is now highlighted Press the green circle key 20 Ensure that View Edit is highlighted and press the gr...

Page 18: ...al Version 2 3 March 22nd 2021 P400 User Manual 18 Step Instruction Screen Information 22 Select Option 1 IPv4 23 Select Option 2 DHCP 24 Select option 1 No Note By selecting No it will then enable 5...

Page 19: ...Step Instruction Screen Information 25 Select Option 3 IP Address 26 Enter the required IP address Note if a field is not 3 digits long then you must enter the leading zeros 27 Repeat steps 25 and 26...

Page 20: ...rsion 2 3 March 22nd 2021 P400 User Manual 20 Step Instruction Screen Information 29 Press the red cross button 30 Highlight Save and press the green circle button 31 When Network Saved is displayed p...

Page 21: ...er Manual Version 2 3 March 22nd 2021 P400 User Manual 21 Step Instruction Screen Information 32 Select Yes to Apply settings on interface 33 Select Yes to Settings applied to interface 34 Press the r...

Page 22: ...External P400 User Manual Version 2 3 March 22nd 2021 P400 User Manual 22 Step Instruction Screen Information 35 Press the red cross button 36 Press the red cross button 37 Select Option 1 Status...

Page 23: ...rsion 2 3 March 22nd 2021 P400 User Manual 23 Step Instruction Screen Information 38 Select option 1 IP Addresses 39 Select option 2 WiFi 40 Check that the status is Up Note If the status is not Up re...

Page 24: ...External P400 User Manual Version 2 3 March 22nd 2021 P400 User Manual 24 Step Instruction Screen Information 41 Press the red cross button until you are back at the Login screen...

Page 25: ...on a hidden Wi Fi network using WPA2 PSK as the network configuration This will not cover the other options that are supported by the terminal Step Instruction Screen Information 1 Turn on the device...

Page 26: ...1 P400 User Manual 26 Step Instruction Screen Information 4 Enter the Supervisor Pin Default 12345 5 Select option 2 Communication 6 Select option 3 Configuration The option will be off the main scree...

Page 27: ...P400 User Manual Version 2 3 March 22nd 2021 P400 User Manual 27 Step Instruction Screen Information 7 Select option 1 Network Interface 8 Select option 1 WiFi 9 Highlight New and press the green circ...

Page 28: ...2021 P400 User Manual 28 Step Instruction Screen Information 10 Select Option 1 SSID 11 Enter the SSID The possible characters can be found in section 2 3 Highlight Save and press the green circle bu...

Page 29: ...rsion 2 3 March 22nd 2021 P400 User Manual 29 Step Instruction Screen Information 13 Select the required authentication for the chosen Wi Fi network Default Yes 14 Select Option 3 Authentication 15 Se...

Page 30: ...021 P400 User Manual 30 Step Instruction Screen Information 16 Select Option 3 Authentication Select the required authentication for the chosen Wi Fi network 17 Select Option 2 Pairwise cipher 18 Sele...

Page 31: ...2 3 March 22nd 2021 P400 User Manual 31 Step Instruction Screen Information 19 Select Option 3 Group cipher 20 Select Option 5 Group Cipher Select the chosen cipher for the chosen Wi Fi Network 21 Se...

Page 32: ...nstruction Screen Information 22 Enter the SSID The possible characters can be found in section 2 3 Multiple presses will result in upper and lower case letters and numerics Once inserted select Save...

Page 33: ...al Version 2 3 March 22nd 2021 P400 User Manual 33 Step Instruction Screen Information 25 Select Option 1 IPv4 26 Select Option 2 DHCP 27 Select option 1 No Note By selecting No it will then enable 5...

Page 34: ...Step Instruction Screen Information 28 Select Option 3 IP Address 29 Enter the required IP address Note if a field is not 3 digits long then you must enter the leading zeros 30 Repeat steps 25 and 26...

Page 35: ...rsion 2 3 March 22nd 2021 P400 User Manual 35 Step Instruction Screen Information 32 Press the red cross button 33 Highlight Save and press the green circle button 34 When Network Saved is displayed p...

Page 36: ...er Manual Version 2 3 March 22nd 2021 P400 User Manual 36 Step Instruction Screen Information 35 Select Yes to Apply settings on interface 36 Select Yes to Settings applied to interface 37 Press the r...

Page 37: ...External P400 User Manual Version 2 3 March 22nd 2021 P400 User Manual 37 Step Instruction Screen Information 38 Press the red cross button 39 Press the red cross button 40 Select Option 1 Status...

Page 38: ...rsion 2 3 March 22nd 2021 P400 User Manual 38 Step Instruction Screen Information 41 Select option 1 IP Addresses 42 Select option 2 WiFi 43 Check that the status is Up Note If the status is not Up re...

Page 39: ...External P400 User Manual Version 2 3 March 22nd 2021 P400 User Manual 39 Step Instruction Screen Information 44 Press the red cross button until you are back at the Login screen...

Page 40: ...n will detail the setup options for the Ethernet connection Step Instruction Screen Information 1 Turn on the device by plugging the device in 2 At the Waiting for Merchant Login press either the key...

Page 41: ...021 P400 User Manual 41 Step Instruction Screen Information 5 Select option 2 Communication 6 Select option 3 Configuration The option will be off the main screen and will require the buttons to be us...

Page 42: ...External P400 User Manual Version 2 3 March 22nd 2021 P400 User Manual 42 Step Instruction Screen Information 8 Select option 1 LAN 9 Select Option 1 Autostart 10 Select Option 1 Yes...

Page 43: ...March 22nd 2021 P400 User Manual 43 Step Instruction Screen Information 11 Select Option 2 IPv4 The default is DHCP if you require static IPs then follow steps 12 18 if not skip to step 18 12 Select...

Page 44: ...ation 14 Select option 1 No Note By selecting No it will then enable 5 additional menu options 15 Select Option 3 IP Address 16 Enter the required IP address Note if a field is not 3 digits long then...

Page 45: ...Version 2 3 March 22nd 2021 P400 User Manual 45 Step Instruction Screen Information 18 Press the red cross button 19 When Network Saved is displayed press the green circle button 20 Select Yes to App...

Page 46: ...P400 User Manual Version 2 3 March 22nd 2021 P400 User Manual 46 Step Instruction Screen Information 21 Select Yes to Settings applied to interface 23 Press the red cross button 24 Press the red cros...

Page 47: ...External P400 User Manual Version 2 3 March 22nd 2021 P400 User Manual 47 Step Instruction Screen Information 25 Select Option 1 Status 26 Select option 1 IP Addresses 27 Select option 1 LAN...

Page 48: ...3 March 22nd 2021 P400 User Manual 48 Step Instruction Screen Information 28 Check that the status is Up Note If the status is not Up repeat the network setup steps 29 Press the red cross button unti...

Page 49: ...o allow the terminal to have a separate connection to the ECR via IP over USB 3 3 1 Configuring the payment device to support RNDIS The P400 needs to be configured to support RNDIS Turn on the P400 by...

Page 50: ...ows Supervisor access is PIN protected Once these settings have been made the P400 will need to be rebooted for the settings to take effect The P400 now needs to be configured to select correct defaul...

Page 51: ...address 192 168 137 2 Broadcast Leave Blank Mask 255 255 255 0 Gateway 192 168 137 1 DNS 1 8 8 8 8 DNS 2 8 8 4 4 Interface pre set miniusb MAC Address pre set variable value MTU Pre set Default Exit t...

Page 52: ...05 02 B3 or a later version Documentation is supplied with the driver please ensure this is read and note taken of any specific Microsoft or Verifone prerequisites It is highly recommended for ease of...

Page 53: ...929 After successful installation of the Verifone driver and resolving any Microsoft pre requisite changes The P400 can be plugged in RNDIS enablement 1 Open Device manager and ensure that the P400 is...

Page 54: ...External P400 User Manual Version 2 3 March 22nd 2021 P400 User Manual 54 3 Select the RNDIS 6 0 Network and drill down into the properties and the IP4 settings Configure the adaptor as shown above...

Page 55: ...ternet connectivity This needs to be set up to share internet connectivity with the RNDIS6 adaptor configured above Configure as shown note that the RNDIS 6 network has been selected as the network th...

Page 56: ...ck to the ping screen Check that the P400 can access the internet using the ping command in the P400 as above but using a common IP address such as 001 001 001 001 Should any of the connectivity fail...

Page 57: ...00 is used Configuration of the ECR and the P400 is now complete By default the P400 will use the ethernet adaptor in the ECR to access the Internet and establish connectivity with Verifone s gateway...

Page 58: ...will see on the terminal Please note messaging will be dependent on the settings enabled on the account and level of integration performed by your POS provider 4 1 SALE Step Instruction Screen Informa...

Page 59: ...Information 3 Enter the amount of the gratuity Note This will only show if you select yes to adding a gratuity 4 Present Insert or Swipe the payment card Note A 1 gratuity was added to the transactio...

Page 60: ...d 2021 P400 User Manual 60 Step Instruction Screen Information 6 The correct PIN was entered by the cardholder 7 The P400 is awaiting a response from the Verifone PAYWare Ocius Gateway 8 The P400 is c...

Page 61: ...tion Screen Information 9 The P400 is awaiting a response from the Verifone PAYWare Ocius Gateway 10 Present Insert or Swipe the payment card Note A 1 gratuity was added to the transaction not shown i...

Page 62: ...2021 P400 User Manual 62 Step Instruction Screen Information 12 The correct PIN was entered by the cardholder 13 The P400 is awaiting a response from the Verifone PAYWare Ocius Gateway 14 The P400 is...

Page 63: ...2021 P400 User Manual 63 Step Instruction Screen Information 15 The P400 is awaiting a response from the Verifone PAYWare Ocius Gateway 16 The transaction has been successfully approved 17 The merchan...

Page 64: ...ction Screen Information 18 Card processing has been completed by the P400 and the cardholder can remove their card 19 The cardholder copy of the receipt is being printed by the POS 20 The transaction...

Page 65: ...2nd 2021 P400 User Manual 65 4 2 REFUND Step Instruction Screen Information 1 The terminal is ready to receive an instruction from the POS 2 Present Insert or Swipe the payment card 3 The P400 is conn...

Page 66: ...2021 P400 User Manual 66 Step Instruction Screen Information 4 The P400 is awaiting a response from the Verifone PAYWare Ocius Gateway 5 The merchant copy of the receipt is being printed by the POS 6...

Page 67: ...March 22nd 2021 P400 User Manual 67 Step Instruction Screen Information 7 The cardholder copy of the receipt is being printed by the POS 8 The transaction has been completed and the terminal is ready...

Page 68: ...arch 22nd 2021 P400 User Manual 68 4 3 CUSTOMER NOT PRESENT SALE MAIL ORDER Step Instruction Screen Information 1 The terminal is ready to receive an instruction from the POS 2 Enter the card number 3...

Page 69: ...Version 2 3 March 22nd 2021 P400 User Manual 69 Step Instruction Screen Information 4 Enter the CSC number from the card 5 Enter the House Number if no number just press the green tick 6 Enter just th...

Page 70: ...Instruction Screen Information 7 The P400 is connecting to the Verifone PAYWare Ocius Gateway 8 The P400 is awaiting a response from the Verifone PAYWare Ocius Gateway 9 This screen is showing what of...

Page 71: ...2nd 2021 P400 User Manual 71 Step Instruction Screen Information 10 The transaction has been approved successfully 11 The merchant copy of the receipt is being printed by the POS 12 The cardholder cop...

Page 72: ...al P400 User Manual Version 2 3 March 22nd 2021 P400 User Manual 72 Step Instruction Screen Information 13 The transaction has been completed and the terminal is ready to receive an instruction from t...

Page 73: ...power Q Can I use my V820 cables A Yes assuming they are on the approved list for the UK PAAS market Please contact Verifone to confirm Q What PTS is device A The P400 is a PTS 5 Q What is the Micro S...

Page 74: ...Saturday 08 00 20 00 Sunday 10 00 17 00 Bank Holidays 08 00 20 00 Closed Christmas Day TECHNICAL SERVICES T 0333 323 6667 E uk techservices verifone com Monday Friday 09 00 17 30 Saturday Sunday Clos...

Reviews: