background image

13

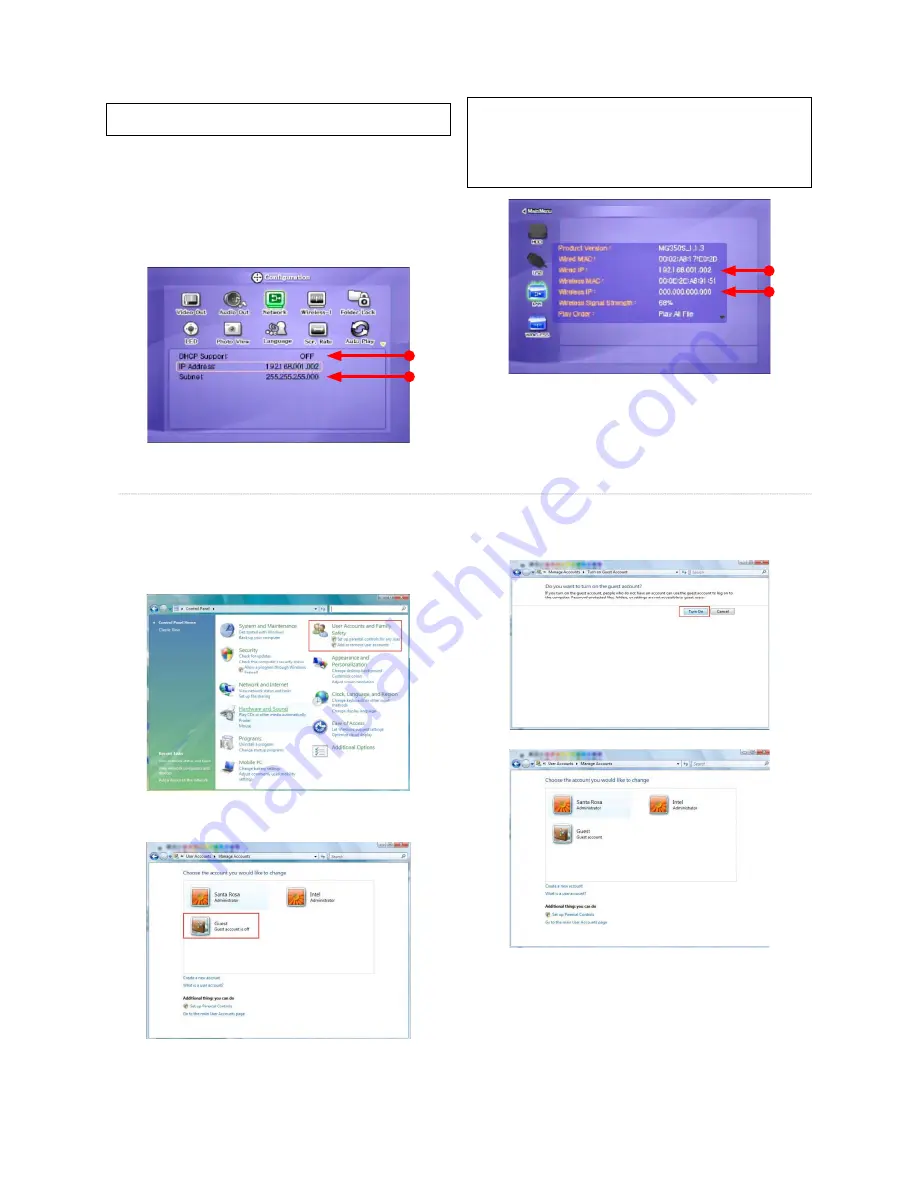
10.  Set the network confi gurations of MediaStation Pro.

✓ 

You have to connect MediaStation Pro to TV set for this setup. See “6.1 Connect Video 

Cable”.


Press [SETUP] of remote control for moving to setup screen. On 
that screen, select ‘DHCP Support Off’ and write IP address & 
Subnet mask. 

 For 

example,

 IP 

Address: 

192.168.1.2


Subnet mask: 255.255.255.0

After writing, press [SETUP] again for saving confi gurations.

✓ 

If you have already been provided dynamic IP address from DHCP Server or IP Router 

on your local area network, you don’t need to write static IP address absolutely. Use 
‘DHCP on’ or write IP address & Subnet mask that DHCP Server or IP Router provide.

✓ 

Check ‘IP address obtained automatically’ 

When you use ‘DHCP On’, you can see the IP address on information screen with 
pressing [INFO] button.

<MediaStation Pro’s IP Address>

3.3 Windows Vista

Before you do “folder sharing”, you need to set up 3 things for Network sharing.

1.  Setup of User Accounts and Family safety


a. Click Start > Settings > Control Panel > Users Accounts and 
Family safety


b. Make sure the account is “Guest”.


c. If the “Guest” account is off, then switch it to “On”.

Summary of Contents for MediaStation Pro Wireless Network Multimedia Hard Drive

Page 1: ...1 MediaStation Pro Wireless Network Multimedia Hard Drive User Guide English...

Page 2: ...Setup 18 6 4 Wireless Setup 19 6 5 Wireless Security Setup 19 6 6 LED Setup 19 6 7 Photo View Setup 19 6 8 Language Setup 20 6 9 Screen Ratio Setup 20 6 10 Auto Play Setup 20 6 11 Internet How to set...

Page 3: ...Max 12Mbps USB Host The USB Host may not be compatible with all USB storage devices Network connection Data transfer through wired or wireless network connection may be disrupted by other network traf...

Page 4: ...PRE REW LEFT PWR NET HDD IR NEXT FF RIGHT STOP DOWN USB HOST LAN USB DEVICE CVBS Y PB PR OPTICAL S VIDEO HDMI PWR ANT COAXIAL Front View POWER Power On Off PLAY PAUSE Play all les from selected le Pau...

Page 5: ...stallation at Windows Start Settings Control panel switch to classic View on Windows XP system Hardware Device manager Universal Serial Bus controllers USB Mass Storage Device 2 Check My Computer or E...

Page 6: ...assumed that the MEDIASTATION PRO will be detected as sda on your system If not you have to write the drive name which is detected as USB Mass Storage not sda How to stop using Do unmount at Device Co...

Page 7: ...s access point Infrastructure Mode Wireless LAN connection type with Wireless Access Point Move to Setup screen by pressing SETUP button Move to Wireless I Icon and press OK button Setup box will be d...

Page 8: ...simultaneously 2 Manual Setting of IP address and Subnet mask In case of AP Mode disable DHCP support and set IP Address and subnet mask manually IP address must be different between MediaStation Pro...

Page 9: ...folder and click Sharing in pop menu 2 Check Share this folder and write share name For example My Movie Make sure to write share name within 12 characters in English 3 Click Permissions and check whe...

Page 10: ...se Obtain an IP address automatically or write IP address Subnet mask that DHCP Server or IP Router provide 10 Set the network con gurations of MediaStation Pro You have to connect MediaStation Pro to...

Page 11: ...Users and double click Guest This is for Windows XP Professional Windows XP Home users can t see this gure Go to next number 6 If you can t nd Administrative Tools at Control Panel click Switch to cla...

Page 12: ...y been provided dynamic IP address from DHCP Server or IP Router on your local area network you don t need to write static IP address absolutely Use Obtain an IP address automatically on or write IP a...

Page 13: ...om DHCP Server or IP Router on your local area network you don t need to write static IP address absolutely Use DHCP on or write IP address Subnet mask that DHCP Server or IP Router provide Check IP a...

Page 14: ...tart Setting Control Panel Network and Internet Network and Sharing Center b Select Password Protected sharing and select Turn off password protected sharing c make a folder you want to share d You wi...

Page 15: ...from various manufacturers without issue 5 1 Connect Video Cable MediaStation Pro supports 4 type of video output Composite S video Component HDMI Use the video connection that your TV supports Standa...

Page 16: ...audio connection and this package includes a stereo audio cable If you can not hear sound after connecting Optical or Coaxial Cable you must change audio setup of MediaStation Pro to Encoded Digital...

Page 17: ...0x1200 TV Output HD DVI Mode HD HDMI Mode Select one among 480p 720p 1080i 1080p 640x480 800x600 1024x768 and 1280x1024 1600x1200 same as TV input mode HDMI HDMI Cable NTSC PAL Standard of TV Output S...

Page 18: ...Move to Network icon and press OK Setup box will be displayed under icon menu Select DHCP Support ON and press OK Finally press SETUP again for saving configuration Check the obtained IP address Pres...

Page 19: ...press SETUP on Mode Selection screen Move to LED icon and press OK Setup box will be displayed under icon menu Select one out of ON or OFF and press OK Finally press SETUP again for saving configurat...

Page 20: ...continuously form the time of being stopped Turn on MediaStation Pro and press SETUP on Mode Selection screen Turn on MediaStation Pro and press SETUP on Mode Selection screen Move to Scr Rate icon an...

Page 21: ...umber keys set the configuration and press ENTER for saving of the configuration Press SETUP button for the saving of the configuration Go to the 2nd page and select i RADIO icon and press ENTER butto...

Page 22: ...s ENTER button after communicating with server radio stream should begin 6 13 SKIN With SKIN function you can make your own GUI of MEDIASTATION PRO After turning MediaStation Pro on press SETUP button...

Page 23: ...of SKIN Support and select SKIN folder Press SETUP button for saving the configuration As the above it supports several font colors Go to the 2nd page and select ETC icon and press ENTER button then y...

Page 24: ...col Here you can set up data transfer protocol to access data stored on servers on your network How to setup After turning MediaStation Pro on press SETUP button and go to SETUP page Go to the 2nd pag...

Page 25: ...red Wireless Network Following example is in case of wired network Functionality is the same for wireless networking Mode Selection Select HDD icon and press OK In case of external USB device select U...

Page 26: ...ng movie music and photo INFO Current information of MEDIASTATION PRO is displayed TV OUT Video Out Signal Press button to cycle through video signal types until you see a picture on your display scre...

Page 27: ...on T MUTE Sound Off Mute the sound SUBTITLE Subtitle Move Size It is possible to change subtitle size and location WX arrow button changes size and ST arrow button changes location After doing press O...

Page 28: ...peat TITLE Go to Title Menu Move to title menu while playing DVD ANGLE Angle Apply angle function INFO Show File Information Show the le information which is being played In order to hide the informat...

Page 29: ...ion FF XXX Fast Forward Whenever pressing this button play speed is changed with 2x 4x 8x 16x 32x in forward REW WWW Rewind Whenever pressing this button play speed is changed with 8x 16x 32x in backw...

Page 30: ...yback press again OK XI Playback Play le Pause When pressing while playing a le pause the playback For returning to playback press again NEXT XXI Playback Next File Play a next le after a current play...

Page 31: ...ght Folder Lock and select OK You can choose to enable private folder view by highlighting ON and pressing OK You can set your own password The default password is 0000 Press down arrow to move to nex...

Page 32: ...se This warranty excludes batteries If this product is found to be defective within the warranty period it will be replaced at no cost to you You may return it with your original cash register receipt...

Page 33: ...io TV technician for help CE Declaration EC DECLARATION OF CONFORMITY It is hereby declared that this product complied with the essential protection requirements of Council Directive 89 336 EEC and it...

Reviews: