2
Introduction
Thank you for purchasing this Verbatim portable hard drive, featuring the
fast and convenient Powered eSATA interface. Before you begin to use the
drive there are a few important things to learn about your new product.
Connectors and Indicators
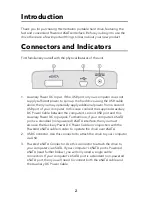
First familiarize yourself with the physical features of the unit.
1. Auxiliary Power DC Input. If the USB port on your computer does not
supply suffi cient power to spin up the hard drive using the USB cable
alone, then you may optionally apply additional power from a second
USB port of your computer. In this case connect the supplied Auxiliary
DC Power Cable between the computer’s second USB port and this
Auxiliary Power DC Input jack. Furthermore, if your computer’s eSATA
port is a standard (non-powered) eSATA interface, then you must
also use the Auxiliary Power DC Power Cable in conjunction with the
Powered eSATA cable in order to operate the drive over eSATA.
2. USB Connector. Use this connector to attach the drive to your computer
via USB.
3. Powered
eSATA Connector. Use this connector to attach the drive to
your computer via eSATA. If your computer’s eSATA port is Powered
eSATA (read further below), you will only need a single cable
connection. If your computer’s eSATA port is a standard non-powered
eSATA port, then you will need to connect both the eSATA cable and
the Auxiliary DC Power Cable.


