background image

- 6 -

ACCESSORIES

Please Check and Identify the Included Accessories.

Remote control ............................................................................................................................. x 1

AAA 1.5V battery .......................................................................................................................... x 2

Mounting template ......................................................................................................................... x 1

1.06" (27mm) spacers .................................................................................................................. x 4

.57" (14.4mm) spacers ................................................................................................................. x 4

.32" (8.2mm) spacers ................................................................................................................... x 4

#M 5 x 69 mm screws .................................................................................................................... x 4

#M 5 x 40 mm screws ................................................................................................................... x 4

Battery Replacement

When the batteries become weak, the operating distance of the remote control is greatly reduced and you
will need to replace them.

Caution: Danger of explosion if battery is incorrectly replaced. Replace only with the same or equivalent
type.

Notes:
• Do not place the remote control near magnetic devices or magnetic cards.
• If the remote control is not going to be used for a long time, remove the batteries to avoid corrosion

damage caused by battery leakage.

• Do not mix old and new batteries. Do not mix ALKALINE, standard (CARBON-ZINC) or rechargeable

(NICKEL-CADMIUM) batteries.

• Always remove batteries as soon as they become weak.
• Weak batteries can leak and severely damage the remote control.
• WARNING: Do not dispose of batteries in a fire. Batteries may explode or leak.

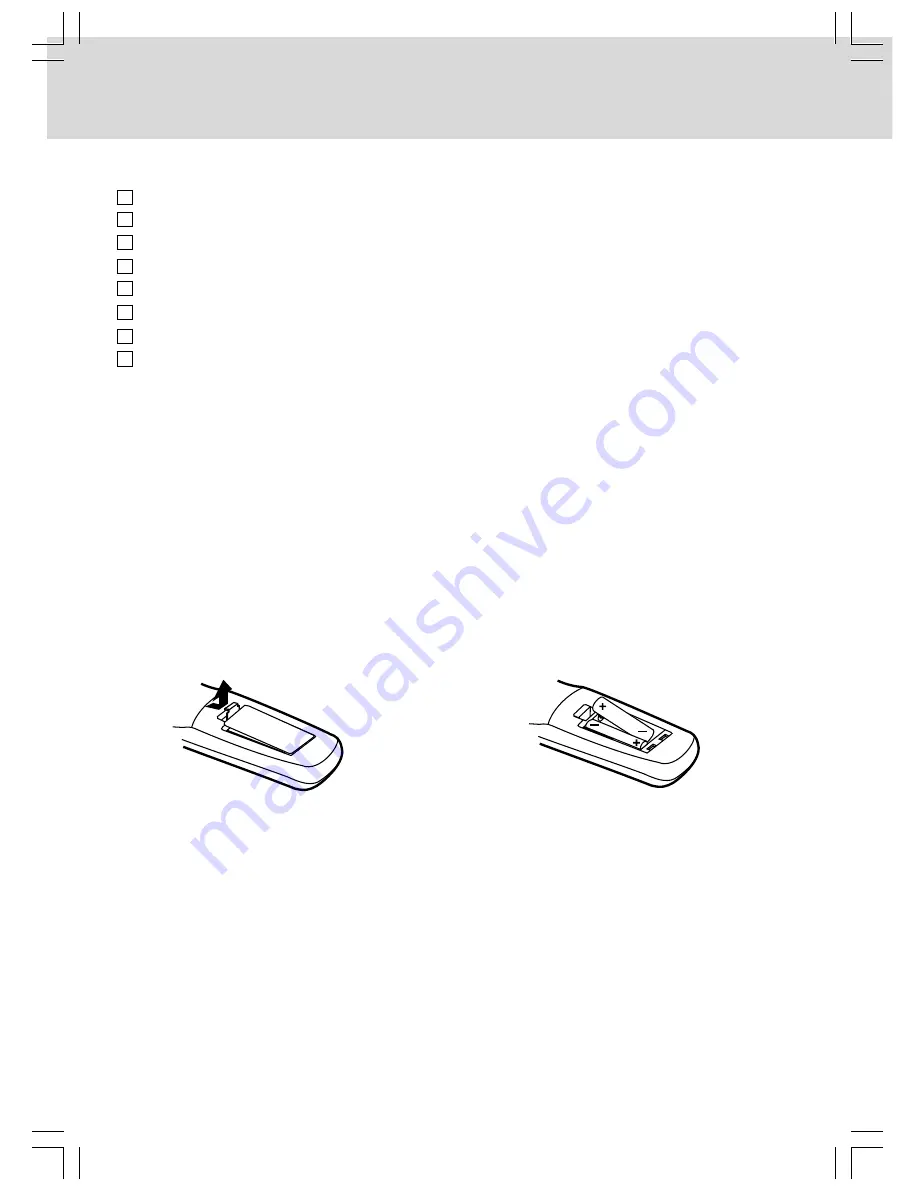
To Install Batteries

1. Open the battery door.

2. Insert two AAA batteries.

REMOTE CONTROL

Using the Remote Control

• This remote control is magnetic and can be attached to most refrigerators. Some refrigerators panels

are not metallic. In this case, try attaching the magnetic remote control to the side of the refrigerator.

• Point the remote control at the REMOTE SENSOR located on the unit.
• When there is a strong ambient light source, the performance of the infrared REMOTE SENSOR may

be degraded, causing unreliable operation.

• The recommended effective distance for remote operation is about 16 feet (5 meters).

Summary of Contents for LCD Kitchen TV

Page 1: ...1 OWNER S MANUAL 7 TFT LCD KITCHEN TV with DVD CD and AM FM Radio R ...

Page 2: ...y damage it and create a hazard On Condensation When left in a heated room where it is warm and damp water droplets or condensation may form inside the unit When there is condensation inside the unit the unit may not function normally Let the unit stand for 1 to 2 hours before turning the power on or gradually heat the room and allow the unit to dry before use Caution marking is located on back en...

Page 3: ...s for a Class B digital device pursuant to part 15 of the FCC Rules These limits are designed to provide reasonable protection against harmful interference in a residential installation This equipment generates uses and can radiate radio frequency energy and if not installed and used in accordance with the instructions may cause harmful interference to radio communications However there is no guar...

Page 4: ...your outlet consult an electrician for replacement of the obsolete outlet 10 Protect the power cord from being walked on or pinched particularly at plugs convenience recep tacles and the point where they exit from the apparatus 11 Only use attachments accessories specified by the manufacturer 12 Use only with a cart stand tripod bracket or table specified by the manu facturer or sold with the appa...

Page 5: ...ce Guide 7 9 Mounting Instructions 10 11 Connections 12 13 Connecting the TV Antenna 12 Connecting the Unit to a TV or other Video Equipment 12 Connecting the Unit to a Stereo Receiver or Amplifier 12 Plugging in the Unit 13 Monitor Operation 13 Unit Operation 14 Sound System 14 Setting the Clock 15 Setting the Cooking Timer 15 Playing a Disc 16 18 Playing a Disc 16 Pausing Playback 16 Stopping Pl...

Page 6: ...VD Titles Chapters and Tracks DVDs are divided into titles and chapters If the disc has more than one movie on it each movie would be a separate title Chapters are sections of titles Audio CDs are divided into tracks A track is usually one song on an Audio CD Icons Used on DVDs Sample lcons Language selections for audio Language selections for subtitles Screen aspect ratio Multiple camera angles R...

Page 7: ...age Do not mix old and new batteries Do not mix ALKALINE standard CARBON ZINC or rechargeable NICKEL CADMIUM batteries Always remove batteries as soon as they become weak Weak batteries can leak and severely damage the remote control WARNING Do not dispose of batteries in a fire Batteries may explode or leak To Install Batteries 1 Open the battery door 2 Insert two AAA batteries REMOTE CONTROL Usi...

Page 8: ...n directly to normal viewing DVD MENU Button Press to enter the main menu of the DVD you are watching VOLUME Buttons Adjusts the volume TUNING Buttons Fast reverse playback Fast forward playback TUNING Scans all available radio stations PREV Button Selects previous titles chapters or tracks on a disc ANGLE Button During DVD playback switch the camera angle of the video presentation when scenes wit...

Page 9: ...o change TV channels ENTER Button Confirm selections on a menu screen MUTE Button Press to turn off the sound STOP BAND Button Stops playback Switches between AM and FM PLAY Button Starts playback PAUSE Button Pauses playback frames advance NEXT Button Selects next titles chapters or tracks on a disc SOUND Button Press to select a sound mode during DVD playback watching TV or radio playing SUBTITL...

Page 10: ... Button Press to start or resume playback of a disc STOP BAND Button Stops playing a disc Switches between AM and FM ADJUST Makes adjustments to certain settings 9 SET CLOCK Button Use to set the current time 10 CH Buttons Button Press to go back to previous chapters tracks Button Press to advance to chapters tracks Use to search for a station automatically or select presetted stations CH Buttons ...

Page 11: ...th which will go completely through your cabinet bottom and extend at least 3 8 past the bottom of your cabinet overhang b This unit includes three sets of four spacers of various lengths The spacers can be put together to form longer spacers to accommodate various cabinet overhang thicknesses Determine the best combination of spacers which is equal to or longer than the cabinet overhang thickness...

Page 12: ... you wear safety glasses while drilling to prevent eye injuries 4 For wood cabinets you may want to mark the hole locations with a nail pressed gently but firmly into the wood so that a slight impression is made This will also help keep the drill bit centered in the right location 5 Hold the drill firmly against the cabinet to keep the drill from walking Continued from previous page c Insert the f...

Page 13: ... left AUDIO IN jacks on your other source Connecting the Unit to aTV or other Video Equipment Use the Audio Video cable not supplied Connect the VIDEO OUT and R L right left AUDIO OUT jacks on the rear of the unit to the VIDEO IN and R L right left jacks on your TV or other video equipment FM ANTENNA To the TV ANT IN terminal 1 2 TV antenna Audio Video cable not supplied red yellow white TV or oth...

Page 14: ...turn completely around CONNECTIONS Plugging in the Unit Plug the AC power cord into the wall outlet a Before plugging in the power cord make sure the voltage of the unit matches your local voltage b Plug the power cord directly into the nearest wall outlet and wrap the remaining cord around the cord storage knob at the rear of the unit CAUTION TO PREVENT ELECTRIC SHOCK MATCH WIDE BLADE OF PLUG TO ...

Page 15: ... on many DVDs Manufactured under license from Dolby Laboratories Dolby and the double D symbol are trademarks of Dolby Laboratories SOUND SYSTEM Press the STANDBY ON button to turn the unit on and the DVD indicator lights up After a short period of time DVD will appear on the front display and the DVD logo start up picture will appear on the screen Press the DVD TV RADIO button the FUNCTION button...

Page 16: ...2 Press the buttons to select your desired time from 1 99 minutes Press the TIMER button repeatedly to select time 10 15 30 45 60 75 90 minutes Press and hold the buttons to fast forward reverse the cooking time 4 To turn OFF the ALARM press the TIMER button once Otherwise the ALARM will automatically turn off after 60 minutes if no button is pressed CANCELLING THE COOKING TIMER Press the TIMER bu...

Page 17: ...ss the PLAY button Each time you press the PAUSE button the picture advances one frame Stopping Playback Press the STOP button at the location where you want to interrupt playback To resume playback at the position where the disc was stopped press the PLAY button If you press the STOP button twice the unit s memory will be cleared and pressing the PLAY button will reset the disc to the beginning S...

Page 18: ...t changing the current subtitle This function can only be used for discs on which subtitles have been recorded in multiple languages On some DVDs subtitles are activated from the main menu of the DVD Press the DVD MENU button to activate the main menu Subtitle Selection 1 While a DVD is playing press the SUBTITLE button to display the current language setting as shown in the example below 2 Press ...

Page 19: ...ton to confirm The unit will start playback about 3 seconds later Notes If the time numbers you entered is not permited by the DVD after you press the ENTER button it will restore to You should re enter correct numbers Some discs may not respond to this process Some scenes may not be located as precisely as you specified This method for accessing specific locations is available only within the cur...

Page 20: ...isplays on the screen Repeating a Title You can play the same title repeatedly 2 While the disc is playing press the REPEAT DISC button until the Repeat Title indicator displays on the screen The current title is played repeatedly Repeating a Whole Disc 2 While the disc is playing press the REPEAT DISC button on the remote control until the Repeat all indicator displays on the screen The whole dis...

Page 21: ...utton to select Clear All then press the ENTER button All the programs will be cleared 3 Press the PLAY button to resume normal playback Notes Some discs may not permit memory playback operation To exit the Program menu press the MEMORY button The programmed selections will be cleared when you open the disc tray or turn off the DVD player VIEWING JPEG FILES This unit can play JPEG files recorded o...

Page 22: ...tons on the remote to select Edit mode then press the ENTER button 2 Use the or button to select Program view then press the ENTER button The programmed tracks files appear on the left side of the window 3 Use the cursor buttons to select the programmed tracks files then press the ENTER button will appear in front of the selected tracks files 4 Use the and buttons to select Clear program then pres...

Page 23: ...subtitle language from the selection on the disc menu Audio 1 Press the SETUP button in stop mode 2 Press the button Use the or button to select Audio 3 Press the button Use the or button to make adjustments then press the ENTER button 4 Press the EXIT button to return to the normal screen Note Some DVDs may not play in the selected language A prior language may be programmed on the disc DVD Menu ...

Page 24: ...ess the button then press the ENTER button 4 Use the or button to select YES then press the ENTER button The original setting will be restored The unit will exit setting menu automatically and reload the disc in the disc tray Note It will take 3 5 seconds to reset the DVD player to the factory default Notes The displayable picture size is preset on the DVD Therefore the playback picture of some DV...

Page 25: ...ayed on the top right corner of the screen This number will disappear after a few seconds When MUTE is pressed the sound is mute and the L O indicator always blinks on the LCD display until MUTE is pressed again or VOL is pressed Searching for TV channels Automatically When this unit is connected to an antenna or a cable or satellite system it can automatically search all channels for those with a...

Page 26: ...ICTURE Tint 0 SETUP 1 Press the TV MENU button 2 Use the or button to select SETUP 3 Use the or button to select the options Language Restore setting 4 Use the or button to make adjustment The screen will change to your selected mode immediately 5 Repeat steps 2 and 3 to adjust other options 6 Press the EXIT button on the remote control to return to the normal screen Language Select the language y...

Page 27: ...creen SELECT ADJUST Program no Color system Sound system 1 NTSC M TV SETTING Auto tune 72 00MHz TV TYPES CABLE SELECT ADJUST AFC Skip On On TV SETTING TV MENU Program no To select a TV channel by pressing the or button Color system NTSC mode is default Sound system M mode is default Auto tune Searches for usable stations and stores them in memory TY TYPES CABLE mode cable satellite broadcasts chan...

Page 28: ...ess and hold the button on the front panel or the TUNING buttons on the remote until the tuner starts searching for a station then release After tuning in a station the search stops The search may not stop at a station with a very weak signal 4 Press the TUNING buttons to tune in to a desired station 5 Press the MEMORY button twice on the remote 6 Repeat steps 2 5 to store other stations FM Stereo...

Page 29: ... disc has been inserted The unit and disc region number are incom patible Condensation may have formed inside the unit due to a sudden change in tem perature Wait about an hour for it to clear and try again The disc does not play Severe hum or noise is heard Remove any obstacles between the remote and the unit Use the remote near the unit Point the remote at the remote sensor on the unit Replace a...

Page 30: ...benzine thinner cleaning fluid or other chemicals Do NOT use compressed air to remove dust Important Note Before transporting the unit remove the disc from the disc compartment Cleaning the Disc A defective or soiled disc inserted into the unit can cause sound to drop out during playback Handle the disc by holding its inner and outer edges Do NOT touch the surface of the unlabeled side of the disc...

Page 31: ... date of repair or replacement The Customer will be required to ship the unit to the Service Center indicated at the time Customer Support is contacted to make the necessary repairs The customer is responsible for all transportation charges to the service facility Packaging and Shipping Instruction When you send the product to the VENTURER service facility you must use the original carton box and ...

Page 32: ...VENTURER be liable for consequential or incidental damages No person agent distributor dealer or company is authorized to change modify or extend the terms of these warranties in any manner whatsoever The time within action must be commenced to enforce any obligation of VENTURER arising under the warranty or under any statute or law of the United States or any state thereof is hereby limited to on...

Reviews: