background image

- 16 -

BBC ONE

BBC ONE

BBC TWO

five

BBC THREE

QVC

UK Gold

Breakfast

Breakfast

No Info.. Arth..

Mio..

Old ..

No In..

Arthur

No Information

No Information

Casual & Co

QVC Outlet

Closedown

No Information

This is BBC THREE

Best of Friends

Animal 24:7

Homes Under the..

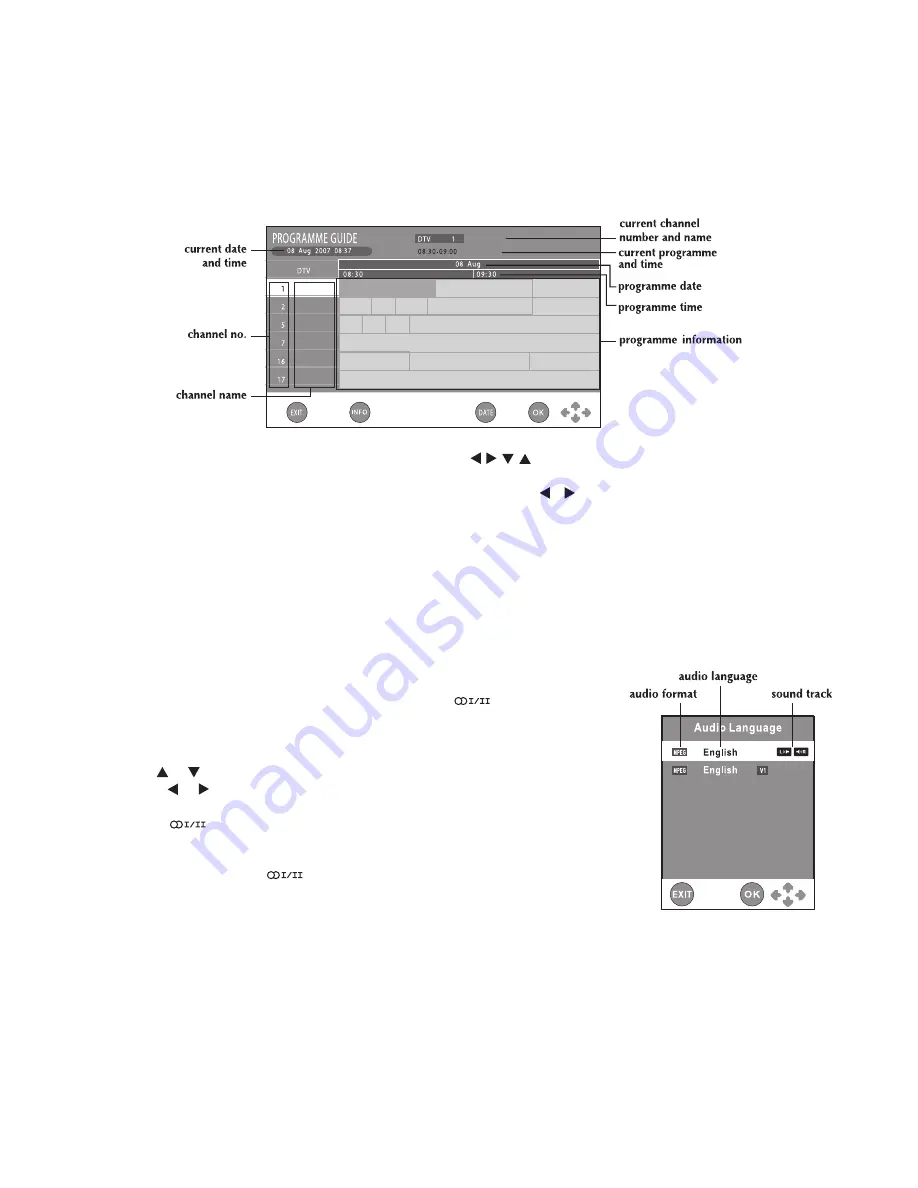
While watching a DTV programme, you can press the GUIDE button to display the Electronic Programme Guide 
(EPG) menu, and check for programme information.

•  Programme time and name will be displayed, use the         button select a programme, press the INFO 

button to display detailed information if available. Press the INFO button again to return.

•  Press the YELLOW button to highlight programme date, use the   /   button to display information for other 

dates. Press the YELLOW button again to return

•  Press the ENTER/OK button to confirm the selected channel.
•  Press the EXIT button to exit the Electronic Programme Guide (EPG) menu.

Note: 
Guide information display may be different according to the DTV programmes.

•  Use the   or   button to select an audio language or audio format if available, 

press the   or   button to select soud track between L/R (Stereo), L/L (Mono 
Left) and R/R (Mono Right). Press the ENTER/OK button to confirm. 

•  Press the 

 or EXIT button to exit the Audio Language menu. 

Note : 
For analogue TV, press the 

 button to select Mono / Stereo or Mono / Dual 

I / Dual II directly.

ELECTRONIC PROGRAMME GUIDE (EPG) fOR DTV

AUDIO LANGUAGE fOR DTV

While watching a DTV programme, you can press the 

 button to display 

the Audio Language menu, and select audio language, audio format and sound 
track.

TV / DTV / RADIO SETUP

Summary of Contents for 17" LCD TELEVISION WITH INTEGRATED DVD PLAYER

Page 1: ...17 LCD TELEVISION WITH INTEGRATED DVD PLAYER OWNER S MANUAL ...

Page 2: ...e a minimum of 60mm around the apparatus for ventilation and 200mm beside the DVD mechanism The ventilation openings should not be impeded by covering with items such as newspaper table cloths curtains etc No naked flame sources such as lighted candles should be placed on the apparatus Attention should be drawn to the environmental aspects of battery disposal The use of apparatus in moderate clima...

Page 3: ...s not to be used for a day or more disconnect it at the wall outlet This symbol means that the unit is double insulated No connection to earth is necessary SAFE USE OF YOUR EQUIPMENT This equipment has been designed and manufactured to meet UK safety standards but like any electrical equipment care must be taken to obtain the best results from the equipment and assure your own safety Here are a fe...

Page 4: ...anguage for DTV 16 Picture Menu 17 Sound Menu 17 Time Menu 18 Setup Menu 18 Lock Menu 18 TELETEXT 19 CUSTOMIZING THE DVD FUNCTION SETTINGS 20 21 Language setup 20 Video setup 20 System setup 20 21 CD DVD OPERATION 22 23 Playing a disc 22 Playing a picture file disc 22 Pausing playback still mode 22 Stopping playback 22 Skipping to a different track 22 Fast forward fast reverse 23 Slow motion play ...

Page 5: ...has more than one movie on it each movie would be a separate title Chapters are sections of titles Audio CDs are divided into tracks A track is usually one song on an Audio CD Note Numbers identify each title chapter and track on a disc Most discs have these numbers recorded on them but some do not Notes on Unauthorized Discs You may not be able to play back some DVD discs on this unit if they wer...

Page 6: ...he back side facing up Please make sure to place a soft cushioned material such as a pillow or thick piece of foam beneath the screen 4 To remove the base stand keep pressing the locking area of the base stand and pull downwards to release the base stand 3 To install the base stand place the base stand on the mounting slot push the stand till it locks MOUNTING ON THE WALL This unit is VESA complia...

Page 7: ...s not to be used for a long period Otherwise it could cause corrosion or battery leakage and may result in physical injury and or property damage including fire Do not mix old and new batteries Do not mix ALKALINE standard CARBON ZINC or rechargeable NICKEL CADMIUM batteries Corrosion oxidation battery leakage and any other gradually acidic defect of this nature will invalidate the guarantee When ...

Page 8: ...xt title chapter or track on a disc 7 VOL controls Adjust the volume level 8 Colour LCD Screen 9 Disc Door Push gently to close the disc door 10 button Push down to open the disc door 11 Remote Sensor Do not block this sensor or the remote control will not work Standby Indicator Indicates whether the unit is ON or in STANDBY OFF mode Light On The unit is in STANDBY Light Off The unit is turned ON ...

Page 9: ...Fast forward playback 9 HOLD button Press to stop the automatic page change from Teletext PREV button Press to select previous title chapter or track on a disc 10 SUBTITLE button Press to select one of the subtitle languages programmed on a DVD DTV 11 ANGLE button Press to switch the camera angle of the video presentation when scenes with multiple camera angles are recorded on a DVD SIZE button Pr...

Page 10: ... to display the channel information in DTV mode 23 AUDIO button Press to select audio soundtracks of a DVD or change the output mode of a CD CANCEL button Press to cancel the Teletext menu 24 SLOW button Press to play a DVD in slow motion INDEX button Press to select the page number of the index from Teletext 25 DVD MENU button Press to enter the main menu of the disc you are watching 26 SETUP but...

Page 11: ...ng and that no objects filled with liquids such as vases should be placed on apparatus The mains plug is used as the disconnecting device It should remain readily accessible and should not be obstructed during use To be completely disconnected from the supply mains the mains plug of the apparatus should be disconnected from the mains socket outlet completely COMMON INTERFACE The unit is equipped w...

Page 12: ... from the other equipment AUDIO and VIDEO IN to this unit Headphone jack and DVD VIDEO OUT jack Press the FUNCTION or DVD button to select DVD mode Note Please refer to the user manual for the other equipment for more information Connecting TO SOURCES WITH SCART Devices with RGB output must be connected to the SCART input Connects the SCART from the source to the corresponding SCART on this unit S...

Page 13: ...luded To COMPONENT VIDEO OUT jacks To SCART jacks Connecting HDMI HDMI High Definition Multimedia Interface supports both video and audio on a single digital connection for use with DVD players DTV set top boxes and other digital AV devices HDMI was developed to provide the technologies of High Bandwidth Digital Content Protection HDCP as well as Digital Visual Interface DVI in one specification H...

Page 14: ...cord is connected the standby indicator lights on Press the I button to turn the unit on the standby indicator will blink for about 10 seconds for loading and will finally light off until the above screens shown Press the FUNCTION button to select the desired mode DTV TV AV1 AV2 SCART YUV SCART DVD or HDMI If you select DVD mode the DVD logo will appear on the screen Note When the unit is not goin...

Page 15: ...gramme Edit menu you can edit the channels by the following steps CI Information Display CAM and Smart card information select the language if available 1 Use the or button to select a channel Press the CH PAGE button to skip to previous next page 2 Press the RED GREEN YELLOW BLUE button or the FAV button to edit the channel DELETE Press the RED button to delete the selected channel press the ENTE...

Page 16: ...information for other dates Press the YELLOW button again to return Press the ENTER OK button to confirm the selected channel Press the EXIT button to exit the Electronic Programme Guide EPG menu Note Guide information display may be different according to the DTV programmes Use the or button to select an audio language or audio format if available press the or button to select soud track between ...

Page 17: ...olour of the picture Sharpness Adjust the sharpness level to improve detail in the picture Colour Temp Select the colour temperature of the picture Select Normal balanced Warm red white Cold blue white mode TV DTV RADIO SETUP sound MENU 1 Press the TV MENU button 2 Use the or button to select the SOUND 3 Use the or button to select the options Sound Mode Treble Bass Balance adjust them by using th...

Page 18: ...vailable for digital channels if multiple subtitle languages are broadcasted Restore Setting Press the ENTER OK button to restore the system settings to the factory default Lock MENU 1 Press the TV MENU button 2 Use the or button to select the LOCK 3 Press the ENTER OK or button to enter enter password to proceed The default password is 0000 4 Use the or button to select the options Lock System Ch...

Page 19: ...IX button The text will be superimposed over the TV programme Press the MIX button again to return to the text page Page search whilst watching TV In Text mode press the CANCEL button Enter the page number you want using the Numeric buttons The top line of the text page will appear whilst the text searches for your page When the page is found the number will remain in the top left hand corner of t...

Page 20: ...yer automatically displays disc menus consistent with the disc s initial language setting VIDEO SETUP 1 Press the SETUP button 2 Use the or button to select the Video Setup 3 Press the button to highlight the TV TYPE 4 Use the or button to select the desired TV type 5 To exit the SETUP MENU and return to the normal screen highlight the Exit Setup Mode and press the ENTER OK button TV Display Pan S...

Page 21: ...ith a password function The contents allowed by parental lock level and the way a DVD is controlled may vary from disc to disc For example if the disc allows you could lockout violent scenes unsuitable for children or you could lock out playback of the disc altogether You cannot play password function equipped DVDs rated higher than the level you selected unless you cancel the parental lock functi...

Page 22: ...press the PLAY button to resume playback You also can use the GOTO function or use the numbered buttons to enter the image number to quickly select any image PAUSING PLAYBACK STILL MODE Press the PAUSE button To resume normal playback press the PLAY button Each time you press the PAUSE button the picture advances one frame STOPPING PLAYBACK Press the STOP button at the location where you want to i...

Page 23: ...tton repeatedly to select the desired subtitle language Note If only one language is recorded the language does not change About two seconds later playback continues with the new subtitle you selected The number of languages recorded differs depending on the disc If no button is pressed within a few seconds playback continues without changing the current subtitle This function can only be used for...

Page 24: ...ck then press the corresponding number button s for the chapter track you want 3 Press the ENTER OK button to confirm Playback starts from the selected chapter track LOCATING A SPECIFIC TIME You can move to a specific location by entering its corresponding time hours minutes seconds 1 Press the GOTO button 2 Press the GOTO button again a screen shown as right will be displayed on the screen Enter ...

Page 25: ...y 1 While the disc is playing press the REPEAT DISC button until the indicator displays on the screen The current track is played repeatedly Repeating AN ENTIRE DISC 2 While the disc is playing press the REPEAT DISC button until the indicator displays on the screen The entire disc is played repeatedly To resume normal playback 3 Press the REPEAT DISC button until the indicator displays on the scre...

Page 26: ... wipe clean with a cloth which has been dipped in a weak soap and water solution and wrung out thoroughly Then wipe it with a dry cloth Never use alcohol beneine paint thinner cleaning fluid or other chemicals Do NOT use compressed air to remove dust IMPORTANT NOTE Before shipping the unit remove any disc from the disc compartment MAINTENANCE PROGRAMMABLE MEMORY The two types of programmed playbac...

Page 27: ... a set top aerial may be your only option If you are installing a new aerial we recommend a wideband rooftop aerial rather than a loft aerial Loft aerials generally receive a weaker digital signal and are more likely to get interference from other electrical equipment in the home We suggest you have an aerial survey done before getting an aerial upgrade Talk to your retailer or contact your local ...

Page 28: ...nit is too hot shut off the unit for 30 minutes to cool it down The region number of the disc doesn t match the region number of this unit Clean the disc The disc is scratched The plugs and jacks are dirty Wipe them with a cloth slightly moistened with alcohol Clean the disc There is no disc inside No Disc appears on the screen Insert the disc correctly with the playback side facing frontwards Cle...

Reviews: