


4
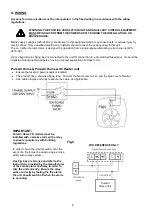
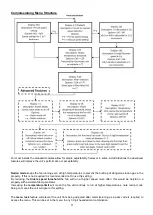
The Lo-Carbon PureAir Home uses a sensor to monitor the temperature in the loft, automatically adjusting the air
volume when necessary.
‘Trickle’ speed is automatically selected when the ambient loft temperature is less than 18°C.
‘Energy Recovery’ is automatically selected when the ambient loft temperature is between 18 and 27°C.
If the ambient loft temperature exceeds 27°C, the Lo-Carbon PureAir Home will automatically switch to standby (no
airflow).
For the model supplied with a heater units (479091 & 479092), the element is activated by default when the loft air
temperature is below 10°C; the system will then work to maintain an input air temperature of 10°C. This temperature
threshold can be adjusted between 5°C and 20°C during commissioning.
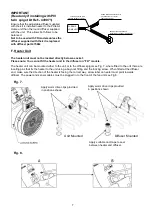
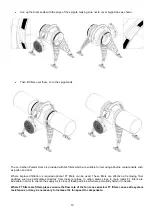
The heater unit can be installed either to the fan unit or directly to the diffuser spigot.
Please note: You cannot fit the heater unit to the diffuser on
“FD” models.
B. INSTALLATION
TYPICAL INSTALLATION
Lo-Carbon PureAir Home UNIT:
Prior to installation ensure that the loft is adequately ventilated. The following tips can be used as a basis for this.
However this is not an exhaustive list.
Ensure that any ridge vents, tile vents and continuous air gaps are not blocked. These may not be present in older
properties;
however there should be enough ‘leakage’ to accommodate the requirements of the Lo-Carbon PureAir
Home unit.
One method of checking this is by entering the loft, closing the loft hatch, switching off the lights and looking for any
daylight penetration. If daylight is visible it is reasonable to assume that there is adequate ventilation within the loft.
There may well be occasions where a loft is so well sealed that additional ventilation may need to be provided by the
owner/occupier. This will not only assist the operation of the Lo-Carbon PureAir Home, but may also help to prevent
future expensive structural damage caused by inadequate air movement. It should be noted that there can never be
too much ventilation in a loft.
Ensure that all water tanks are covered and sealed.
Check that all water pipes are lagged.
Ensure that any extract fans are discharging to the outside and not into the loft.
Check that the loft hatch is tightly sealed.
Ensure that all holes in the ceilings are sealed, i.e. ceiling light fittings etc.
A visual inspection of any flues or chimneys for leakage in the loft should be carried out by the installer.
If any leakage points are found, or if there is any doubt at all, the installer should advise the house owner/provider as
soon as possible and seek instruction from them before proceeding with the installation.
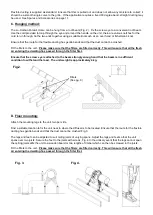
Fig.1.