


5
c).
Ceiling mounted
Installation
.
See the dimensional details below for the mounting hole positions.
-Spigot diameters are 125mm
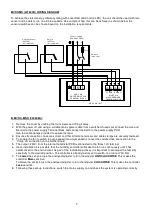
C. INSTALLATION
To reduce the system resistance in your duct system, and therefore lower the speed, power consumption and noise
of the fan, please follow these instructions:
•
Keep the length of duct runs to a minimum, particularly the exhaust duct run.
•
Use larger diameter ducting rather than smaller.
•
If you need to use flexible ducting, make sure that it is fully extended and not crushed, sagging or torn.
•
Try to minimise the use of dampers by having similar length duct runs to the inlets.
•
The bend radius, (measured to the inside of the bend), should be at least 1x the duct diameter. The larger,
the better.
•
Avoid having any bends, filters or other obstructions within 250mm of the fan inlets and outlet.
1. Position the MULTIVENT, taking into consideration the position of the rooms to be ventilated, the exhaust
position, the drainage position and the electrical services. Ensure there is adequate access for installation
and maintenance. Securely mount the MULTIVENT through the mounting brackets on the casing using the
appropriate anti-vibration mounts, screws, washers, rubber bushes etc.
2. Ducting passing through an unheated space should be insulated.
The MVDC-MS can be connected to either Ø125mm or Ø100mm ducting. Remove the blanking caps to
connect Ø125mm ducting. To connect Ø100mm ducting, peel out the centre of the cap with a screwdriver as
indicated on the cap and leave the cap surround in position.
Please note that the exhaust duct must always be Ø125mm ducting.
Summary of Contents for Lo-Carbon MULTIVENT MVDC-MS
Page 2: ...2...