background image

- 53 -

User Manual - CRONO.X programmable thermostat

English

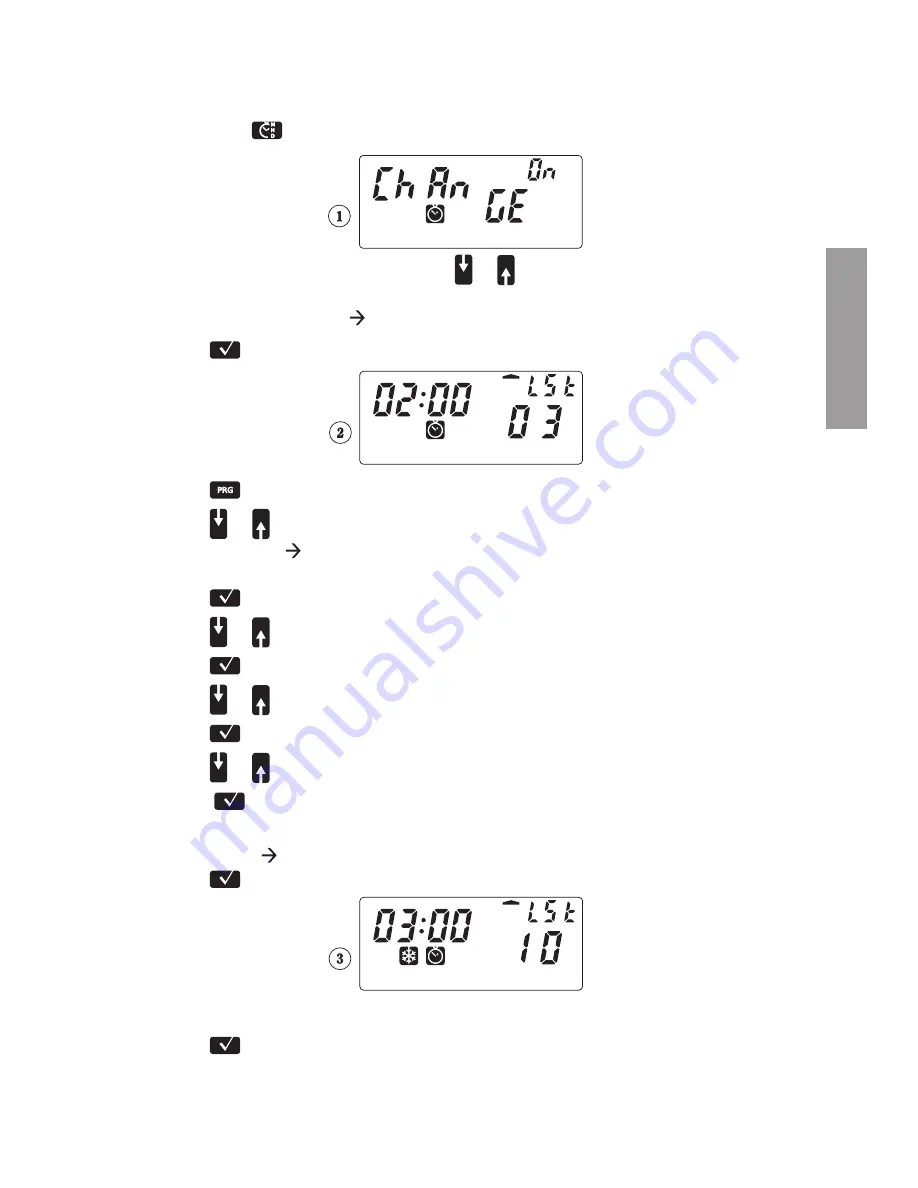
  To alter the solar-daylight saving time switch

    Hold down 

 for approximately 3 seconds: the following reading will appear 


(If the reading is “

[hange 0FF

” press   or   to switch it to “

0N

”)

• Daylight 

saving 

time 


solar time switching

1)  Press 

 to confi rm: the following reading will appear 

2) Press 

 to change the settings: “

LST

” will fl ash

3)  Press   or   to select the week of the month in which the 

Daylight saving   Solar time switch is to take place (“1ST” for fi rst, “2ND” for 
second, “3RD” for third, “4TH” for fourth, “LST” for last)

4)  Press 

 to confi rm: the Sunday segment will fl ash

5) Press   or   to select a day of the week

6) Press 

 to confi rm: “03” will fl ash

7) Press   or   to select a month

8) Press 

 to confi rm: “02:00” will fl ash

9) Press   or   to select the time

10)   Press 

 to confi rm: All segments will be continuously lit

• Solar 

time 


daylight saving time switching

 Press  : the following reading will appear


Follow the instructions from step 2) to 9)

 Press   to confi rm and exit the settings

Summary of Contents for Crono.X

Page 1: ...English ELECTRONIC PROGRAMMABLE THERMOSTAT Crono X User Manual ...

Page 2: ... 32 User Manual CRONO X programmable thermostat English ...

Page 3: ...e pag 48 Winter heating summer air conditioning modes pag 48 Timer controlled operation pag 49 Timer controlled off type pag 49 Timer controlled manual type pag 49 Timer controlled automatic type pag 49 Control by telephone dialler pag 50 Configuration for X CODE BUS pag 51 Configuration for X CODE Wave and general purpose phone dialer pag 51 Other available functions Settings guard password pag 5...

Page 4: ...TIONS The CRONO X thermostat performs 1B type actions and is aimed for household or similar premises under a normal pollution degree During product installation and operation it is necessary to observe the following instructions 1 The instrument must be installed by a qualified person 2 Disconnect power supply while installing the unit 3 Do not power or connect the product if any part of it is dam...

Page 5: ...when the house is not used permanently or it is a holiday home To implement this function it is necessary to install a device that receives calls or SMSs and interfaces with the programmable thermostat phone dialer mod VN782900 X Code Wave for landline phone VE072500 X Code Bus for GSM network 4 Daylight saving time solar time switching can be automatically enabled or disabled 5 The cut in differe...

Page 6: ...phone dialer by Vemer X CODE WAVE and X CODE BUS or by general purpose phone dialer with a potential free output contact Maximum and minimum daily temperature reading Antifreeze temperature to be selected from 1 C to 10 C can be disabled Power supply 2 alkaline batteries 1 5V AA size Battery autonomy approximately 2 years for alkaline batteries 2500mAh at 23 C Standby charge for battery replacemen...

Page 7: ...N AND ASSEMBLY It is advisable to install the programmable thermostat in a zone in which the temperature is the closest to the room average value Do not install it too near doors windows sources of heat direct sunlight or in places in which there is too much or too little air flow Installing the programmable thermostat about 150 cm from the floor is recommended Mounting can be on a wall or on a 50...

Page 8: ... 38 User Manual CRONO X programmable thermostat English FRONT FLAP OPENING DIMENSIONS mm 123 0 93 5 33 5 ...

Page 9: ...nly accessible using a sharp tool Reset only accessible using a sharp tool To set T0 for Automatic operation To set T1 for Automatic operation To set T2 for Automatic operation System off Timer controlled operation Hourly programming for automatic operation hold it down for 3 sec to enter advanced programming To set the time and date hold it down for 3 secs to enable or change the solar daylight s...

Page 10: ... will flash on the display Press the minutes will flash Press all the segments will be continuously lit the hour minutes and the temperature measured will appear as well as a set of small squares indicating daily programming CRONO X will operate in automatic mode cfr page 42 Set the time cfr page 41 Default settings are Operation WINTER HEATING Mode AUTOMATIC Hourly schedule MON FRI PRG1 SAT SUN P...

Page 11: ... seconds will flash Press the minutes will flash To enter the minutes press or Press the hours will flash To enter the hours press or Press the year will flash To enter the current year press or Press the month will flash To enter the current month press or Press the day will flash To enter the present day press or Press the seconds will flash again Press the device will resume normal operation No...

Page 12: ... key temperature T2 1 small square to adjust the temperature from the set point by pressing key temperature T1 no small square to adjust the temperature from the set point by pressing key temperature T0 Factory settings Default feature the temperature profile corresponding to Program 1 for Monday through Friday Program 2 for Saturday and Sunday refer to the profiles on page 45 PROGRAM SELECTION Th...

Page 13: ... zeroed and the associated small squares will flash 4 Press or to move to the hour segment whose assigned temperature needs to be modified 5 If you wish to delay the temperature change by 15 30 or 45 minutes press the key below once twice or three times 6 Press or to select the temperature to be assigned to the hour segment Temperature T0 no small square Temperature T1 1 small square Temperature T...

Page 14: ...ure T0 no small square for WINTER HEATING mode min 2 0 C max T1 for SUMMER AIR CONDITIONING mode system off the display will read Press to set temperature T1 one small square for WINTER HEATING mode min T0 max T2 for SUMMER AIR CONDITIONING mode min 10 C max T2 Press to set temperature T2 two small squares for WINTER HEATING mode min T1 max 35 0 C for SUMMER AIR CONDITIONING mode min T1 max 35 0 C...

Page 15: ...2 23 P3 T2 T1 0 1 2 3 4 5 6 7 8 9 10 11 12 13 14 15 16 17 18 19 20 21 22 23 P4 T2 T1 0 1 2 3 4 5 6 7 8 9 10 11 12 13 14 15 16 17 18 19 20 21 22 23 P5 T2 T1 0 1 2 3 4 5 6 7 8 9 10 11 12 13 14 15 16 17 18 19 20 21 22 23 P6 T2 T1 0 1 2 3 4 5 6 7 8 9 10 11 12 13 14 15 16 17 18 19 20 21 22 23 P7 T2 T1 0 1 2 3 4 5 6 7 8 9 10 11 12 13 14 15 16 17 18 19 20 21 22 23 Note Program 7 keeps temperature T0 all ...

Page 16: ... 0 1 2 3 4 5 6 7 8 9 10 11 12 13 14 15 16 17 18 19 20 21 22 23 P4 T2 T1 0 1 2 3 4 5 6 7 8 9 10 11 12 13 14 15 16 17 18 19 20 21 22 23 P5 T2 T1 0 1 2 3 4 5 6 7 8 9 10 11 12 13 14 15 16 17 18 19 20 21 22 23 P6 T2 T1 0 1 2 3 4 5 6 7 8 9 10 11 12 13 14 15 16 17 18 19 20 21 22 23 P7 T2 T1 0 1 2 3 4 5 6 7 8 9 10 11 12 13 14 15 16 17 18 19 20 21 22 23 Note Program 7 keeps temperature T0 all day long and ...

Page 17: ...temperature to be set flashes time day and temperature may differ from the example 2 Press or to set the desired temperature 3 Press to confirm or wait for 45 seconds the display will then read the time the temperature measured and the icon the reading SET will disappear SETTING THE MANUAL TEMPERATURE 1 Press or the reading SET will appear up on the right and the temperature previously set in manu...

Page 18: ... the temperature will still be read To select the off operation status Press only the time day and temperature will be displayed To exit the off operation status Press the device will resume the previous operation mode Manual or Automatic WINTER HEATING SUMMER AIR CONDITIONING OPERATION MODES CRONO X controls both Heating and Air conditioning systems Depending on the selection the device s control...

Page 19: ...on can be used during vacations so that automatic mode is discontinued TIMER CONTROLLED MANUAL TYPE The Starting operating mode is MANUAL and it is kept for a determined term hours or days after which the device resumes Automatic operation This type of timer controlled operation can be used to keep for a few hours or days a temperature different from the Automatic set point For example this can be...

Page 20: ... is adjusted when the timer is set the latter will not be updated To select timer controlled operation 1 Press the display will read and 00 will flash 2 To set the timer in hours press the reading will appear with 00 flashing 3 To set the timer in hours or days press or 4 Press to confirm or wait for 45 seconds the icon will stay lit on the display until the timing expires CONTROL BY TELEPHONE DIA...

Page 21: ...TH RS485 After connectig the two terminals OUT BUS in the CRONO X up to those marked BUS on the X CODE BUS respecting polarity Go to Advanced Programming cfr pages 57 59 and set the bUS parameter to Yes Confirm by The Adr memory address will appear Hold down the ON OFF key in the X CODE BUS for at least 5 seconds the ON OFF led will flash Wait for approximately 10 20 seconds as soon as the ON OFF ...

Page 22: ...s selected in parameter PAS of the Advanced Programming area cfr pages 57 and 59 The default password is 123 To enable the settings guard From the Automatic Manual or OFF operating modes hold down the keys simultaneously for a few seconds the display will read and will resume the previous operation mode Automatic Manual or off To disable the settings guard Hold down the keys simultaneously for a f...

Page 23: ... the week of the month in which the Daylight saving Solar time switch is to take place 1ST for first 2ND for second 3RD for third 4TH for fourth LST for last 4 Press to confirm the Sunday segment will flash 5 Press or to select a day of the week 6 Press to confirm 03 will flash 7 Press or to select a month 8 Press to confirm 02 00 will flash 9 Press or to select the time 10 Press to confirm All se...

Page 24: ...aximum temperature This function is available when in Automatic and off mode but not when in manual mode To set the minimum or maximum readings to zero just hold down or for at least 3 seconds until the display reads The maximum value will be identified as KI the minimum as Lo LOW BATTERY LEVEL INDICATOR When the batteries are about to be dead the display will start to flash When in this condition...

Page 25: ...ontrol period ONLY when rEG P and WINTER HEATING operating mode PEr 10 minutes 10 20 30 minutes Differential ONLY when rEG O dIF 00 3 C 00 1 C 01 0 C Antifreeze temperature only when in WINTER HEATING mode 0FF 06 0 C 01 0 C 10 0 C disabled The temperature is kept pressing the OFF key Unit of measurement deg C C Celsius F Fahrenheit External sensor ESt n0 n0 not provided YES external sensor is conn...

Page 26: ...3 secs until the display reads rEG 2 Press or to select the desired value 3 Press to confirm 4 Repeat steps from 2 to 3 to change the remaining Advanced Programmimg parameters 5 After confirming the parameter nt the device resumes the previous operating status Automatic Manual or System Off Description of advanced programming parameters TEMPERATURE CONTROL METHOD rEG The choice of the temperature ...

Page 27: ...switched on when the temperature exceeds the set point by a value equaling the cut in differential dIF the system is switched off when the temperature drops below the set point E g Tset 20 0 C dIF 00 3 C Tset Manual or Automatic temperature set point When the temperature exceeds 20 3 C Tset dIF the system switches on and stays on until the temperature drops below 20 0 C Tset Proportional temperatu...

Page 28: ...nal control parameters Optimized Proportional Control depends on a correct choice of parameters Control Period Selection PEr 10 min for low thermal drift systems fan coil type 20 min for medium thermal drift systems e g aluminum radiators 30 min for high thermal drift systems e g cast iron radiators Control Band Selection bnd wide band 5 C for systems with a high thermal gradient narrow band 0 5 C...

Page 29: ...nnected is a X CODE BUS code VE072500 for the GSM network and RS485 serial communication is used Select nO if the phone dialer connected provides a potential free contact e g VN782900 X CODE WAVE for landline phone and X CODE BUS for GSM network used with a relay output As for operating the CRONO X with a phone dialer cfr page 50 MEMORY ADDRESS Adr This can only be viewed if bUS YES It is a numeri...

Page 30: ...ove the CRONO X display view by adapting it to the light existing in the premises in which it is installed Brightness ranges from 0 light and 15 dark Default value is 8 A brighter display uses more power and therefore causes battery autonomy to be shorter BATTERY REPLACEMENT Use alkaline batteries only 2 x 1 5V LR6 AA size After removing the old batteries place the new ones within one minute to av...

Page 31: ...n CRONO X is in SUMMER AIR CONDITIONING mode the relay will stay permanently off CONNECTION 8A 250V NA NC COM EXT NTC OUT BUS Relay output The system control must be connected between the relay output contacts COM and NA The relay contact is potential free clean contact The maximum contact capacity is 8A 250Vca External sensor EXT NTC An optional NTC temperature sensor model X TEMP code VN883500 c...

Page 32: ...93 68 EEC Low Voltage Electrical Equipment 89 336 EEC amended by 92 31 EEC and 93 68 EEC EMC is declared with reference to the following harmonized standards Safety EN 60730 2 7 Automatic electrical controls for household and similar use Part 2 Particular requirements for timers and time switches EN 60730 2 9 Automatic electrical controls for household and similar use Part 2 Particular requirement...

Page 33: ......

Page 34: ...Vemer S p A I 32032 Feltre BL Via Camp Lonc 16 Tel 39 0439 80638 Fax 39 0439 80619 e mail info vemer it web site www vemer it V3IS00411 010 ...

Reviews: