background image

Electrical connection (only by a qualified technician) :

Attention please!

Electrical connections must be made in accordance with local regulations 

established by the applicable national regulations or local electricity 

distribution company.

Electrical instantaneous water heater is a device with protection class I and 

must be connected to protective ground!

All water connections should be completed before the electrical connections!

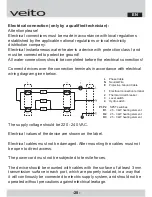
Connect devices over the connection terminals in accordance with electrical 

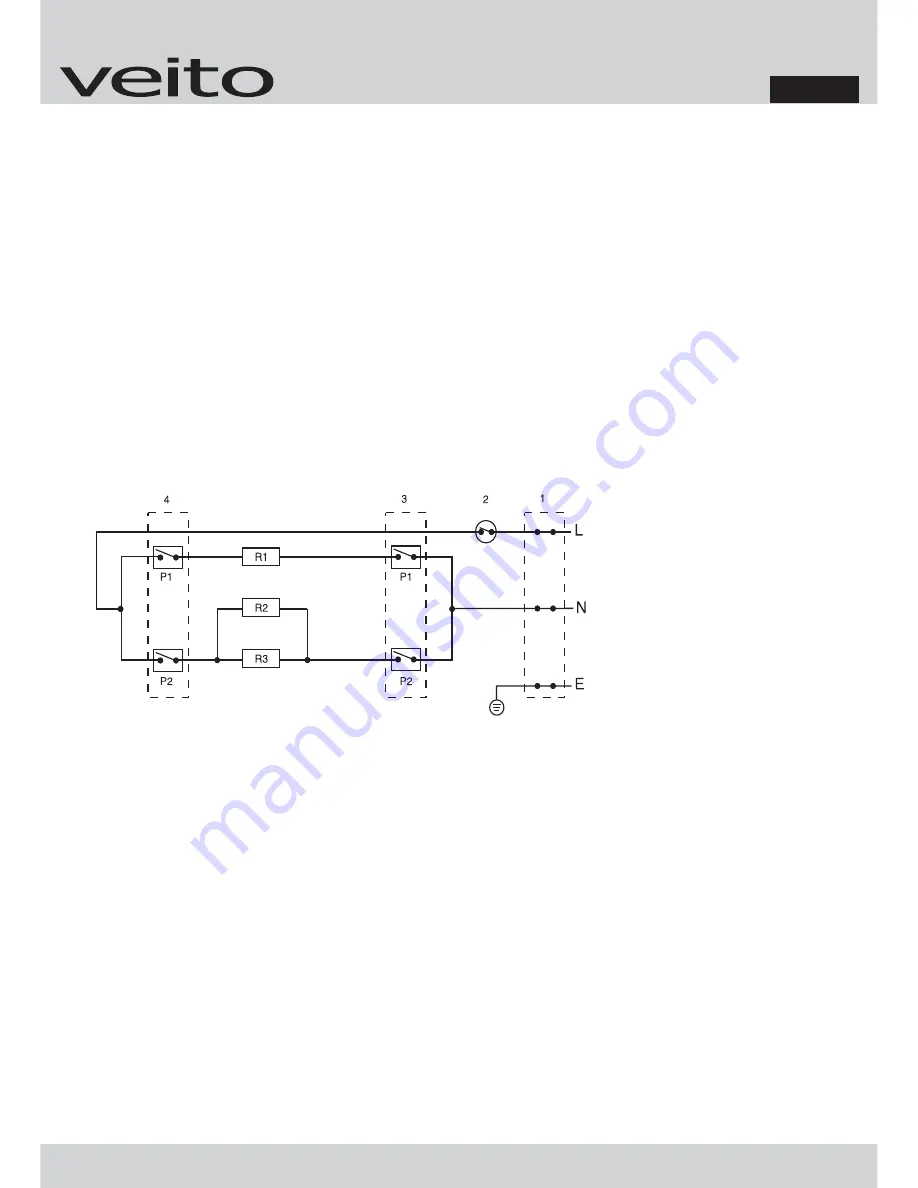
wiring diagram given below.


    Phase Cable


N

     Neutral Wire


    Protective Ground Cable


     Electrical connection terminal


     Thermal circuit breaker


     Level switch


     Hydro switch


P1,P2 

    SPST switches


R1 

    2.5 - 3 kW heating element


R2 

    2.5 - 3 kW heating element


R3 

    2.5 - 3 kW heating element 


The supply voltage should be 220 - 240 VAC.

Electrical values of the device are shown on the label.

Electrical cables must not be damaged. After mounting the cables must not 

be open to direct access.

The power cord must not be subjected to tensile forces.

The device should be mounted with cables with the surface of at least 3 mm 

transmission surface in each port, which are properly isolated, in a way that 

it will continously be connected to electric supply system, and should not be 

operated without precautions against electrical leakage.

EN

-28-

Summary of Contents for FLOW

Page 1: ...TR Montaj ve Kullan m K lavuzu EN Installation and Operating Instructions FLOW FLOW S Tek Fazl Ani Su Is t c Single Phase Instant Water Heater...

Page 2: ...andartlardan ve montaj d zenlemelerinden sorumlu olacak yetkili bir teknisyen taraf ndan yap lmal d r Montaj esnas nda g sterilecek itina cihaz n za uzun ve sorunsuz bir al ma mr sa layacakt r Verilen...

Page 3: ...rne in d kkanlar n b rolar n ve di er mesleki i letmelerin ortak hizmet mutfaklar nda ve ayr ca pansiyonlar n k k otellerin ve benzeri ikamet donan mlar n n banyolar nda kullan m i in uygundur Montaj...

Page 4: ...lerden sak n n z Bu cihaz s rekli olarak sabit d enmi tesisatlara ba lanmal d r Kablo kesiti kurulu olan g ce uygun olmal d r Topraklamal su tesisatlar bir topraklama hatt n n yerini alamaz Montajdan...

Page 5: ...edilen yenisi ile de i tirilmelidir Bu cihaz fiziken yetersiz alg lamada zorluk eken veya zihinsel z rl ki ilerce 8 ya alt ndaki ocuklar da dahil veya onlar n g venli inden sorumlu bir ki inin g zetim...

Page 6: ...ve cihaz n zerinde bulunan etikette belirtilen zellikler ve teknik de erlere uyulmal d r Montaj Yeri Cihaz n do ru yerle tirilmesi i in yukar daki ekil dikkate al nmal d r Montaj i in cihaz n etraf n...

Page 7: ...alt nda yer alan ve yukar daki ekilde g r len viday s kerek n kapa arka kapaktan ay r n z Cihaz n duvardaki konumu belirlendikten sonra yandaki ekilde g r len ve kitap k ile birlikte verilen montaj a...

Page 8: ...aretli ve s cak su hatt n cihaz n su k na k rm z i aretli her bir u ta verilen contalardan birer adet kullanarak ba lay n z Ba lant borular n n rakorlar n i inde eksenel olarak oturmas na dikkat edin...

Page 9: ...ablosu N N tr Kablosu E Koruyucu Toprak Kablosu 1 Elektrik ba lant klemensi 2 Termal devre kesici 3 Kademe anahtar 4 Hidro alter P1 P2 SPST anahtarlar R1 2 5 3 kW s tma eleman R2 2 5 3 kW s tma eleman...

Page 10: ...ki di er cihazlar n a ktaki metal par alar na ve cihaz n montaj edildi i topraklama hatt na TSE standartlar na uyulacak ekilde ba lanmal d r Cihazdan maksimum verim elde edebilmek i in sigorta panosu...

Page 11: ...lant terminallerine elektrik ba lant emas na g re dikkatlice ba lay n z Ba lant klemenslerinin vidalar n tamamen s k n z ve kablo izolelerini ba lant vidalar n n alt nda kalmamas na dikkat ediniz Gev...

Page 12: ...unu a n z ve d zenli ekilde su ak oluncaya kadar bekleyiniz Hava ve yabanc maddelerden ar nm suyun d zg n ak yakla k 1 dakika sonra sa lanacakt r Sonra b t n hava bo luklar n n sistemden ve cihazdan...

Page 13: ...e giri suyu muslu unu kapat n Daha sonraki sayafalarda yer alan Giri suyu s zgecinin temizlenmesi k sm ndaki talimatlara uygun olarak giri suyu s zgecini yerinden kar n Ak d zenleyici g revi g ren pla...

Page 14: ...niz veya lavabo borusu perlat rlerinin t kal olup olmad n kontrol ediniz Sorun devam ederse daha nceki sayfalarda yer alan Ak d zenleyicinin s k lmesi ba l alt nda yer alan talimatlara g re d zenleyic...

Page 15: ...na belirlenerek giderilmesi ve sistemin yeniden devreye al nmas sa lanmal d r Temizlik ve Bak m Cihaz temizlerken g l a nd r c lar ya da eritici s v lar kullanmay n z Bu maddeler plastik ba lant lara...

Page 16: ...uyu ba lant hortumunu cihaz n mavi i aretli su giri inden s k n z Cihaz n su giri i i erisinde bulunan giri suyu s zgecine imdi ula abilirsiniz Giri suyu s zgecini yerinden kar n z Giri suyu s zgeci t...

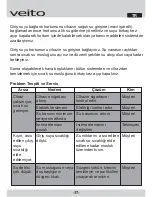
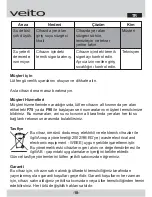
Page 17: ...n s cak su muslu unu birka kez a p kapat n z Problem Tespiti ve Servis Ar za Nedeni z m Kim Cihaz al m yor s cak su gelmiyor Cihaz n sigortas atm Elektrik kesilmesi Su bas nc minimum seviyenin alt nda...

Page 18: ...e bildiriniz Bu numaralar ani su s t c s n n alt taraf nda yer alan her iki su ba lant rekorunun aras nda bulabilirsiniz Tasfiye Bu cihaz mr n dodurmu elektrikli ve elektronik cihazlar ile ilgili Avru...

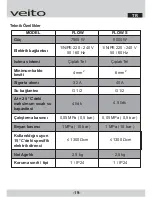
Page 19: ...igorta ak m 32 A 40 A Su ba lant s G 1 2 G 1 2 Is tma sistemi plak Tel plak Tel t 25 C deki maksimum s cak su kapasitesi 4 l dk 4 5 l dk al t rma bas nc 0 05 MPa 0 5 bar 0 05 MPa 0 5 bar Beyan bas nc...

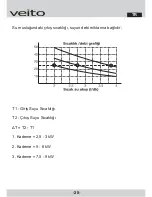
Page 20: ...20 TR Su muslu undaki k s cakl suyun debi miktar na ba l d r T1 Giri Suyu S cakl T2 k Suyu S cakl T T2 T1 1 Kademe 2 5 3 kW 2 Kademe 5 6 kW 3 Kademe 7 5 9 kW...

Page 21: ...ce should be carried out by a qualified technician who is responsible for the applicable standards and mounting arrangements Care that will be shown during the installation will ensure a long and trou...

Page 22: ...d use or similar to household use but not industrial such as mutual kitchens of shops offices and other professional businesses and also the bathrooms of pansions small hotels and bathrooms of similar...

Page 23: ...ce must be permantently connected to the fixed installation Cable cross section must be suitable to the installed power supply Grounded plumbing system does not take the place of a grounding line Afte...

Page 24: ...is not suitable for the use of people who are physically inadequate or mentally handicapped or people who have difficulty in sensing including children under 8 years of age without the supervision by...

Page 25: ...ifications indicated on the label and technical values must be complied with Mounting Place The figure above should be considered in order for the device to be placed correctly For installation from a...

Page 26: ...the front cover Remove the front cover from the back cover by dismounting the screw at the bottom of the device shown in the figure above After determining the location of the device on the wall fix t...

Page 27: ...nce water outlet marked in red with suitable water pressure resistant spiral connection hoses by using one piece of the seal at each end Make sure that the connecting pipes are placed axially inside t...

Page 28: ...e E Protective Ground Cable 1 Electrical connection terminal 2 Thermal circuit breaker 3 Level switch 4 Hydro switch P1 P2 SPST switches R1 2 5 3 kW heating element R2 2 5 3 kW heating element R3 2 5...

Page 29: ...ices around the installation site and to the grounding line where the device installed into in accordance with to TSE standards In order to achieve maximum efficiency from the device shortest cable di...

Page 30: ...onnecting cables to the electrical connection terminals according to wiring diagram Tighten the screws of the connection terminals and make sure the cable is completely isolated to remain below the at...

Page 31: ...until the regular water flow starts Laminar flow of water purified from the air and foreign matter will be provided after about 1 minute Then open hot water tap a few times to compeletely remove all...

Page 32: ...water tap Remove the inlet water filter in accordance with the instructions provided in the section Cleaning the water inlet filter on the following pages The plastic part serving as the inlet water...

Page 33: ...filter is contaminated or not or check if aerators of sink pipe is clogged or not If the fault is not eliminated you can remove the regulator in accordance with the instructions provided in the secti...

Page 34: ...rce of the failure should be determined by a qualified technician and re commissioning of the system should be ensured Cleaning and Maintenance Do not use strong abrasive or dissolving fluids to clean...

Page 35: ...the inlet water connection hose from the blue marked water inlet of the device Now you can see the water inlet filter which is in the water intake Detach the water inlet filter Inlet water filter can...

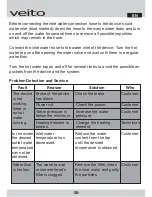
Page 36: ...ice and the system Problem Detection and Service Fault Reason Solution Who The device is not working there is no hot water running Brake of the device has blown Power cut Water pressure is below the m...

Page 37: ...ttom of the device These numbers can be found between the two water connection records which are under the instant water heater Liquidation This device has been marked accordingly with the European re...

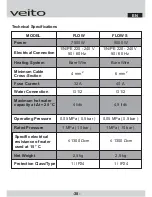
Page 38: ...mm 2 Fuse Current 32 A 40 A Water Connection G 1 2 G 1 2 Heating System Bare Wire Bare Wire Maximum hot water capacity at t 25 C 4 l dk 4 5 l dk Operating Pressure 0 05 MPa 0 5 bar 0 05 MPa 0 5 bar Ra...

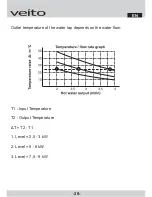
Page 39: ...Outlet temperature of the water tap depends on the water flow T1 Input Temperature T2 Output Temperature T T2 T1 1 Level 2 5 3 kW 2 Level 5 6 kW 3 Level 7 5 9 kW 39 EN...

Page 40: ......
Reviews: