background image

-

  Connection of Other Devices   

D1 series has differences in feature as  described below.  Be  cautious.   

Item   

SVR-1648D1   

SVR-1648D1   

6 SATA  

Internal HDD   

Bay   

Spot   

 4/1 BNC - Single or Quad   

16
16
4

8

Item   

Audio   

Sensor  
Relay 

POS   

Connect the PTZ controller cable, audio input/output, network, and sensors as shown below.   

Connecting Device


 DVR Terminal


1   

 SPOT Monitor(CCTV Monitor)     Rear Panel SPOT   

2   

 Mike / Speaker   

 Rear Panel Audio Input / Audio Output   

3   

 LAN Cable   

 Rear Panel Ethernet   

4   

 PTZ Camera   

 Rear Panel Terminal Block   

5   

 Sensor / Relay / POS   

 Rear Panel Terminal Block   

6   

 Keyboard controller   

 Rear Panel Terminal Block   

1) SPOT Monitor  

Connect Spot Monitor to the rear SPOT terminal.   

SVR-1648D1 supports 4ea SPOT terminals and 

2) Audio Input/Output  

SVR-1648D1 supports 16 audio inputs and 1 output   


3) Terminal Block    

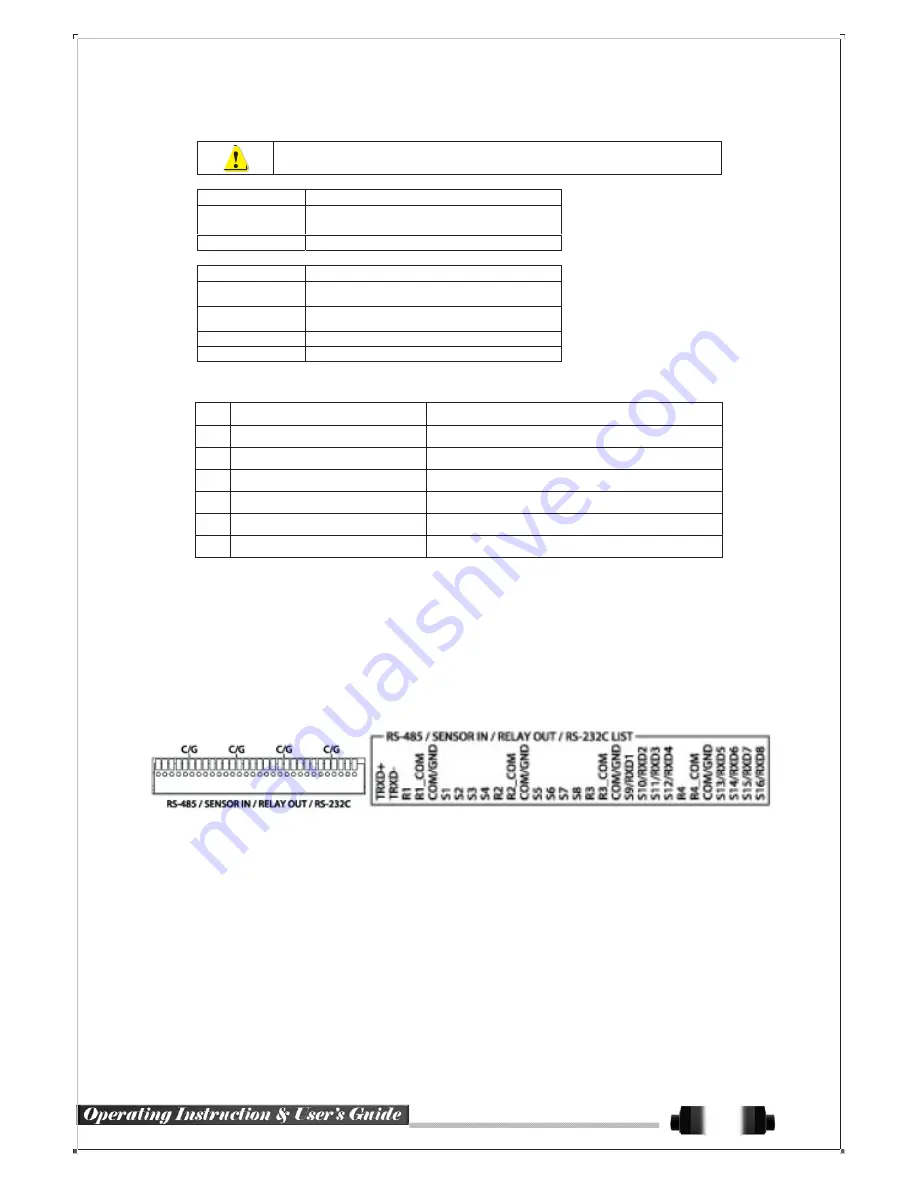
[Figure 2-3 . SVR-1648D1 series Terminal Block and Description]   


The terminal blocks in the rear of the product are for the connection of PTZ / Sensor / Relay / POS Connection.  

The number of the terminal block may be different depending on the model.  


  PTZ Camera/Keyboard Controller  

Connect PTZ control cable; TRX+, TRX- and GND to Terminal Block(TB1);No.4 TRXD+, No.5 TRXD- and No.10  

GND in the rear of DVR. You may refer to APPENDIX for supported PTZ cameras in this manual. Keyboard  con-

troller has the same connection as PTZ camera.   

13   

Summary of Contents for SVR-1648D1

Page 1: ...SVR 1648D1 USER MANUAL The Art of Surveillance...

Page 2: ...ation Environment of the DVR 1 Maintain the following conditions operating temperature of 5 C 40 C operating humidity of 10 80 2 Install the DVR in a safe place that is free from external vibration 3...

Page 3: ...d danger 2 Dispose used lithium batteries properly Warning and Caution are indicated as follows Possible injury or product damage Risk of minor injury or product damage Cautions for the usage of the p...

Page 4: ...on 18 Power ON 20 HD frequency setting 20 Storage Setup 20 Recording Setup 20 Date Time Setup 21 Camera TV Setup 21 Screen View and Other Setup 21 External Device Setup 21 Recording View 21 Backup 21...

Page 5: ...ckup 36 Screen Mode 36 Log Viewer 36 Log Type 36 System Log Viewer 37 Recording 37 Recording Types 37 Recording Setup 37 Recording Status View 38 Backup 38 Backup in The Real Time Monitoring Mode 38 B...

Page 6: ...t 54 E mail 54 Bandwidth 54 Callback 54 System 55 DVR Name 55 ID for Remote Controller 55 ID For Keyboard Controller 56 User Registration 56 Admin Password 56 Upgrade 56 Factory Default 57 RS232C Port...

Page 7: ...5 26 Playback Status and Control Window 33 Figure 5 27 Playback Menu 34 Figure 5 28 Smart Search Area Designation 34 Figure 5 29 Smart Search Motion Detection Window 35 Figure 5 30 Panorama Playback 3...

Page 8: ...0x1024 BNC SDTV 720x480 576 POS ATM Interface 8 RS232C Simplex Terminal Block Backup Copy Access eSATA DVD RW USB2 0 Network Network Access Ethernet 10 100 1000 RJ45 PTZ Controller Access RS485 Half D...

Page 9: ...users Privacy zone mask Covert channel Digital single multi zoom Smart search Pattern change Text detection search Multi time day Index event search playback Panorama playback Data backup to NAS over...

Page 10: ...Chapter Installation and connection SVR 1648D1 Names and Features of Each Part SVR 1648D1 Rear Panel 10...

Page 11: ...Ethernet ADSL Cable Modem Ethernet 10 100 Base T Network Connection RJ 45 8 RS 232C Console Output D SUB 9P NTSC PAL VGA TV Full HD 1920x1080 HD 1920x1080 WSXGA 1680x1050 SXGA 1280x1024 9 CONFIG DIP...

Page 12: ...w CONFIG SWITCH Setup 3 CCTV Monitor Rear Panel TV 4 VGA Monitor LCD Monitor Rear Panel VGA OUT 5 HDMI Monitor Rear Panel HDMI 6 Mouse Rear Panel USB CONFIG SWITCH Setup Switch 1 Switch 2 Switch 3 Swi...

Page 13: ...oard controller Rear Panel Terminal Block 1 SPOT Monitor Connect Spot Monitor to the rear SPOT terminal SVR 1648D1 supports 4ea SPOT terminals and 2 Audio Input Output SVR 1648D1 supports 16 audio inp...

Page 14: ...nsor Connection Connect the sensor to the terminal block S1 S16 depending on the model Each input terminal is connected relatively with the channel number 2 Relay Connection Relay the output signal to...

Page 15: ...ESC Exit the current menu or move to the upper menu SPOT Spot Control PTZ PTZ Pan Tilt Zoom Control 10 CAPTURE Capture the displaying image into USB BACKUP Save the recorded image at other media SEARC...

Page 16: ...recorded videos PTZ Shift to the PTZ camera control mode Move from one category to another or MOVE change to the display mode UP DOWN Log Page Up Down C Search Button Playback Mode Play Fast Forward...

Page 17: ...remove Play Menu Click on the right button Show sub folder of the certain Menu window Click on the left Select Menu button Double click on the Select Menu left button Click the left button Move a cer...

Page 18: ...ct 1 Normal termination of the system and fully unplugged power code are required before conducting HDD installation 2 After installing HDD Do not connect to power supply with the top case opened The...

Page 19: ...6 By reversing Step 2 combine both top and bottom HDD bay with the body Step 4 7 Connect the power cable and data cable to HDD SVR 1648D1 model has a different type of SATA power cable 9 Connect the H...

Page 20: ...e 4 5 Menu Window ID and Password are required for initial installation Default ID and Password are shown below Local Admin 00000 User1 1111111 User2 2222222 User3 3333333 User4 4444444 Password chang...

Page 21: ...n View and Other Setup Select and set up Menu Miscellaneous Screen View Select and set up Menu Miscellaneous Channel Group External Device Setup Configure external devices For more information check 2...

Page 22: ...e Icon Motion Detection Recording Sensor Recording Recording Event Audio Recording Pattern Change Recording Text Recording Video Recording Recording Mode Audio Recording Text Recording Recording Event...

Page 23: ...functions depending on the given authorities User For Authorization Setup Move to Menu Setup System 4 User Registration Functions available for Authorization Setup Network Live View the real time imag...

Page 24: ...images will be displayed on a screen divided into 16 9 division depending on the model Except for the basic setting the system follows user s setting on the screen division from next booting D1 serie...

Page 25: ...only avaiabel when mutilple cameras are connected Channel Grouping Channel Grouping is to switch the image location in the screen between channels in the monitoring mode On the real time monitoring sc...

Page 26: ...quential image through Spot Move to Menu Miscellaneous Control Spot Sequence Menu in Monitoring Mode The user can control all functions available in Monitoring Mode in Menu Press the Menu or right cli...

Page 27: ...w keys Screen Control by using PTZ This enables the user the real time monitoring by using PTZ camera The PTZ camera must be connected to the system For external connection refer to 2 3 Connection of...

Page 28: ...e by designating the coordinates and move to the designated coordi nates quickly Home Position Time If there are no controlling signals to PTZ camera after a certain time it goes automatically to the...

Page 29: ...n 1 10seconds and TV OUT Adjustment are available After selecting Display Setting it becomes the 1 channel mode and a menu pops up as shown below Figure 5 19 Display Setting Window TV OUT Adjustment i...

Page 30: ...1 16 channel text input Search Search Mode Move to Menu Search in the real time monitoring mode Figure 5 23 Playback Menu Playback Menu 1 Calendar Search Calendar Search allows the user search and pl...

Page 31: ...me change can be found at Menu Calendar Search Time Index Selecting a file at Menu Calendar Search Time Index leads to a selection window popup and the user can select a file in different folders befo...

Page 32: ...The hourly displayed video of the selected channel will then be displayed in the minute bar graph Move the time line by using the arrow keys and the numeric buttons and specify the time Afterward pres...

Page 33: ...lly searched and played this function is possible only in the Multi channel Playback mode both backward playback and forward playback are possible Pressing buttons the user can adjust the playback spe...

Page 34: ...rch 30 frames once Quick Search In the PAL mode search 25 frames once Detail Search Search all frames Move to the Smart Search and select the desired channel After shifting to the 1 channel mode selec...

Page 35: ...ontrol between 1 8 Calendar Search Move to Menu Search Calendar Search and then a searching window pops up MULTI TIME The user can playback the video recorded image of the certain channel recorded in...

Page 36: ...d remote controller Figure 5 31 Display Mode Log Viewer DVR records all Log information over the system operation including Power on off System Setup and Network Access Move to Menu Miscellaneous Log...

Page 37: ...ar window that time changes are made Otherwise a red triangu lar icon is displayed at an unchanged date To view the log details select the desired date with a red icon Selecting a date with the blue i...

Page 38: ...In order to backup the data make sure to check that either internal or external storage devices CD DVD or HDD supports USB 2 0 is connected For supported external devices refer to Appendix The user ca...

Page 39: ...ver then only that channel is selected For the remaining backup procedures see 5 33 Common Backup Procedure Backup in Playback Mode In the Playback mode select Menu Backup Any playback in progress at...

Page 40: ...press the ESC button Changing the backup time causes the name of the directory to be backed up to be changed as well If the file to be backed up exceeds the free space its size is displayed in a yello...

Page 41: ...Figure 5 37 Log Backup Log files are created at a folder shown below 565645348945_20100303 log log file is the text file Print The user can print the current displaying image and GUI A print using PS...

Page 42: ...ackup Snapshot in the real time monitoring Playback and Log mode When only one USB2 0 backup device excluding ODD devices is searched the JPG file is stored in the same device If there are no or more...

Page 43: ...nize the time of the DVR system with DTS When the DTS time or a zone is changed the change is reflected on DVR series belonging to the network the synchronization signals are broadcasted without passi...

Page 44: ...On the selection window select the standard time zone you want to set 2 DST By using the arrow keys and the Select button select Summer Time On the selection window select On Off by using the arrow k...

Page 45: ...ta are being saved on the real time monitoring screen even though they are displayed in black PZ Mask Used to hide a certain area of the real time monitoring screen After selecting PZ Mask over each c...

Page 46: ...on detection doesn t applied The selected area turns brown Select Exit to finish 1 Motion Sensitivity Lowest Low Middle High Highest 2 PCD Time Select between 2 3 4 5 6 7 8 9 3 Sensor Type Select the...

Page 47: ...evice recording will be initiated based on the event frame value Text Recording 1 Recording Resolution Used to set the resolution of the recorded channel Resolution by Video Type Type Resolution NTSC...

Page 48: ...he last 7 seconds before the event occurrence are recorded Log Setup On Off for Motion Sensor Audio Pattern TEXT Advanced Setup Watermark On Off QP Control QP Control is to adjust the size of the savi...

Page 49: ...lidays are marked with a red tag On the Holiday Registration Window select the date by using the arrow keys and the Select button and press the Select button After setting the holiday move to Save at...

Page 50: ...line state Offline Changes the selected storage device in offline state Format Format the selected storage Eject Separate the selected device completely from the software Physical states supporting th...

Page 51: ...by using the arrow keys and the Select button A newly displayed disk will then be displayed as New Select a newly installed disk by using the arrow keys and the Select button and initialize the disk a...

Page 52: ...ect the model first As shown below proceed with the following order Offline Format Online Figure 6 45 Storage Format Procedure It may take some time during formatting After formatting select the model...

Page 53: ...NS name regardless of the change of in the IP address It provides dynamic DNS to ensure URL access in the dynamic IP environment User can monitor the remote place thru internet with web server functio...

Page 54: ...the limit of the bandwidth to be used when bringing the live image adjust resolution quality and transmitting the data by using the network Image Resolution CIF 2CIF 4CIF HCIF QCIF Adjust quality of t...

Page 55: ...ue 8 RS232C Port Use of the RS232C port 9 Alarm Set the alarm On Off and alarm format 10 Alarm Duration Set the alarm time by continuous 5 10 15 User setting 11 Menu Time Out Used to set the time for...

Page 56: ...and give authorities to users as shown below System Access Authorization Network Live View the real time images upon network access Playback View the recorded images Copy download Copy and download fi...

Page 57: ...s not supported The upgrade information window will then appear within 15 seconds Read the information and select Yes to start the upgrade gradually Select No to return to the System mode After the up...

Page 58: ...the Select button Menu Time Out If no input is made in the System Setup menu from the front buttons remote controller and mouse the system automatically shifts to the real time monitoring mode Move t...

Page 59: ...RATEL 8 GSP GSP CYBERSCAN_1 9 HITRON FASTRAX2 FASTRAX2 10 HONEYWELL SCANDOME2 HSDN 251 LG_MULTIX 11 LG LG LG_OLD 12 MIKAMI MIKAMI MIKAMI 13 ORIENTAL ORX 1000 ORX 1000 14 PANASONIC WVCS854 WVCS854 PELC...

Page 60: ...The Art of Surveillance...

Reviews: