background image

10

11

Calibration 

Ensure ‘Display Crossing’ is turn on, go to 
‘Options > XY Guide > On/Off’.

The microscope will default to crossing 
‘On’, we recommend that this is left on.

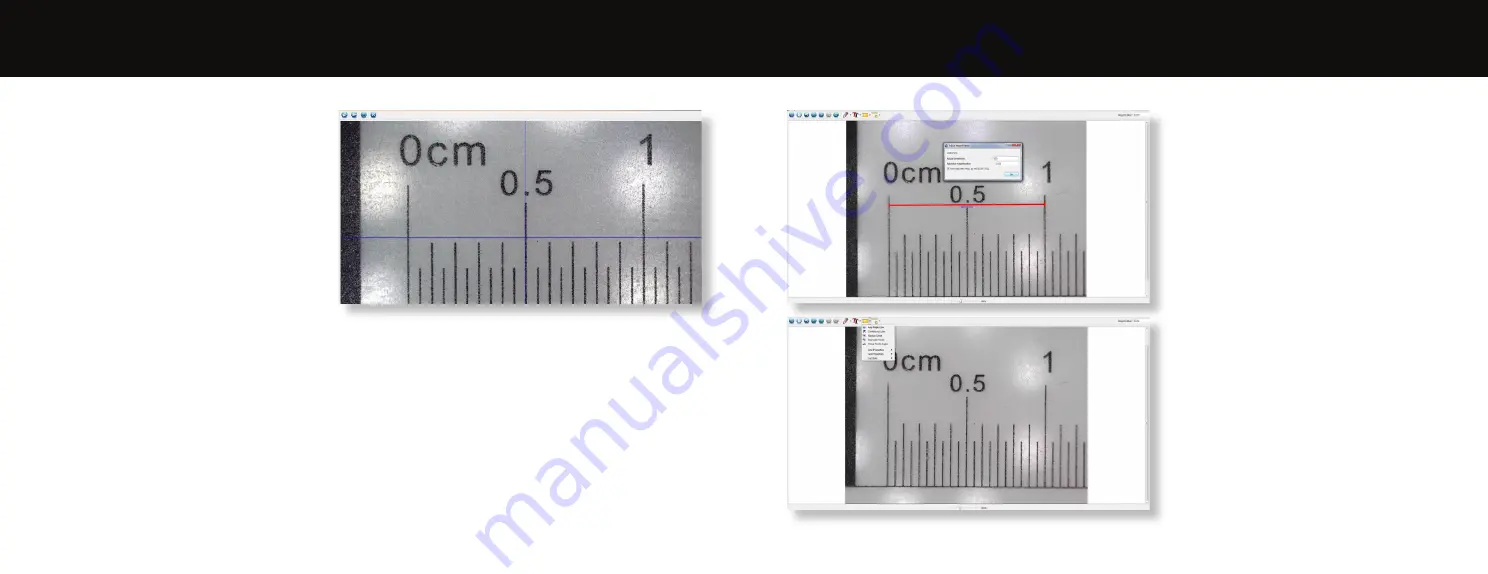
Step 1 

Focus the microscope on the 

supplied calibration ruler, adjust the 
magnification wheel until the picture is 
clear. Take a picture of the selected area 
when the ruler lines are parallel to the 
blue XY guides, as shown in the image.

Step 2

 Double-click on the image 

captured to enter the measurement 
interface.

Step 3

 Once the image is open, click on 

the calibration icon. Using the mouse, 
click on the beginning and ending points; 
you must know the distance between the 
points (using the ruler). A dialogue box 
will pop up, enter the exact value of the 
measurement into ‘Actual dimension’. 
The software will automatically calibrate 
the magnification rate. Click ‘OK’ and the 
adjusted magnification rate will show in 
the upper right corner.

Step 4

 Now using ‘Any Angle Line’, 

under the measurement icon, measure 
the same distance again. If the value 
measured is approximately the same as 
the actual value, then calibration has 
been successful.

Calibration & Measurements

Summary of Contents for DISCOVERY DX-1

Page 1: ...VMS 006 DX1 User Manual...

Page 2: ...afe for future reference Before using the microscope please read the safety precautions below Always ensure that the unit is operated correctly n The DX 1 microscope is not waterproof n Use and store...

Page 3: ...roscope until clicks into place The angle of the cradle can be adjusted by undoing the locking nut Focus Wheel Adjusts the focus of the microscope on the object Brightness Wheel Adjust the brightness...

Page 4: ...onto your PC the installation will begin Installing microscope software Operating system requirements n Windows 7 8 10 Mac OS 10 12 and later n P4 1 8 or above n RAM 1GB n Video Memory 126M n USB port...

Page 5: ...to see on screen whether the DX 1 is focused Capture a still photo or video footage at any point when using the microscope use the icons or dropdown menu within the Micro Capture Plus software Settin...

Page 6: ...urement interface Step 3 Once the image is open click on the calibration icon Using the mouse click on the beginning and ending points you must know the distance between the points using the ruler A d...

Page 7: ...to measure any continuous length Click hold and drag from one point to other points then release Radius Circle Measurement Click hold and extend out to the chosen radius The radius circumference and...

Page 8: ...ar enter your chosen magnification rate and click OK 3 If you want to use the same magnification rate to capture pictures click Set Magnification then Set Capture Magnification to save settings All pi...

Page 9: ...ure Plus with measurement for Win Mac Dimensions Microscope 110mm x 33mm Troubleshooting Problem Solution Photo capture or video is blurred or shaky The image is not in focus correct this by turning t...

Page 10: ...In the event you need to contact Veho for support or troubleshooting for your Veho DX 1 Microscope please contact us via our Live Chat on our website at veho world com Support...

Reviews: