3
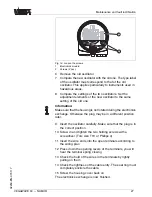
R
emove approx
.
10
cm
(
4
in
)
of the cable mantle
,
strip
approx
.
1
cm
(
0
.
4
in
)
insulation from the ends of the
individual wires
4
I
nsert the cable into the sensor through the cable entry
5
L
ift the opening levers of the terminals with a screwdriver
(
see following illustration
)
6
I
nsert the wire ends into the open terminals according to
the wiring plan
7
P
ress down the opening levers of the terminals
,
you will
hear the terminal spring closing
8
C
heck the hold of the wires in the terminals by lightly
pulling on them
9
T
ighten the compression nut of the cable entry
.
T
he seal
ring must completely encircle the cable
10
I
f necessary
,
carry out a fresh adjustment
11
S
crew the housing cover back on
T
he electrical connection is
fi
nished
.
F
ig
.
8
:
C
onnection steps
5
and
6
5
.
3
W
iring plan
,
single chamber housing
T
he following illustrations apply to the non
-
E
x as well as to the
EE
x d version
.
VEGAWAVE
63
- -
NAMUR
17
C
onnecting to voltage supply
32259
-
EN
-
070117

