background image

8

2 Loading or source exchange

Source loading and exchange • VEGASOURCE 31, 35

39155-EN-181126

• 

Push in the holding pin (4) and move the source holder (9) over 

the pin until the arrow mark points to the holding pin (4)

• 

Pull out the source holder (9)

• 

Place the protective cover on the source container to protect 

against pollution until reinstallation of the source holder

• 

If available, remove safety bolt (6) with Allen key size 2.5

• 

Swivel the cover (7) in front on the thin cylinder of the source 

holder (9) to the side. To do this, lift the cover (7) slightly with a 

small slotted screwdriver

• 

Only when exchanging the source: Allow the source capsule (8) to 

fall out downwards into a shielded vessel

• 

Insert new source capsule (8) and close cover (7). For insertion 

use a suitable gripping device or a manipulator

• 

Screw in the safety bolt (6) (optional)

• 

Completely insert the source holder (9) into the source container 

and turn it until the holding pin (4) pops out

• 

Continue turning the source holder (9) up to position OFF

• 

Insert the key lock (2) with key and lock. Detach the key

• 

If necessary, remove extension rod (1)

• 

Screw in capstan screw (5) and secure together with the retaining 

pin (4) with new seal

• 

Remove existing type labels (when exchanging the source)

• 

Unpack the type label set and letter it respectively. You can find 

further information in chapter "

Safety instructions - Labelling

"

1

1

3
2

2

4

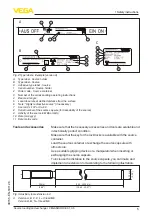
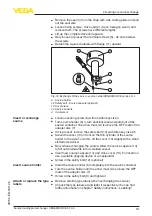
Fig. 5: Fasten type label
1  Type label - source container (already on the source container)

2  Type label - Source (107 x 17 mm)

3  Adhesive type label - Source (48 x 30 mm)

4  Adhesive label "Radioactive"

• 

Letter the adhesive type label (48 x 30 mm)n. Clean the surface 

provided on the source holder and attach the adhesive type label

• 

Letter the type label (107 x 17 mm) and fasten it to the neck of the 

source container with two grooved pins

• 

Attach the adhesive label "Radioactive" to the protective cover of 

the source container (if not already present)

• 

Attach the protective cover

• 

Insertion or exchange of the source is finished

Insert or exchange 

source

Insert source holder

Attach or replace the type 

labels

Summary of Contents for VEGASOURCE 31

Page 1: ...Supplementary instructions Source loading and ex change VEGASOURCE 31 35 Document ID 39155...

Page 2: ...nts 1 Safety instructions 3 2 Loading or source exchange 7 2 1 Version A 7 2 2 Version B 9 2 3 Version C 12 2 4 Version D 15 2 5 Version K L 18 2 6 Version M N 21 3 Supplement 24 3 1 Technical data 24...

Page 3: ...x 16 mm capsule VZ 79 001 Cs 137 A2 Nipple d 6 4 x 16 mm capsule VZ 64 001 Co 60 B1 Thread M4 d 6 4 x 17 6 mm capsule VZ 1508 001 Cs 137 B2 Thread M4 d 6 4 x 17 6 mm capsule VZ 1486 001 Co 60 C1 Nipp...

Page 4: ...ng on If possible practice this procedure especially the handling with the gripping device or suitable manipulator in advance Pre printed type label stainless steel 107 x 17 mm 4 21 x 0 67 in Pre prin...

Page 5: ...raceability of the source 9 Activity of the source in MBq or GBq 10 Date mm yyyy 11 Data matrix code Make sure that the necessary accessories and tools are available and in technically perfect conditi...

Page 6: ...ource loading and exchange VEGASOURCE 31 35 39155 EN 181126 Note To carry out the exchange you need a new type A container These containers must not be used more than once Contact our specialists befo...

Page 7: ...size 2 5 optional Flat headed screwdriver size 1 5 x 10 Side cutters Gripper tool or manipulator for source capsule Possibly extension rod M8 Remove the protective cover see operating instructions of...

Page 8: ...pops out Continue turning the source holder 9 up to position OFF Insert the key lock 2 with key and lock Detach the key If necessary remove extension rod 1 Screw in capstan screw 5 and secure together...

Page 9: ...1 Extension rod M8 optional You need the following tools when exchanging the source on version B Key for padlock Hexagon spanner size 5 Allen key size 2 5 optional Flat headed screwdriver size 1 5 x 1...

Page 10: ...d screwdriver Only when exchanging the source Allow the source capsule 9 to fall out downwards into a shielded vessel Insert new source capsule 9 and close cover 8 For insertion use a suitable grippin...

Page 11: ...hesive label Radioactive 2 Type label Source 3 Type label source container already on the source container Letter the type label 55 x 45 mm and fasten with four grooved pins to the source holder Attac...

Page 12: ...n version C Key for padlock Hexagon spanner size 5 Allen key size 2 5 optional Flat headed screwdriver size 1 5 x 10 Side cutters Gripper tool or manipulator for source capsule Possibly extension rod...

Page 13: ...psule 7 to fall out downwards into a shielded vessel Insert new source capsule 7 and close cover 6 For insertion use a suitable gripping device or a manipulator Screw in the safety bolt 5 optional Com...

Page 14: ...Radioactive 2 Type label Source 3 Type label source container already on the source container Letter the type label 55 x 45 mm and fasten with four grooved pins to the source holder Attach the adhesiv...

Page 15: ...Locking screw 3 Capstan screw 4 Fixing strap 5 Source holder 6 Slot 7 Source capsule 8 Spring ring 9 Extension rod M6 optional You need the following tools when exchanging the source on version D Key...

Page 16: ...to the source Unscrew source holder 5 with spanner size 13 and pull it out of the source container Only when exchanging the source Insert the blade of a screw driver 4 mm into the slot 6 on the source...

Page 17: ...the source Unpack the type label set and letter it respectively You can find further information in chapter Safety instructions Labelling 2 1 3 Fig 14 Fasten type label 1 Adhesive label Radioactive 2...

Page 18: ...Adhesive type label Source 11 Squared adapters with flange A Arrow mark You need the following tools when exchanging the source on versions K and L Key for padlocks Hexagon socket wrench size 4 Allen...

Page 19: ...bove the OFF mark of the adapter disc 7 If it is present remove the safety bolt 12 with Allen key size 2 5 Swivel the cover 13 in front on the thin cylinder of the source holder to the side To do this...

Page 20: ...flange 11 with the four clamping screws 5 The arrow mark A of the source holder 6 is above the OFF mark of the adapter disc 7 Tighten the terminal screws 5 Check if the source container is in position...

Page 21: ...e source holder 7 Adapter disc 8 Source holder 9 Type label Source holder 10 Adhesive type label Source 11 Squared adapters with flange A Arrow mark You need the following tools when exchanging the so...

Page 22: ...t out of the source container Only when exchanging the source Insert the blade of a screw driver 4 mm into the slot 12 on the source holder 8 and press out the source capsule 13 or unscrew the source...

Page 23: ...e to the specified position of the source container if not already present Fasten the square adapters with flange 11 with the three fixing screws 5 The arrow mark A of the source holder is above the O...

Page 24: ...rce Co 60 Cs 137 Co 60 Cs 137 Attenuation factor 37 294 181 3100 Number of the half value layers 5 2 8 2 7 5 11 6 Tab 1 Attenuation factor and half value layers Max activity of the source VEGASOURCE 3...

Page 25: ...ormationen unter www vega com Les lignes de produits VEGA sont globalement prot g es par des droits de propri t intellec tuelle Pour plus d informations on pourra se r f rer au site www vega com VEGA...

Page 26: ...26 Notes Source loading and exchange VEGASOURCE 31 35 39155 EN 181126...

Page 27: ...27 Notes Source loading and exchange VEGASOURCE 31 35 39155 EN 181126...

Page 28: ...of delivery application practical use and operat ing conditions of the sensors and processing systems correspond to the information available at the time of printing Subject to change without prior n...

Reviews: