19
2 Loading or source exchange
Source loading and exchange • VEGASOURCE 31, 35
39155-EN-181126
•
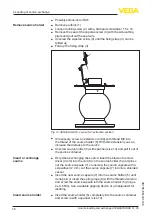
Remove the seal (4) from the strap with side cutting pliers and pull
out the seal wire
•
Loosen fixing screws - drive unit (2) (3 pcs, hexagon size 4) and
remove them. The screws have different lengths
•
Lift up the complete drive unit upward
•
Only loosen (4 pieces) the terminal screws (5) - do not unscrew
the screws
•
Detach the squared adaters with flange (11) upward
14
13
6
A
12
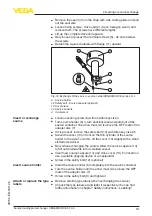
Fig. 16: Exchange of the source - source holder VEGASOURCE version K, L
6 Source holder
12 Safety bolt - Source capsule (optional)
13 Cover plate
14 Source capsule
A Arrow mark
•
Loosen securing screw (8) with an Allen key size 4
•
Turn source holder (6) ¼ turn anticlockwise and pull it out of the
source container. The arrow mark (A) is above the OFF mark of the
adapter disc (7)
•
If it is present, remove the safety bolt (12) with Allen key size 2.5
•
Swivel the cover (13) in front on the thin cylinder of the source
holder to the side. To do this, lift the cover (13) slightly with a small
slotted screwdriver
•
Only when exchanging the source: Allow the source capsule (14)
to fall out downwards into a shielded vessel
•
Insert new source capsule (14) and close cover (13). For insertion
use a suitable gripping device or a manipulator
•
Screw in the safety bolt (12) (optional)
•
Insert the source holder (6) completely into the source container
•
Turn the source holder until the arrow mark (A) is above the OFF
mark of the adapter disc (7)
•
Screw in the safety bolt (8) and tighten it
•
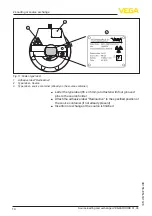
Remove existing type labels (when exchanging the source)
•
Unpack the type label set and letter it respectively. You can find
further information in chapter "
Safety instructions - Labelling
"
Insert or exchange
source
Insert source holder
Attach or replace the type
labels

