background image

Vega SH-2 / User Manual 


13


Revision 02 

 05 April 2019  


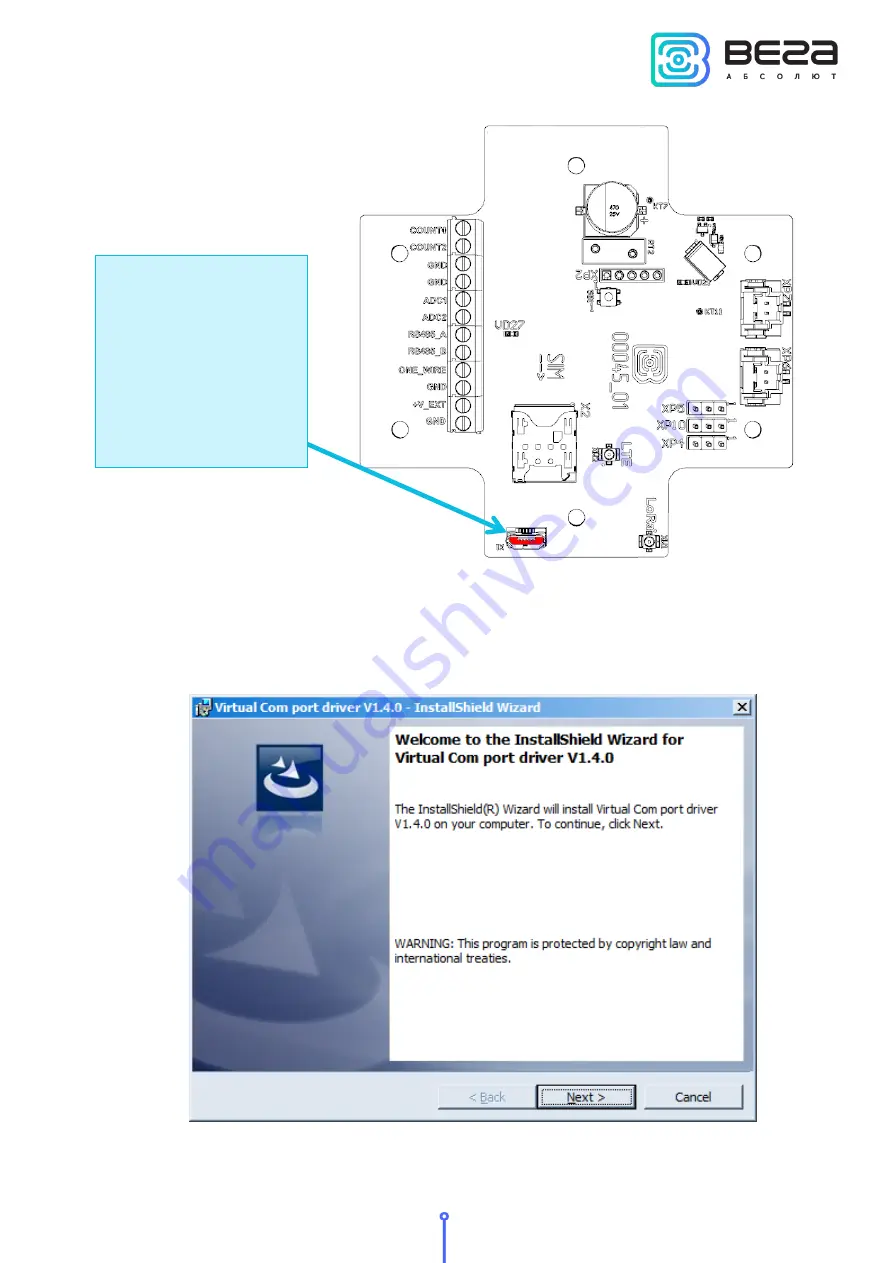
Before connecting the device to the  computer  for  the first time,  you  must  install the 

driver  for  the  COM  port  stsw-stm32102,  which  can  be  download  from 

iotvega.com

.  After 

running the executable file VCP_V1.4.0_Setup.exe, the installer window will appear: 


Micro-USB port on 
the board  

Summary of Contents for SH-2

Page 1: ... ru LORAWAN NB IOT MODEM VEGA SH 2 User manual Modem Vega SH 2 can work with both LoRaWAN technology and NB IoT data transfer technology There are two options for the device with 6400 mAh battery with 12800 mAh battery ...

Page 2: ...e Manual Translation from Russian Document number V02 SH2 01 Revision and date 02 05 April 2019 This document applies to the following products Product name Type number End devices Vega SH 2 Revision History Revision Date Name Comments 01 25 03 2019 KEV Document creation date 02 05 04 2019 KEV Case dimensions are changed ...

Page 3: ...tion 12 Connecting via USB 12 4 VEGA LORAWAN CONFIGURATOR 15 Interface of the application 15 Connection to the device 16 Device info tab 17 LoRaWAN settings tab 19 Vega SH 2 tab 24 5 COMMUNICATION PROTOCOL 27 Vega SH 2 modem transmits the following types of packets 27 VEGA SH 2 modem receives packets of the following types 28 Message format for MQTT broker sending 29 6 STORAGE AND TRANSPORTATION R...

Page 4: ...solute LLC and provides information on powering and activation procedure control commands and functions of the modem This manual is targeted at specialists familiar with installation work fundamentals of electronic and electrical equipment The modem shall be installed and adjusted by qualified specialists in order to ensure proper operation of the device ...

Page 5: ...munication session with LoRaWAN network Memory can hold up to 100 packets The modem has two digital inputs which may be configured as pulse or security Besides the device has two analog inputs 1 Wire and RS 485 interfaces Communication period can be equal to 5 15 30 minutes 1 6 12 and 24 hours While communication session the modem transmitting saved packets from the earliest to the latest The mode...

Page 6: ... up 3 years with one battery and communication period 24 hours LTE NB IoT antenna type external LoRaWAN LoRaWAN class C Quantity of LoRaWAN channels 16 Frequency plan RU868 EU868 IN865 AS923 AU915 KR920 US915 KZ865 custom EU868 based Activation type ABP or OTAA Type of the LoRaWAN antenna external Sensitivity 138 dBm Radio coverage in restrained urban conditions up to 5 km Radio coverage within li...

Page 7: ...gital input 1 2 COUNT2 Digital input 2 3 GND Ground 4 GND Ground 5 ADC1 Analog input 1 0 21 В 6 ADC2 Analog input 2 0 21 В 7 RS485_A RS 485 Interface A 8 RS485_B RS 485 Interface B 9 ONE_WIRE 1 Wire Interface 10 GND Ground 11 V_EXT External power 12 GND External power Digital inputs COUNT1 and COUNT2 may operate in pulse or security mode If the input has not connection there is a logic 1 ...

Page 8: ...vent for security input triggering via the Vega LoRaWAN Configurator application Analog inputs ADC1 and ADC2 may be used for measuring an external voltage from 0 to 21 V RS 485 modbus and 10Wire interfaces cannot connecting at the same time Switching between two interfaces carried out with jumpers on the XP4 and XP5 connectors on the board 1 Wire interface allows to connect is up to 10 external th...

Page 9: ...ting via NB IoT technology and when the operating modes are changed Also there is a green LED which used only for configuring during manufacture LED signal Meaning LoRaWAN technology Series of short flashings Linking to the LoRaWAN network One long flashing The device connected to the network and is in active mode Three long flashings Device switched to the Storage mode Red LED on the board ...

Page 10: ...gy Two short flashings every 2 seconds Linking to the NB IoT network Three short flashings every 2 seconds The device connected to the network and transmits the data on the server Short flashings for 1 5 seconds Successful coordinates determinated or data transmitted ...

Page 11: ...see part 4 LORAWAN TECHNOLOGY OPERATION The modem supports two activation methods in the LoRaWAN network ABP and OTAA Select one of the methods using Vega LoRaWAN Configurator application See part 4 1 ABP After power supply connection the device immediately begins to operate in the Active mode 2 OTAA After pressing the start button the device makes three attempts to connect to the network within t...

Page 12: ...ccurs schedule alarm etc the modem begins registration in the network After registration and data transmitting or if the data transmitting is unsuccessful the modem switch to the lower power consumption mode until the next communication session according to the schedule CONNECTING VIA USB The modem can be adjusted with the Vega LoRaWAN Configurator application See part 4 The modem must be connecte...

Page 13: ...cting the device to the computer for the first time you must install the driver for the COM port stsw stm32102 which can be download from iotvega com After running the executable file VCP_V1 4 0_Setup exe the installer window will appear Micro USB port on the board ...

Page 14: ...his window you need to click Next then Install and then the installation will begin When the installation complete successfully the following screen appears After pressing Finish the driver is ready for operation it is possible to connect the modem via USB ...

Page 15: ...of the signal from the gateways are available Next the work of the application considering in the Expert mode INTERFACE OF THE APPLICATION The Vega LoRaWAN Configurator application does not require the special installation When the executable file launching the window for working with the application appears The menu on the left allows you to switch between the Simple and Expert modes select the d...

Page 16: ...nu on the left The application automatically recognizes the type of device and the device selection menu becomes inactive To read the settings from the device you need to click the Get settings button until this point the application will display the default settings or from the last connected device After making the necessary changes to the settings you should click the Apply settings button and ...

Page 17: ...er The Air Activation is displayed Key management not displayed in the Simple mode allows you to change the factory keys to register the device on the network and reset the keys back to the factory settings Device info the configurator reads information about the device model its firmware and automatically corrects the device s time when connected to it Update firmware allows you to select the fir...

Page 18: ... already connected to the network reconnection procedure will occurs Link check not displayed in the Simple mode when pressed the device sends a special signal to the LoRaWAN network in response to which the network informs it of the number of gateways that received this signal and the signal quality This button only works when the device is connected to the network Device output not displayed in ...

Page 19: ... 125 kHz 3 868 5 MultiSF 125 kHz RX2 869 525 SF12 125 kHz RU 868 1 868 9 MultiSF 125 kHz 2 869 1 MultiSF 125 kHz RX2 869 1 SF12 125 kHz Custom Set up in application In the device frequency plan only those channels are active by default on which sending requests for connection to the network join channels The remaining channels that the device should use can be transferring by the LoRaWAN network s...

Page 20: ...s are mandatory Without these parameters the custom frequency plan will be considered empty Activation type displays ABP or OTAA device activation method Confirmed uplinks when you choose confirmed the device will retry sending the packet until it receives the server confirmation or until the Uplink number of transmission is over see below If you choose to send a packet without confirmation the mo...

Page 21: ...mode specifies the time between end of packet transmission and first receiving window opening The second receiving window always opens after 1 second after the first Join accept delay 1 not displayed in the Simple mode sets the time that the device will open the first receiving window to receive confirmation for the join request from the LoRaWAN network while OTAA mode active The second window alw...

Page 22: ...acket as many times as specified in this option If Confirmed uplinks is enabled the device will send packets until it receives a confirmation or until it sends as many packets as specified in this option TX power not displayed in the Simple mode the device RF transmitter power is adjusted to this value when sending packets to the LoRaWAN network This option can be changed by the network server ...

Page 23: ...n 02 05 April 2019 TX datarate not displayed in the Simple mode the device transmission datarate at which it will transfer packets to the LoRaWAN network This speed can be changed by the network server if the ADR algorithm is enabled ...

Page 24: ...H 2 TAB The Vega SH 2 tab contains the settings of the connected device Current state displays the current parameters of the device the number of counted pulses at the inputs LTE modem state and signal quality the battery level and the state of analog inputs ...

Page 25: ...removed from the device memory by pressing the button Delete all sensors Interface settings allows setting up the type of every input it may be pulse or security mode Guard settings allows setting up the work of security inputs namely what kind of security circuit state is reason to send an alarm message short open or both Connection settings a group of parameters that allows you to configure the ...

Page 26: ...eived after the fulfilled in the settings uplink number device completes the communication session until the next one according to the schedule In this case the device continues to collect data according to the data collection period and store it in memory Non transmitted packets remain in the device memory until the next communication session With the Confirmed uplinks option turned off the devic...

Page 27: ...lues in this packet unixtime UTC 1 byte Temperature С 20 bytes External temperature sensors readings С 4 bytes Pulse number on the input 1 4 bytes Pulse number on the input 2 2 bytes Voltage value on the analog input 1 mV 2 bytes Voltage value on the analog input 2 mV The modem has internal clock and calendar time and date is factory set When sending a packet with the current readings the device u...

Page 28: ...ment of the packet transmission unixtime UTC After receiving this type of package the application can send to modem the packet with time correction VEGA SH 2 MODEM RECEIVES PACKETS OF THE FOLLOWING TYPES 1 Real time clock adjustment send by application on LoRaWAN port 4 Size in bytes Field description 1 byte Packet type this packet 255 8 bytes The value in seconds for which you need to adjust the ...

Page 29: ... specify a topic name where the data published and a client name the name which the device use for publishing All those settings specified in Vega LoRaWAN Configurator in part MQTT over LTE settings For watching the data sending by the device you should to deploy MQTT broker on a PC and subscribe some application on MQTT broker Vega SH 2 sends the message on the server as a text of JSON format See...

Page 30: ... EARFCN the number of radio frequency channel absolute PCID physical network address RSRP input signal power RSRQ input signal quality RSSI indicator of the input signal power SNR signal to noise ratio Telemetry part with collected data one packet reason transmitting reason date date of the data collection time time of the data collection bat battery charge pulse1 pulse number on the input 1 pulse...

Page 31: ...ATION REQUIREMENTS Vega SH 2 modem shall be stored in the original packaging in heated room at temperatures 5 С to 40 С and relative humidity less than 85 The modem shall be transported in covered freight compartments of all types at any distance at temperatures 40 C to 85 C ...

Page 32: ...02 05 April 2019 7 CONTENT OF THE PACKAGE The modem is delivered complete with Vega SH 2 modem 1 pc Antenna 2 pcs 6400 mAh battery 1 or 2 pcs 3 Factory certificate 1 pc 3 The number of delivered batteries depends on the order conditions ...

Page 33: ... and operation specified in this user manual Warranty does not apply to power supplies of devices the device with mechanical electrical and or other damages and defects caused by violation of the transportation storage and operation requirements the device with traces of repair performed not by the manufacturer s service center the device with traces of oxidation or other signs of liquids leaking ...

Page 34: ...Vega SH 2 User Manual 34 Revision 02 05 April 2019 vega absolute ru User Manual Vega Absolute LLC 2018 ...

Reviews: