background image

FX80 / FX81 PON Optical Power Meters User Manual  

 Page 

10

 of 

50


5.1.1 Battery Replacement 

Battery replacement in the field is not authorized or permitted. The unit must be returned to an 

authorized VeEX service center or sales partner for repair. 
 

5.2 

Configuring Device Settings 

Before saving measurement results for the first time, set the device date and time.  

To configure settings:


1.  Power ON the FX80/FX81 by pressing and holding the 

|Power| 

button for 3 

seconds. 

2.  Press 

|Shift/Enter|+|Down| 

to enter the 

Settings 

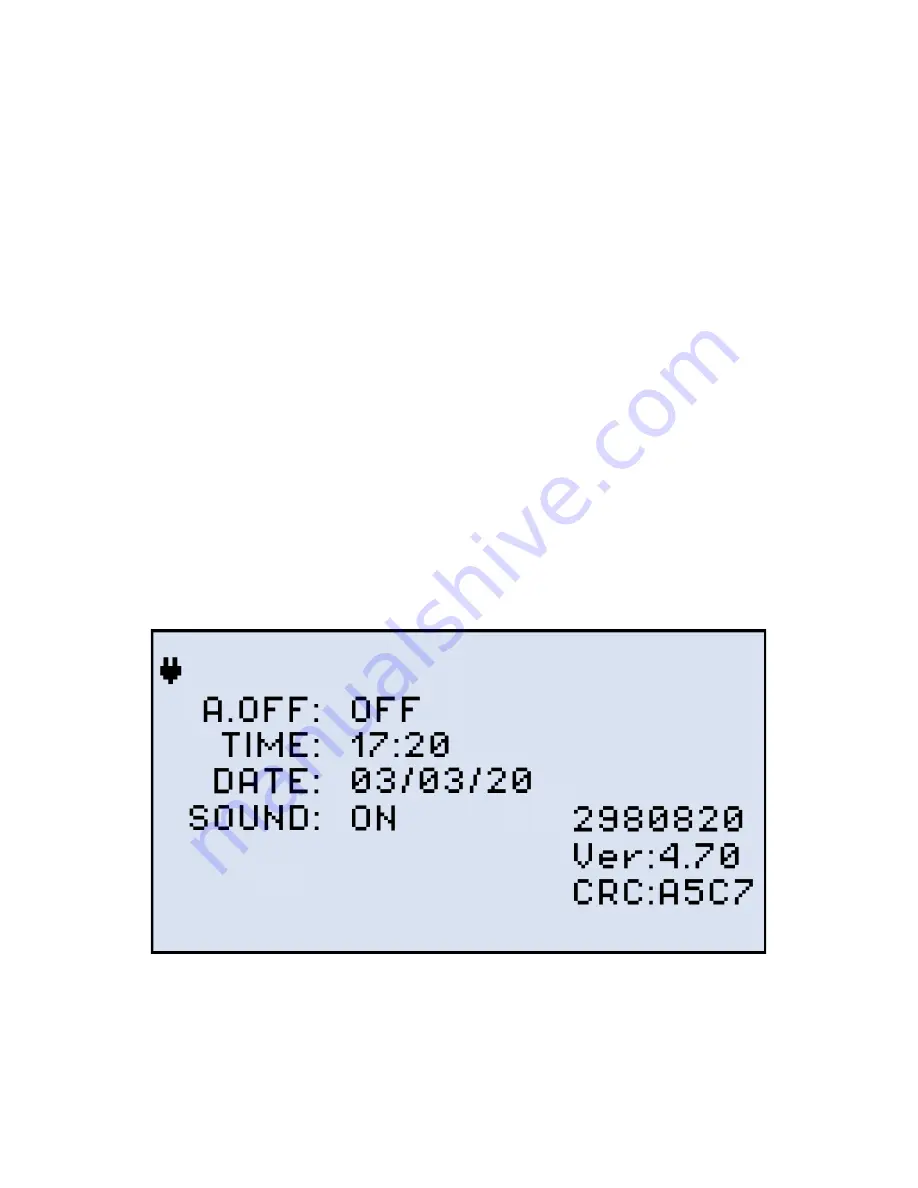
mode - the following parameters 

can be set: 


Auto Shutdown mode

: after the preset time of inactivity the device shuts down. 

The options are 45 min, 30 min, 15 min, and OFF (never). 


Time

: current time. 


Date

: current date.  


Sound

: if ON, pressing the keyboard buttons produces a sound. 

The test parameter selected will flash and is then available to edit. 


FX80/FX81 Instrument Setting screen 

3.  Press 

|Up| 

and 

|Down| 

to select the parameter to edit. 

4.  Press 

|MODE| 

to select the field to edit, then change the value, if necessary, by 

pressing 

|Up| 

and 

|Down|

Summary of Contents for FX80

Page 1: ...thout prior agreement and written consent of VeEX Incorporated as governed by International copyright laws Information contained in this manual is provided as is and is subject to change without notic...

Page 2: ...reating a Pass Fail Threshold Profile for Measurements 16 6 2 2 3 Thresholds Adhering to the Current 1G 10G PON Standards 17 6 2 3 Performing Optical Power Measurements in PON 21 6 3 Broadband Power M...

Page 3: ...of their respective companies No part of this document may be reproduced or transmitted electronically or otherwise without written permission from VeEX Inc This manual describes software and or a de...

Page 4: ...ort ProductRegistration 1 3 Patent Information VeEX product hardware and software may be protected by one or more patents on file with the United States Patent Office 1 4 Documentation Conventions Ico...

Page 5: ...urces are inactive before connecting fiber to the test set to avoid skin or eye damage or damage to the unit It is recommended to Deactivate the laser before connecting or disconnecting optical cables...

Page 6: ...eam and 1310 nm upstream PON optical power levels FX80 and FX81 XG S PON and 10G EPON channels 1270 nm upstream and 1577 downstream PON optical power levels FX81 only The measurement results can be tr...

Page 7: ...ent mode of operation will be displayed MODE Select the mode of operation PON Burst PON CW Read optional PM1 2 optional VFL default is PON Burst PON For more information about FX80 FX81 modes see Sect...

Page 8: ...els for XGS PON 10G EPON OPM optional Measures optical power in absolute and relative mode and to save the measurement results VFL optional Use the 650 nm visual fault locator to visually locate break...

Page 9: ...erating on battery the Battery icon appears It is recommended to charge the battery at room temperature to preserve its life and to obtain maximum charge To charge the test unit connect the AC DC adap...

Page 10: ...g and holding the Power button for 3 seconds 2 Press Shift Enter Down to enter the Settings mode the following parameters can be set Auto Shutdown mode after the preset time of inactivity the device s...

Page 11: ...ld the red Power button for at least 15 seconds After the FX80 FX81 reboots reset the date and time see Section 5 2 Configuring Device Settings During reset the threshold and reference values will be...

Page 12: ...oss of Co Existence CEx elements using a companion light source PM PM1 or PM2 OPM test mode to measure any optical signal level The signal can be CW or modulated with 270 330 1000 or 2000 Hz The Wave...

Page 13: ...accurate values To set the ZERO level 1 Press the MODE button to enter the required measurement mode PON Burst PON or PON CW 2 Press F2 ZERO The ZERO notification will display briefly on screen Settin...

Page 14: ...ower reading for that wavelength a PASS reading will be displayed 6 2 2 1 Creating User Defined P F Thresholds To create P F thresholds 1 Press the MODE button to enter the required PON measurement mo...

Page 15: ...ss Fail thresholds FX81 3 Press the Up and Down arrow button to select the wavelength 4 Press Shift Enter to set the threshold The corresponding value starts flashing 5 Set the necessary value pressin...

Page 16: ...ss Fail Threshold Profile for Measurements One profile with threshold values can be created and saved in memory for future recall To save the current set of thresholds as a profile 1 In the P F mode e...

Page 17: ...hen performing measurements onsite ITU T G 984 2 Standard Pass Fail Thresholds 1 244 Gbps DS direction 1490nm OLT Launch Power 1490 ONT ONU Receive Power ODN Class Class A Class B Class C Class A Clas...

Page 18: ...ction 1310nm ONT ONU Launch Power 1310 OLT Receive Power ODN Class Class A Class B Class C Class A Class B Class C Min Avg Power dBm 3 2 2 24 28 29 Max Avg Power dBm 2 3 7 3 7 8 622 Mbps DS direction...

Page 19: ...T G 987 2 Standard Pass Fail Thresholds 10G asymmetric 9 95328 Gbps DS direction 1577nm OLT Launch Power 1577nm ONT ONU Receive Power ODN Class Class N1 Class N2 Class E1 Class E2 Class N1 Class N2 Cl...

Page 20: ...270nm OLT Receive Power ODN Class Class N1 Class N2 Class E1 Class N1 Class N2 Class E1 Min Avg Power dBm 4 0 4 0 4 0 26 0 28 0 30 0 Max Avg Power dBm 9 0 9 0 9 0 5 0 7 0 9 0 9 95328 Gbps DS direction...

Page 21: ...N 1 Select the necessary mode PON Burst or PON for FX81 for active networks or PON CW for networks without signals by pressing the MODE button See Section 6 1 Modes for Optical Power Measurements for...

Page 22: ...raffic RVO If no signal s are detected begin troubleshooting and make sure the proper test port is connected 4 Once a valid 1490 nm and or corresponding 1577 nm XGS PON 10G EPON signal level is confir...

Page 23: ...r Manual Page 23 of 50 PON Burst mode measurement results as values FX81 If P F thresholds have been set the measurement results are presented as Pass or Fail see the example below PON Burst mode meas...

Page 24: ...s User Manual Page 24 of 50 PON Burst mode measurement results as P F thresholds FX81 To switch back to actual values for the same measurement press the F1 P F button Switching from thresholds to valu...

Page 25: ...senting numeric values for the same measurement 6 3 Broadband Power Measurements Optional for FX80 FX81 4 Wavelength Version The Broadband OPM features an InGaAs detector with a wavelength range from...

Page 26: ...wavelength press the F1 WAVE button The resulting calibrated wavelength list is then shown below Selecting a wavelength for PM measurement Select a wavelength by pressing the Up and Down buttons then...

Page 27: ...under test to FX 8x OLS OLTS TLS TLTS Using FX86 Check if the wavelength selected is transmitted through the correct port Press PORTS F3 select the port corresponding to the wavelength to transmit usi...

Page 28: ...ION button Selecting a reference option for PM measurement REF SET function sets the current power value as the reference level Select REF SET with the cursor and press the Shift Enter button The valu...

Page 29: ...level in small increments Press the Up and Down buttons to change the reference level by 0 01 To set the adjusted level as reference press Shift Enter To exit without setting press F3 EXIT Broadband m...

Page 30: ...al Page 30 of 50 Starting VFL mode 3 Press the F1 ON button to begin the test Starting VFL testing continuous light 4 To modulate the light 1 or 2 Hz press F2 1Hz or F3 2Hz respectively The pressed bu...

Page 31: ...FX80 FX81 PON Optical Power Meters User Manual Page 31 of 50 VFL testing modulated light 5 To switch from the VFL mode to another mode press the MODE button...

Page 32: ...essing F1 and F2 Viewing Measurement Results Read mode The FX80 can be optionally equipped with Bluetooth If so the Bluetooth sign appears in the top right corner in the Read mode 7 1 Editing Notes to...

Page 33: ...the top line The comment can include up to 10 symbols in total with 7 symbols reserved for the comment text and 3 numbers for the comment number 5 Press CLEAR to reset the index position to 000 when...

Page 34: ...izer Tab Fiberizer LTSync VeEX Customer Portal Software Releases Webpage 3 For detailed operating instructions please refer to the corresponding manuals More information on Fiberizer Cloud and LTSync...

Page 35: ...SB driver 1 Connect the VeEX power meter to the PC using a USB A to micro USB cable 2 Launch Windows Device Manager and check for FX8x in the Other devices list FX8x will be flagged with exclamation m...

Page 36: ...elect Browse my computer for driver software define the path where the downloaded driver is to be saved and then click Next The driver installation begins A new window appears when the driver has been...

Page 37: ...ement results via the micro USB cable install the USB driver see Section 8 1 Installing the FX 8x USB Driver For Bluetooth transfer no driver is needed 8 2 1 Transfer Results Using Micro USB Cable To...

Page 38: ...e measurement results onscreen click the Download button Results will appear in a table as shown in the figure below Use the scroll bar to view all results For more information on using LTSync see the...

Page 39: ...certain period go to the Hardware tab and select the Load results for period checkbox This brings see the Figure below Filtering measurement results by time Todelete a row of results select its check...

Page 40: ...For instructions on pairing the unit via Bluetooth see the FX8x Test Results Transfer LTSync Quick Guide available from the FX80 81 product page on the website at www veexinc com To transfer results v...

Page 41: ...l devices connected to the PC via Bluetooth select the desired device in the drop down list After the FX80 FX81 and PC are connected the Bluetooth sign inverts its colors see below FX80 and PC connect...

Page 42: ...in the LTSync program To do this go to the Cloud storage tab and click the Log in to Fiberizer Cloud button then enter credentials in the resulting form LTSync Fiberizer Cloud Login Profile Fiberizer...

Page 43: ...d device for example FX8x 2822319 and uploads measurement results into this folder Fiberizer Cloud Upload button highlighted in orange with previous successful upload The status bar at the bottom left...

Page 44: ...s version Use Fiberizer Desktop Plus software to upload measurement files from oxlts sor etc formats and perform advanced post processing results managing and merging results generate pdfs excel files...

Page 45: ...CSV Report Generation PDF Report Generated 9 2 Downloading Measurement Results to Fiberizer Mobile OLTS FMOLTS for Android The Fiberizer Mobile OLTS Android app is available on Google Play and the Ve...

Page 46: ...test results from FX 4x and FX 8x series OPMs via Bluetooth or USB connection using VeEX compatible OTG cable The screenshots below show the procedure to transfer results from FX80 FX81 to the Androi...

Page 47: ...FX80 FX81 PON Optical Power Meters User Manual Page 47 of 50 Bluetooth device connection menu Bluetooth device pairing selection in app...

Page 48: ...FX80 FX81 PON Optical Power Meters User Manual Page 48 of 50 Test result shown on the main screen Downloaded FX81 results For more information see the FMOLTS User Manual...

Page 49: ...ory 9 of the WEEE 2002 96 EC Directive RoHS and WEEE Position Statement The Council of the European Union and the European Parliament adopted Directive 2002 95 EC January 27 2003 to Reduce the use of...

Page 50: ...ss all stages of network deployment maintenance field service turn up and integrate service verification features across copper fiber optics CATV DOCSIS mobile 4G 5G backhaul and fronthaul next genera...

Reviews: