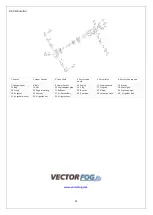
background image

11 


04. Carburettor 


1. Venturi 

2. Upper Gasket 

3. Cone shaft 

4. Petrol valve 
board 

5. Petrol valve 

6. Petrol valve support 

7. Spring washer 

8. Bolt 

9. Lower Gasket 

10. Engine 

11. Ejection nozzle 

12. Nozzle 

13. Ring 

14. Nut 

15. Engine upper pipe 

16. Plug 

17. Plug cap 

18. Metal grip 

19. O-ring 

20. Engine rear peg 

21. Reducer 

22. Run tee 

23. Elbow 

24. Explosion pipe 

25. Air gasket 

26. Washer 

27. Air Gasket Bolt 

28. Air elbow 

29. Extension hose 

30.  Air gasket bolt 

31. Air gasket washer 

32. Air gasket nut 

33. Air gasket nut 


www.vectorfog.com


Summary of Contents for VECTORFOG H400

Page 1: ...isk of fire CAUTION MARKS Please read this manual before using the equipment You must wear protective equipment face breathing mask protective clothing gloves etc when handling potentially hazardous c...

Page 2: ...Fuel Petrol Fuel Consumption 1 8 Litres Per Hour Start Automatic Fuel Tank Capacity 3 8 Litres Performance 23kW 30 08 hp Weight net 36 Kg Dimensions 162 x 110 x 58 cm Additional Features Tool Kit Clea...

Page 3: ...r are all housed inside of the main body of the machine Operating at its optimum performance combustion and injection is repeated with a frequency of around 200 250 cycles per second Once the machine...

Page 4: ...power supply is being used 110 220 volts Connect the charger to the unit and then connect to the mains When first purchased the machine requires around 8 to 10 hours to fully charge Fill the fuel tan...

Page 5: ...ank cap tightly To turn on the machine Press the power button START and keep it pressed for 8 to 10 seconds once you hear combustion starting sounds like small explosions After the engine starts leave...

Page 6: ...the Chemical Supply Valve clockwise to stop the supply of chemical to the resonator Before turning the Close Valve off keep it running for 5 10 seconds to get rid off any chemical mixture still in th...

Page 7: ...spark plug using a spanner or spark plug remover Remove any carbon deposits between the electrode and the earth section with a wire brush Make sure that there is a space of 3 5 mm between the electrod...

Page 8: ...embled The distance between the petal valve and the valve plate o should be approximately 1 mm COMMON TROUBLESHOOTING If there is no ignition If there is noise coming from the engine but there is no i...

Page 9: ...sure the seal in the petrol cap is not damaged Make sure the cap is firmly closed to prevent leakage Unscrew the fuel injector and examine that the injector hole is not blocked If blocked clean with...

Page 10: ...ng compressed air to remove any blockages Check there is no leaks in the chemical tank Blow compressed air backwards though the chemical tube from the inlet nozzle to see if any bubbles appear Replace...

Page 11: ...0 Engine 11 Ejection nozzle 12 Nozzle 13 Ring 14 Nut 15 Engine upper pipe 16 Plug 17 Plug cap 18 Metal grip 19 O ring 20 Engine rear peg 21 Reducer 22 Run tee 23 Elbow 24 Explosion pipe 25 Air gasket...

Reviews: