background image

19

AW DX

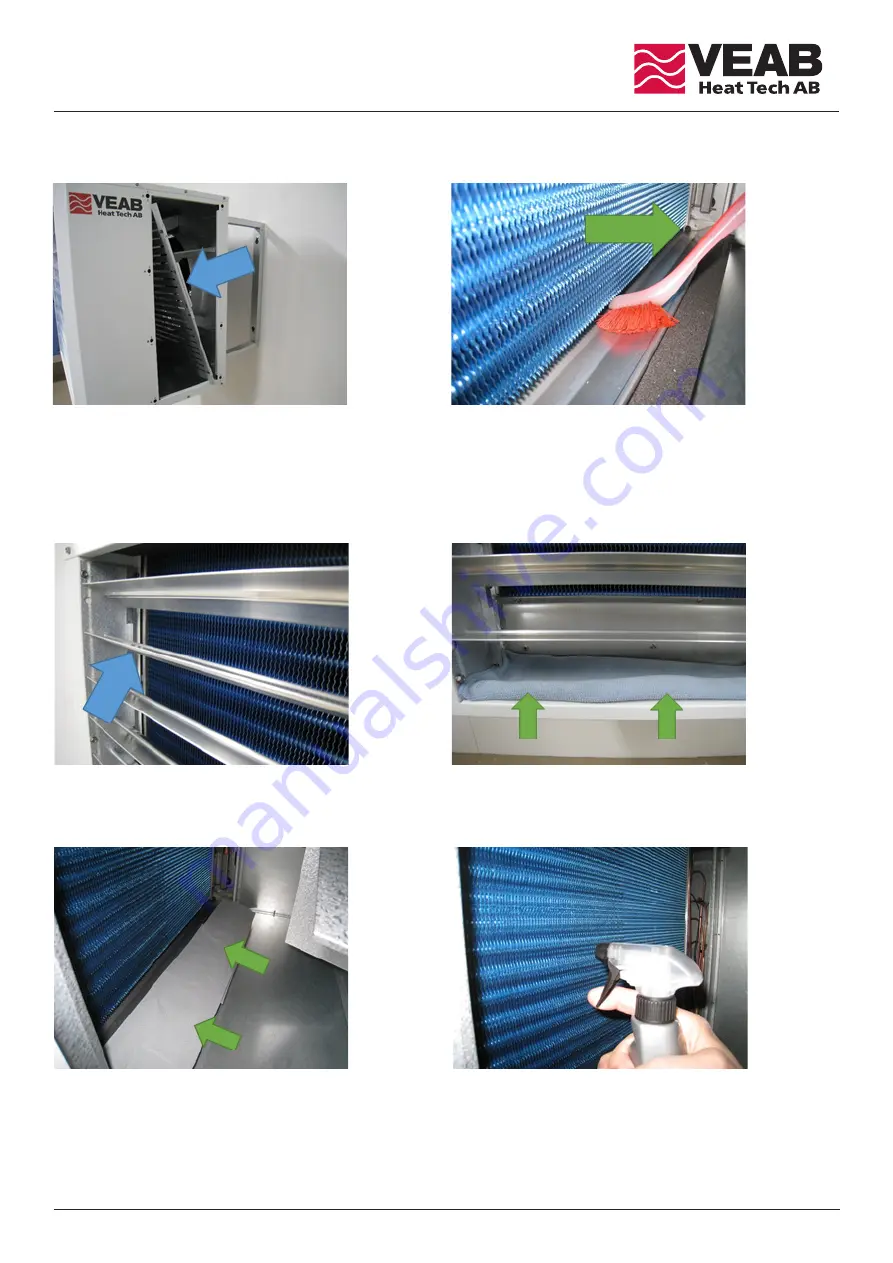
Fig. 22

Fig. 23

Fig. 24

Fig. 25

6. If the air conditioner is cleaned with cleaning spray, first remove the air deflector or turn the air deflector blade all the 

  way up, see Fig. 22.

7. Place liquid-absorbing paper or the like on the bottom plate, which absorbs the cleaning spray and rinsing liquid, see Fig. 23.
8. Proceed accordingly on the inside, see Fig. 24.

9. Apply cleaning spray to the entire coil, see Fig. 25. Follow the instructions on the spray bottle.

  Protect the fan motor from cleaning spray and spray fluid.
10. After cleaning, reinstall the air distribution plate and cleaning flap.

      Make sure that the air distribution plate is correctly installed and held in the correct position by the springs.

Fig. 20

Fig. 21

5. Clean the fan grille, fan motor, fan motor air vents, and coil  with a soft brush and a vacuum cleaner.

  Then clean the drain plate (Fig. 21). Make sure that the condensate drain (green arrow) is free from contamination.

4. Hold the air distribution plate at an angle and take it out, see Fig. 20. 

    Make sure that the coil element is not damaged!

Summary of Contents for AW DX

Page 1: ...installation connection and putting the product into use Save the manual for future use 14 DE Handbuch AW DX f r Inneneinheit WICHTIG Lesen Sie die Betriebsanleitung bevor Sie das Ger t montieren ans...

Page 2: ...lume of the AW DX coil meets the recommendations of the outdoor unit manufacturer for best and safe operation It is also possible to connect several indoor units to one outdoor unit In doing so it is...

Page 3: ...crewdriver to loosen the four screws securing the transport lock see Fig 4 Remove the transport lock and then reinstall the screws Pull off the entire protective film from the white painted sheets CON...

Page 4: ...alled outside the internal element frame see Fig 8 Use contact paste and straps with metal locking insulate with insulating tape 5 Attach the supplied straps in the hole on the inside of the wall brac...

Page 5: ...oor unit is positioned low at least 850 mm above the floor or if the air is to be directed upwards Loosen the eight screws with a 1 4 hexagon head and turn the air deflector see Fig 14 10 The indoor u...

Page 6: ...nance company or a qualified person Attention The air distribution plate on the indoor unit must always be installed otherwise the heat capacity drops significantly Even with comfort cooling the capac...

Page 7: ...nstructions on the spray bottle Protect the fan motor from cleaning spray and spray fluid 10 After cleaning reinstall the air distribution plate and cleaning flap Make sure that the air distribution p...

Page 8: ...40 40 Kylm aine R410A R410A Kotelointiluokka IP44 IP44 Paino kg 48 63 1 Mitattu 5 metrin et isyydelt AW n edest Ilma C Kondensoitumisl mp tila C AW DX22 n l mm ntuotto kW AW DX42 n l mm ntuotto kW 15...

Page 9: ...ient temperature C 40 40 Refrigerant R410A R410A Protection class IP44 IP44 Weight kg 48 63 1 Measured 5 metres in front of AW unit Air in C Condensation temp C AW DX22 heating output kW AW DX42 heati...

Page 10: ...ax Umgebungstemperatur C 40 40 K ltemittel R410A R410A Schutzart IP44 IP44 Gewicht kg 48 63 1 5 Meter vor dem AW gemessen Luft in C Kondensierungstemperatur C AW DX22 W rmeleistung kW AW DX42 W rmelei...

Page 11: ...138 3166 VAT no SE556138316601 Postal Cheque Service 48 51 08 5 Bank Transfer Service 926 0365 Fax Int 46 451 410 80 E mail veab veab com Phone Int 46 451 485 00 Website www veab com NB We reserve us...

Reviews: