background image


8

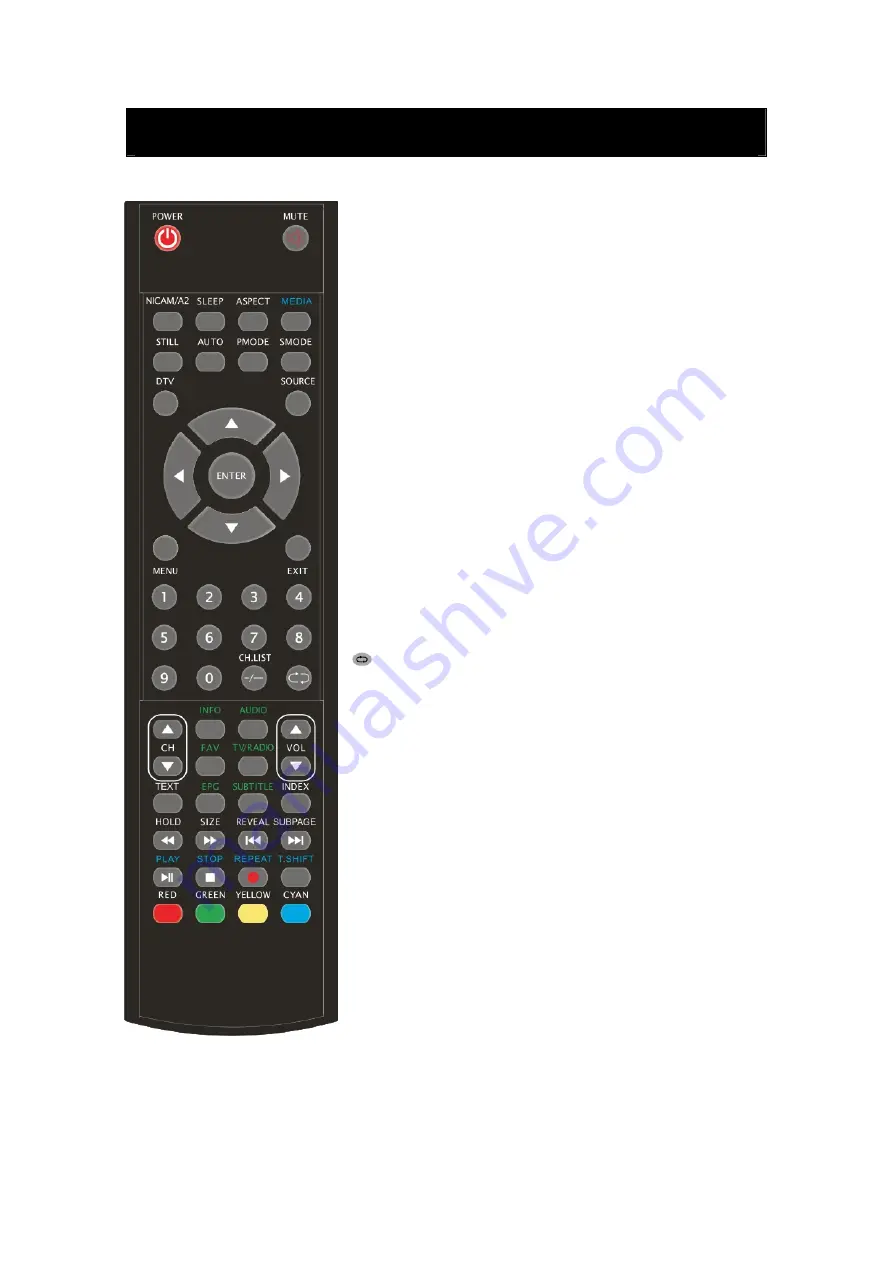
Remote control 


POWER: 

Power on/off button, press once to turn the TV on and 

press again to turn the TV off. 

MUTE:

 Press this button to mute or restore sound. 

NICAM/A2:

 In the TV 

mode,

 press this key to select the 

sound 

effects. 

SLEEP: 

Set the sleep timer. 

ASPECT:

 Press to 

adjust picture ratio. 

MEDIA: 

Press to select the MEDIA signal source.


STILL:


Press this button to hold the picture.


AUTO:

 Adjust the picture automatically in pc mode. 

PMODE:

 Select picture mode. 

SMODE:

 Select sound mode. 

DTV: 

Press to 

switch to DTV (Digital TV) mode 

SOURCE:

 Press to change signal source. 

MENU: 

Press this button to enter the main menu. 

EXIT:

 Exit the OSD (On-screen display). 

ENTER: 

Enter the selected option or perform the selected 

operation.


0-9

: Select and switch to a channel using 0 - 9.


-/--

CH.LIST

Display the “Channel List” menu. 


:

 Switch back and front between the current and previous 

channels. 

CH+/CH-: 

Change the channel. 

VOL+/VOL-:

 Adjust the volume. 

INFO: 

Display some information of current program in DTV 

mode 

and ATV mode

.  

(

Used for models with DTV,

ATV 

function only

)


AUDIO:

 Press to select the DTV audio.


(

Used for models with DTV function only

FAV: 

Switch between custom set " Favourite List"   

(

Used for models with DTV function only

TV/RADIO: 

Switch between 

DTV

 program and radio program 

(Only audio but not image). 
(

Used for models with DTV function only

EPG:

 Enter electronic program guide. 

(

Used for models with DTV function only

SUBTITLE:

 Open or close subtitle.   

(

Used for models with DTV function only


Summary of Contents for TQT026AVDT.001

Page 1: ...USER S MANUAL LCD TV SET TQT026AVDT 001...

Page 2: ...1 Contents z Introduction z Warning z Caution z Main Unit Description z Remote Control z OSD basic adjustment z DTV Features z USB Features z PVR Opration z Specifications z Trouble Shooting...

Page 3: ...ble viewing Allow enough space between the receiver and the wall to permit ventilation Avoid excessively warm locations to prevent possible damage to the cabinet or premature YPBPR failure This TV can...

Page 4: ...personnel This symbol is intended to alert the user to the presence of important operation and maintenance instructions in the literature accompanying the equipment CAUTION TO AVOID THE RISK OF ELECTR...

Page 5: ...evision cabinet slots or openings Never spill any kind of liquid on the television receiver Caution Avoid exposing the main unit to direct sunlight and other sources of heat Do not stand the televisio...

Page 6: ...n individual and damage to the television may result if it should fall Caution When the product is not used for an extended period of time it is advisable to disconnect the AC power cord from the AC o...

Page 7: ...input terminal 6 YPBPR input terminal 7 Video input terminal 8 AUDIO input terminal 9 ATV antenna close circuit TV network port or DTV antenna port Power Input Configuration AC POWER VOL Volume up VOL...

Page 8: ...Mobile HD works well you should use other power supply for the Mobile HD And do not use the USB jack in the same time It supports Mobile HD by connecting with USB jack must more than 2GB The partitio...

Page 9: ...n screen display ENTER Enter the selected option or perform the selected operation 0 9 Select and switch to a channel using 0 9 CH LIST Display the Channel List menu Switch back and front between the...

Page 10: ...t page Press again to hide the information Used for European region only Skip to previous chapter Used for models with MEDIA DTV function only SUBPAGE Carry out the function of SUBCODE in the text whi...

Page 11: ...CTURE You can select the type of picture which best corresponds to your viewing 1 Press the MENU button to enter the OSD menu Then press e f button to select the PICTURE menu Enter the PICTURE menu by...

Page 12: ...e f button to select open or close the noise reduction function SOUND You can select the type of sound which best corresponds to your listening 1 Press the MENU button to enter the OSD menu Then press...

Page 13: ...f button to select sleep time 6 Press c d button to select Auto Sleep and press the e f button to select the function On or Off 7 Press c d button to select Time Zone and press the e f button to selec...

Page 14: ...annel and press the e f button to select On or Off Setting to On enables Program Blocking 3 Press c d button to select Change Password and press the f button or ENTER button to enter to change passwor...

Page 15: ...he program 5 Press c d button to select Programme Edit and press the f button or ENTER button to enter a DELETE Press c d button to select the program and press RED button twice to delete the program...

Page 16: ...s e f button to select the CHANNEL menu Enter the CHANNEL menu by pressing d button or ENTER button 2 Press c d button to select Auto Scan and press the f button or ENTER button to do auto search Pres...

Page 17: ...16 6 Press c d button to select PVR File System and press the f button or ENTER button to enter...

Page 18: ...m Information When the source is selected as DTV you can press INFO button to display the channel s information The PROGRAM INFORMATION window is illustrated as follows Audio When the source is select...

Page 19: ...displayed on the top of the screen When you have selected a program you can press INFO button to display the program s detail Press YELLOW button to select the data and press the e f button to change...

Page 20: ...he file of Memory to play the corresponding document and then press ENTER button to play 4 Press the e f button to play the MOVIE option and prsee ENTER button to confirm You should prsee the c d butt...

Page 21: ...o select Select Disk and press the f button or ENTER button to choice disk b Press c d button to select Check PVR File System and press the f button or ENTER button to check PVR file system c Press c...

Page 22: ...1 The U disk will be formatted when in burning please do not store important files in the U disk 2 When you play recording files press T SHIFT button to paused 3 Press button for the first time to st...

Page 23: ...59 94 60 576i 720 x 576i 15 63 50 480p 720 x480p 31 47 59 94 60 576p 720 x 576p 31 26 50 720p 1280 x 720p 37 50 44 96 50 59 94 60 1080i 1920 x 1080i 28 13 33 75 50 59 94 60 1080p 1920 x 1080p 56 25 67...

Page 24: ...remote then press the button repeatedly to select the TV source Poor picture sound OK Check the cable between TV and antenna external AV device Try another channel the station may have broadcast diff...

Page 25: ...iances must be collected separately in order to optimize the recovery and recycling of the materials they contain and reduce the impact on human health and the environment The crossed out wheeled bin...

Page 26: ...After sale Service In case any problem mostly like a fault occurs while your using LCD TV please contact the store where you purchased this unit or the service agency...

Reviews: