

Connect Audio and Video
The audio and video connectors allow the H.264 video appliance to receive audio and/or video from
your input source, for example a video camera or a DVD player. (If you have a rack mount shelf, be sure
to install any encoder blades before performing this step. See "Step 6. Installing Blade Encoders.")
1.
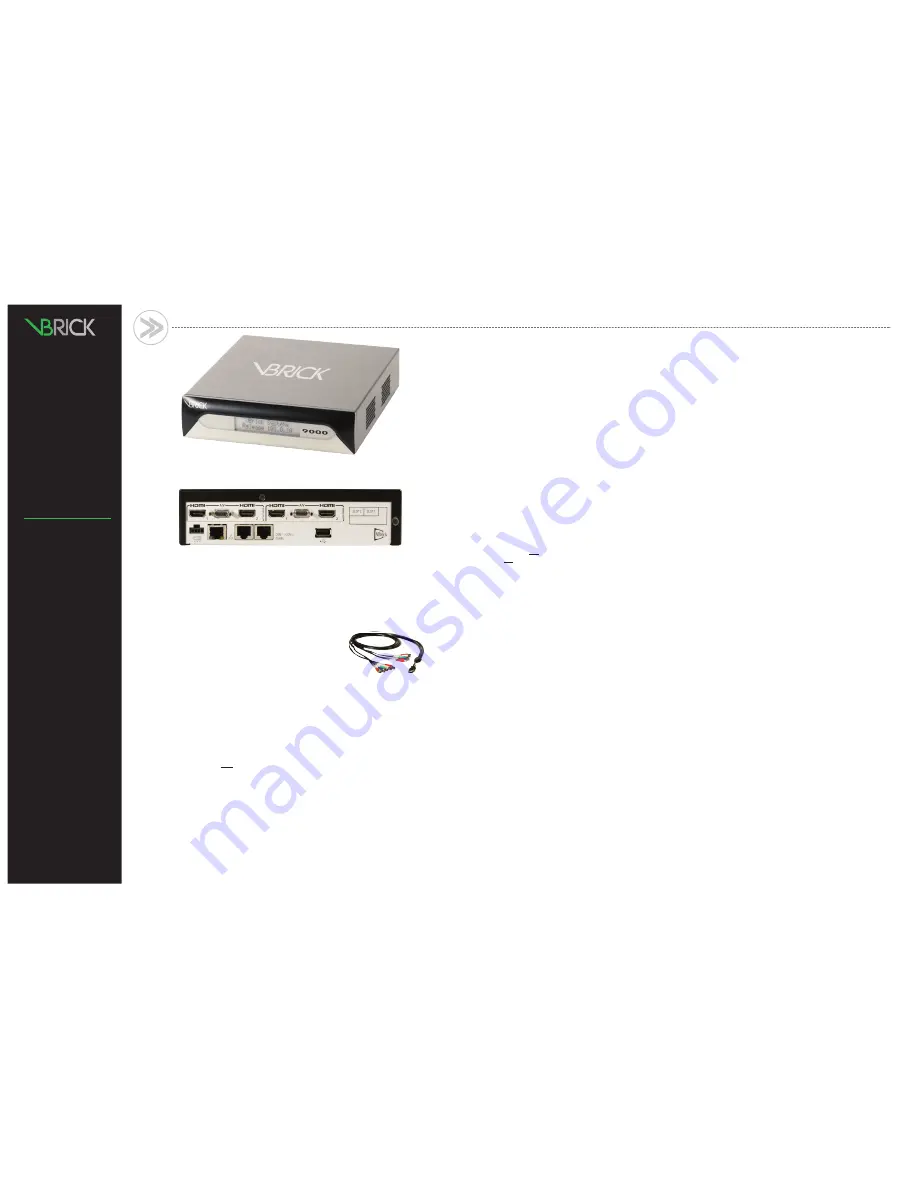
Connect the video.
On the back panel, connect one end of the
VBrick-provided "breakout" cable to the Micro-D15
A/V
connector
in Slot 1. Note that Slot 1 is on the right.
2.
Using the labeled component connectors on the other end of the
cable, connect the three "channel 1" component video cables (YPb-
Pr) to the three source video connectors on your video
camera or DVD player.
Note:
There are two channels on each breakout cable for a maximum of four video channels
in an appliance with two slots. In this Quick Start demo we only need to connect one set of (three)
component connectors.
3.
Connect the audio.
Connect the "channel 1" (left and right) audio cables on the breakout cable
to the source audio connectors.
Note:
The previous steps explain how to setup a 9000 Series encoder or a blade using "component"
connections. If you will be using the VBrick-provided HDMI cable, you will need to change the
"How is Video Connected" parameter in the VBAdmin management application (go to Video/Audio
Configuration > Video) after connecting to the network.
Connect to the IP Network
Use the provided Ethernet cable to connect the appliance to your IP network.
1.
Plug one end of the Ethernet cable into the Ethernet port (to the left of the COM port)
on the H.264 appliance.
2.
Plug the other end of the Ethernet cable into a network port or switch.
Power-on the Appliance
Attach the provided power cable to the appliance or rack mount
shelf (which has two cables) and to appropriate AC power
source(s) as explained below. When powered-on, the appliances
will automatically run a power-on self-test sequence.
1.
For standalone appliances, insert the power connector that
comes with the appliance into the 24 VDC power receptacle
in the lower left corner of the back panel.
2.
For a rack mount shelf, insert the two power connectors into
the dual power supplies on the back panel.
3.
Connect the other power connector end(s) to a conventional
110/220 VAC power source.
4.
Wait until the appliance or blade completes the boot
sequence before continuing.
This may take up to 60 seconds
and the unit will self-test while displaying status messages on
the optional LCD display on the front panel.
5.
The appliance will then search for a DHCP server and display
the IP address on the LCD panel (if present). If this process
completes successfully, note the IP address and go to Step 5.
6.
If you do not have an LCD display, and/or your network is
not DHCP-enabled, you will need to connect an ASCII terminal
to the serial port to find or set the IP address as explained
in Step 4.
Find or Set the IP Address
All VBrick appliances are configured by default with DHCP
enabled. This means that when you power on the appliance,
if a DHCP server is present on your network, the VBrick will
automatically get its IP Address and Subnet mask from the DHCP
server. If the appliance cannot find a DHCP server, you will
need to set a static IP address manually using the serial (
COm1
)
port. Similarly, if your network requires a Gateway IP Address,
and this is not provided by the DHCP server, you will also need
to enter this address manually.
Find or Set Ip Address Using the Serial port
1.
Connect an ASCII terminal from the RJ-45 serial port (
COm1
)
on the appliance to the COM port of the computer or terminal
device (usually COM1), using the provided serial cable.
2.
From the Windows Start menu, go to: Start > All Programs >
Accessories > Communications > HyperTerminal and press
Enter to display the login prompt. Configure the Port Settings
for 9600 baud, 8 Data bits, no Parity, 1 Stop bit (8N1).
3.
Login to the appliance using "
admin
" (case-sensitive) for both
User Name and Password.
4.
When the Command Line Interface is displayed, type "
nt
"
to display the Ethernet Network Options. This will let you set IP
Address, Subnet Mask, and other options.
5.
When done, type "
apply
" and press Enter to save your changes.
Q U I C K S T A R T G U I D E
1
2
4
3
5
Verify Streaming Video and Audio
The last step is to verify the appliance is running properly and
streaming audio and video. Assuming you connected a video
source as explained in Step 1, you can use the VBAdmin manage-
ment application or VBrick StreamPlayer to verify that video is
streaming from the appliance.
Verify Operation with VBAdmin
(Windows or macintosh)
You can verify operation on Windows or Macintosh desktops
by playing the stream directly from the appliance using the
VBAdmin management application. This method requires the
Apple QuickTime plugin.
1.
Open a browser and launch VBAdmin with the appliance
IP Address from Step 3 or Step 4 in the following format:
http://<appliance_ip_address>
Then login with "
admin
" and "
admin
"
Note:
These steps assume that the video source you connected
in Step 1 is streaming at 1080i/60. If not streaming at 1080i/60,
go to the Video/Audio Configuration > Video page in VBAdmin
and set the "Video Format" to match your video source.
2.
Navigate to the Program Configuration > Servers and click
the Edit button. Then click on the link labeled "
Click Here
to Play Stream
."
3.
This will launch the stream using the QuickTime plugin.
QuickTime 7.0 or higher is required
. If QuickTime is not
installed, you will be prompted to download it from Apple.
Note:
If you have streaming problems with Quicktime 7.0, go to
Edit > Preferences > QuickTime Preferences > Advanced > Video >
DirectX and uncheck "Enable Direct3D video acceleration".
Verify Operation with Streamplayer
(Windows only)
You can verify operation on Windows desktops by playing the
stream directly from the appliance with StreamPlayer 5.3. VBrick's
StreamPlayer application lets you receive and play streaming video
originating from the appliance on a PC. You can install StreamPlay-
er 5.3 from the StreamPlayer Product CD (if purchased) or you can
download and install the 30-day demo version available from our
website. Once StreamPlayer is installed:
1.
Launch the StreamPlayer application. Go to Start > All Programs >
VBrick > StreamPlayer.
2.
In the IP Address field (near bottom of player) type the following
text and press Enter:
vbrtsp://<appliance_ip_address>/vbstream1s1
(type vbstream1s2...1s3...1s4 to test other channels)
3.
This will launch the stream in the Windows Media Player. If you
hear audio and see video, you are successfully streaming from
the VBrick appliance to your local PC.
This Quick Start Guide
explains how to quickly
verify that you can stream
audio and video from the
encoder to your desktop–
over your local area net-
work. Just follow the steps,
in order, and you will be
able to play a stream from
a video camera or DVD
player (on your Windows
or Macintosh desktop) us-
ing Windows Media Player
or QuickTime.
The following technical
publications explain how
to set up, configure, and
operate your 9000 Series
appliance. They are avail-
able on the 9000 Series
Product CD or can be
accessed from the Help
link in the VBAdmin man-
agement program. Note
that all VBrick documenta-
tion is posted on the web.
For detailed information
about other compatible
products in the VBrick eco-
system, go to
www.vbrick.
com/documentation
•
h.264 Getting Started
(4410-0315-000x)
•
h.264 Admin Guide
(4410-0314-000x)
•
h.264 Release notes
(4410-0316-000x)
V B R I C K 9 0 0 0 S E R I E S h . 2 6 4 E n C O D E R ( F R O n T V I E W )
V B R I C K 9 0 0 0 S E R I E S h . 2 6 4 E n C O D E R ( R E A R V I E W )
S T E p S C O n T I n U E O n B A C K p A G E
▶▶


