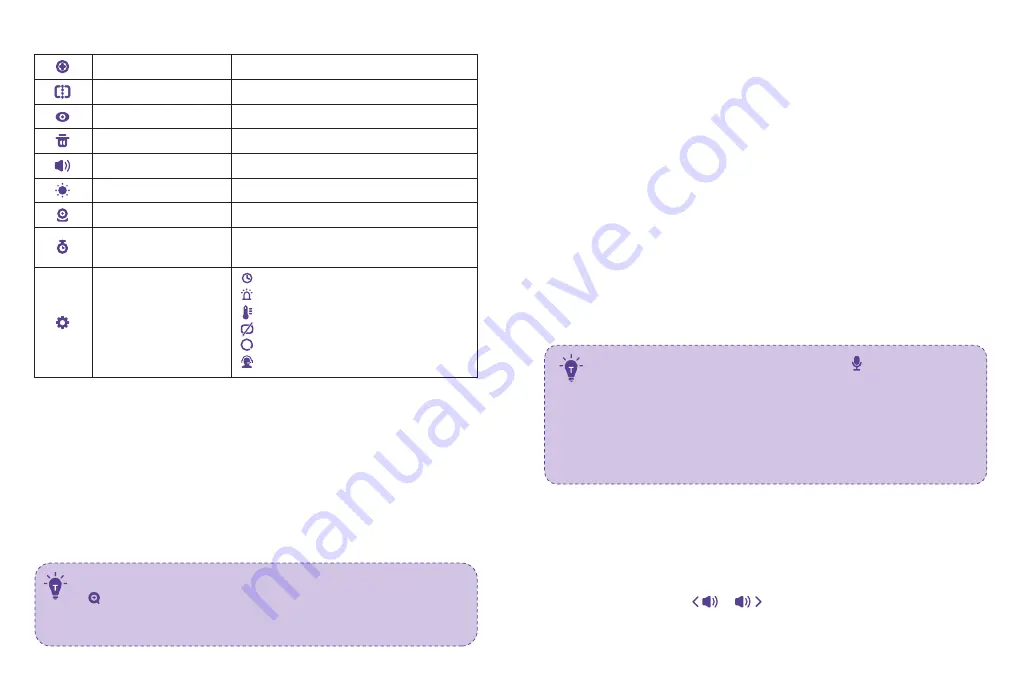
background image

0 9

10

Bot t om Menu Brief

Add Camera

Split Sc reen 

View Camera 

Delete Camera

Speaker Volume

Brightness 

Camera  

Max. 4 c ameras 

Select the cameras for split screen display

Selec t to view eac h at a time 

Selec t to delete c ameras

0 - 7 levels (mute when it’s 0 )

1- 8 levels 

To add /  view /  delete c ameras

OFF /  2Hr /  4Hr / 6Hr /  Set Time
 (ho ur /  minute /  AM, PM)

Settings

Time  
System so und vo lume  
Temperature sc ale  
Auto - sleep time  
Resto re to  fac to ry setting  
Custo mer servic e c o ntac ts

Alarm 

1 . Digit al Zoom & Circulat ing

1) Under split sc reen mo de, press Left /  Right Butto n - > OK Butto n to  selec t 

the c amera (Camera 1 o r 2) yo u want to  view o r zo o m in.

2) Press Zo o m Butto n to  zo o m in to  2X /  4X when viewing the c amera. A third 

pressing of the butto n will resto re to  the o riginal image.

3) Press and ho ld OK Butto n fo r 4 sec o nds to  start auto  c irc ulating 2 

c ameras simultaneo usly, press OK again to  sto p. Then press Menu Butto n 
to  return to  split sc reen display.

• The c urrent zo o m level number will be shown with the Zo o m ic o n       
          o n the mo nito r

.

• Under split sc reen mo de, yo u c an selec t o nly o ne c amera to  
  zo o m in.

2

2. Pan- n- Tilt

When viewing the c amera, press Left /  Right /  Up /  Down Butto n to  view at 
different angles, 10 8 degrees vertic ally and 270  degrees ho rizo ntally. 

3 . Night  V ision 

The night visio n is auto matic ally ac tivated in a dim enviro nment. The c amera 
has 12 high- intensity infrared LEDs fo r pic king up c lear images in the dark. 
Blac k and white images c an be c aptured within 2m distanc e. 

4 . Talkback

1) Press Talk /  Shortc ut Button onc e to  quic kly adust the Volume or Brightness.
2) Talking Under Split Sc reen Mo de: 

• Press Left /  Right Butto n to  selec t the c amera (Camera 1 o r 2) yo u want 

to  talk to. Ho ld to  talk and release to  exit.

• When yo u enter the talking mo de, the ic o n      will be shown o n 

the mo nito r. 

• When it’s mute o r the speaker vo lume is to o  low, yo u may no t 

be able to  hear the baby. 

• When yo u’re pressing the Talk Butto n, the c amera will no t 

transfer the so und to  the mo nito r. Please release the butto n to  
listen to  yo ur baby. 

5. Volume Adjust ment  

1) Use Sho rtc ut Butto n: Press Talk Butto n - > Left /  Right Butto n to  quic kly 

adjust the vo lume with           &          ic o ns.


Summary of Contents for VA-IH006

Page 1: ...Model VA IH0 0 6 VAVA Baby Monitor User Manual www vava com Rev_1 6_EN MADE IN CHINA E mail support vava com Manufacturer Manufacturer...

Page 2: ...ngle Lens Optional FUNCTIONS OPERATIONS Monitor Interface Overview 1 Digital Zoom Circulating 2 Pan n Tilt 3 Night Vision 4 Talkback 5 5 Volume Adjustment 6 Display Brightness Adjustment 7 Camera 8 VO...

Page 3: ...ll parts keep them out of your baby s reach at all times This product is NOT intended to replace the proper supervision of children You MUST check your child s activity regularly This product is not i...

Page 4: ...ndicator Power Indicator Menu Button Zoom Button Left Button Up Button Right Button OK Button Down Button Talk Button Power Button Upgrade Pinholes Back Stand Speaker USB C Port 1 2 3 4 5 6 7 8 9 1 0...

Page 5: ...ly the camera number with icon will be shown at the top left Microphone feedback might occur when the monitor is too close to the camera Please keep them at least 1 5m 4 9ft apart It is recommended to...

Page 6: ...FUNCTIONS OPERATIONS Monitor Interface Overview Top Status Indications Install your wide angle lens separately sold referring to the previous mounting wide angle lens section Now you can view the came...

Page 7: ...ill be shown with the Zoom icon on the monitor Under split screen mode you can select only one camera to zoom in 2 2 Pan n Tilt When viewing the camera press Left Right Up Down Button to view at diffe...

Page 8: ...a camera 2 Press and hold the Pair Button on the camera for 3 seconds Split Screen 1 Press Menu button select through 2 Then select two cameras Camera 1 2 3 4 for Split screen display View Camera 1 Pr...

Page 9: ...on Choose OK Button 2 Press Menu button Choose OK Button 2 Press Menu button Choose OK Button 2 Select the lullaby you want Select to play the lullabies in a loop 3 Select the time you want or set the...

Page 10: ...cts and Restore to factory setting 1 Press Menu button Choose OK Button 2 Select the function to be adjusted 1min Screen o 2min Screen o 5min Screen o Explanation The monitor will prompt too high 35 C...

Page 11: ...nform YES to reset Press Menu button or conform NO to exit 17 18 Press OK Button to confirm resetting Restoring factory settings will be shown when restoring and you can t press any button to control...

Page 12: ...Way Talk Multi Camera Storage Temperature Operation Temperature SPECIFICATIONS Monitor Camera 720p 1280x720 1 0M 1 4 2 4GHz h 264 frame rate 18fs 5V 2A 2m long Micro USB cable 108 degrees vertical Up...

Page 13: ...the camera power cable plugging and pairing Check whether the screen is in sleep mode Press any button to awake it Check whether the camera is within range of the monitor Adjust the monitor antenna to...

Page 14: ...ed and found to comply with the limits for a Class B digital device pursuant to Part 15 of the FCC Rules These limits are designed to provide reasonable protection against harmful interference in a re...

Page 15: ...le brouillage est susceptible d en compromettre le fonctionnement The device meets the exemption from the routine evaluation limits in section 2 5 of RSS 102 and compliance with RSS 102 RF exposure us...

Reviews: