background image

92

Introduction

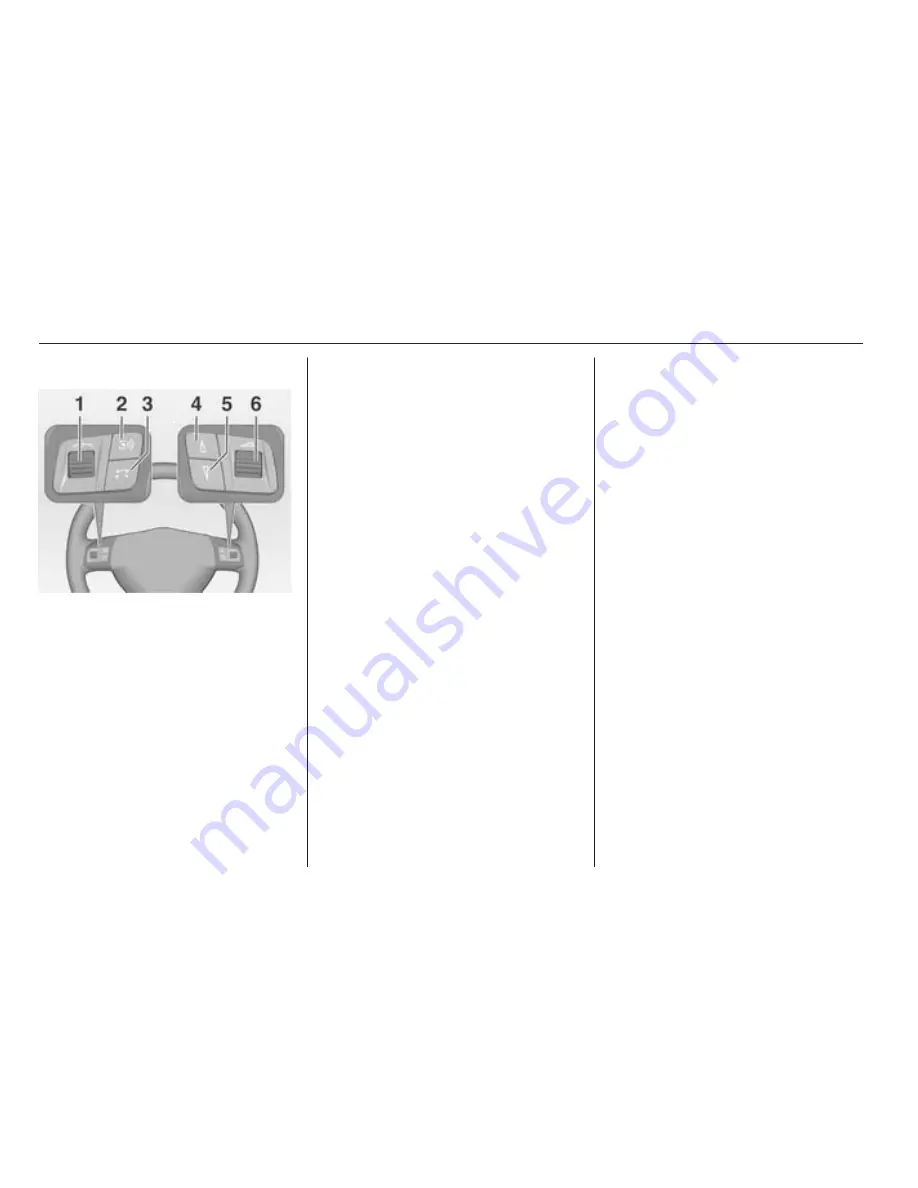
Steering wheel audio controls

1

Thumbwheel ......................... 92
Turn: Move cursor ................. 92
Press: confirm a selection ..... 92

2

q

 button ............................. 102

Radio: next stored station ... 102

3

p

 button ............................ 115

Switch between audio

sources ............................... 115

Radio: discontinue TA and

PTY31 messages ................ 102
If a DAB receiver is

connected: changing

between analogue and

digital reception ................... 102

4

d

 button ............................... 102

Radio: search up, scroll

forwards through station

memory ............................... 102
Discontinue TA and

PTY31 messages  ............... 102
CD, USB, iPod: Skip one

track forwards, fast forward . 115

5

c

 button ............................... 102

Radio: search down, scroll

back through station

memory ............................... 102
Discontinue TA and

PTY31 messages  ............... 102
CD, USB, iPod: Skip one

track backwards, fast

reverse station memory ...... 115

6

Turn: adjust volume .............. 90

Operation

Control elements

The Infotainment system is operated

via function buttons, multifunctional

knobs and menus that are shown on

the display.
Inputs are made optionally via:

■ the central control unit in the

instrument panel 

3

 90

■ controls on the steering wheel

3

 90.

Switching the Infotainment

system on or off

Press the 

e

 knob.

The audio source last set is played.

Switching on and off with the ignition

key (automatic switch-on)

If the automatic switch-on is enabled,

the Infotainment system can also be

switched off and on again via the

ignition.
This link between the radio and

ignition is preset in the factory, but this

can be disabled.

Summary of Contents for Zafira 2014

Page 1: ...0 1 Infotainment Manual Model Year 2014 5 Edition January 2014 KTA 2729 3 VX en VAUXHALL Zafira Infotainment Manual Model Year 2014 5 Edition January 2014 KTA 2729 3 VX en...

Page 2: ...Touch Connect 3 CD 40 USB 87 CD 30 CD 30 MP3 127 Mobile phone portal 155 Contents...

Page 3: ......

Page 4: ...Introduction 4 Radio 18 CD Player 23 AUX input 28 USB port 29 Bluetooth music 32 Navigation 34 Phone 73 Index 84 Touch Connect...

Page 5: ...ed will automatically avoid traffic jams or other traffic problems In addition the Infotainment system is equipped with a phone portal that allows for comfortable and safe use of your mobile phone in...

Page 6: ...s roads and entrances that you are not allowed to drive into Radio reception Radio reception may be disrupted by static noise distortion or loss of reception due to changes in distance from the transm...

Page 7: ...reen button to confirm your input A message with important information regarding the safe use of the Infotainment system is displayed for a few seconds The Infotainment system is unlocked and ready fo...

Page 8: ...Introduction 7 Control elements overview Touch Connect...

Page 9: ...4 CD ejection 24 7 NAV 35 Navigation menu 35 8 TRAF 63 Traffic info menu 63 9 SETUP 9 Setup menu 9 10 Multifunction knob 9 Turn mark screen buttons or menu items set numeric values 9 Press select acti...

Page 10: ...bwheel 9 Turn adjust volume 9 Operation Control elements The Infotainment system is operated via function buttons multifunctional knobs a touch screen and menus that are shown on the display Inputs ar...

Page 11: ...is stored by the Infotainment system and will be automatically used for all future voice command announcements until the setting is changed again Adjusting the volume of AUX input sources The relativ...

Page 12: ...of an on screen slider element by moving it with a finger Caution Do not use pointed or hard items like ball pens pencils or similar for touch screen operation Multifunction knob In case the touch scr...

Page 13: ...he menus can only be selected activated via the touch screen not via the multifunction knob Example FM radio menu buttons TA FM List and Tune can only be selected activated via the touch screen Note I...

Page 14: ...are shown and described below Example Audio settings With touch screen Tap on one of the screen buttons e g or beside a setting to adjust this setting With multifunction knob 1 Turn the multifunction...

Page 15: ...low a setting indicate how many options are available for that setting With multifunction knob 1 Turn the multifunction knob clockwise or anti clockwise to select a menu item 2 Press the multifunction...

Page 16: ...ently active e g the FM1 or CD menu press the multifunction knob Note The Audio screen button in the SETUP menu is not selectable when the volume is set to zero Bass Use this setting to enhance or att...

Page 17: ...e To adjust the relative volume level for external audio sources e g a CD player set AUX Level to Quiet Medium or Loud Adjusting the volume of voice commands navigation To open the NAVIGATION SETUP me...

Page 18: ...ommands will be changed likewise To open the LANGUAGE menu select the Language menu item Select the desired language for the menu texts Activating or deactivating touch clicks If the menu item Touch C...

Page 19: ...me related information are displayed Selecting the waveband Press the FM AM button once or several times to select the desired waveband The station last played in that waveband will be received If the...

Page 20: ...ached on the scale A search is made for the next station that can be received and it is played automatically If no other receivable station is found the last station played will be received again Manu...

Page 21: ...eband 2 Tune to the desired station or select it from the FM station list 3 Press and hold one of the station buttons until you hear a beep The corresponding button number e g P3 is displayed beside t...

Page 22: ...announcement the volume can be changed by turning the m knob The traffic announcement can be cancelled by selecting the Cancel screen button When the traffic announcement is finished or cancelled the...

Page 23: ...e g FM1 or CD menu and in the TRAFFIC INFO menu In the TRAFFIC INFO menu the TA screen button is not selectable if the volume is set to zero Listening to traffic announcements only Enable traffic anno...

Page 24: ...d WMA files written in any format other than listed above may not play correctly and their file names and folder names may not be displayed correctly Audio CDs with copy protection which are not in co...

Page 25: ...MP3 and WMA files is identical When a CD with WMA files is loaded MP3 related menus are displayed Usage Note Within the CD player menus you can only use the touch screen to select activate the screen...

Page 26: ...During audio CD replay Select the Browse screen button to display a list of all tracks on the CD The list entry of the currently played track is highlighted in red Select the desired track During CD M...

Page 27: ...shown on the display During MP3 CD replay If an MP3 CD is inserted all tracks in the currently selected folder or all tracks on the CD can be played in random order Select the Mix screen button once o...

Page 28: ...peat folder mode or to deactivate the repeat mode Dependent on the activated mode Repeat track or Repeat folder is shown on the display Enabling or disabling traffic announcements TA Select the TA scr...

Page 29: ...t a portable CD player with a 3 5 mm jack plug to the AUX input Usage Press the MEDIA button once or several times to activate the AUX mode The audio signal of the connected audio source is now transm...

Page 30: ...vices connected to the USB port must comply with the USB Mass Storage Class specification USB MSC Devices connected via USB are supported according to USB Specification V 2 0 Maximum supported speed 1...

Page 31: ...e set Playing saved audio files MP3 player USB drive SD card Press the MEDIA button once or several times to activate the audio USB mode Replay of the audio data stored on the USB device is started Th...

Page 32: ...rious options for the selection and playing of tracks Select the Browse screen button to display a menu with the available options for music browsing Select the desired option for music browsing The f...

Page 33: ...does not support AVRCP only the volume can be controlled via the Infotainment system Before connecting the Bluetooth device to the Infotainment system become acquainted with its user guide for Bluetoo...

Page 34: ...nctions of the external audio source can now be operated via the Infotainment system Operation via Infotainment system Starting replay of tracks Select the l screen button Skipping to next or previous...

Page 35: ...esponsibility for a correct vigilant attitude in road traffic The relevant traffic regulations must always be followed If a navigation instruction contradicts traffic regulations the traffic regulatio...

Page 36: ...t in the TRAFFIC MESSAGES menu To be able to use TMC traffic information the system has to receive TMC stations in the relevant region Dynamic route guidance only works if traffic information is recei...

Page 37: ...traffic events in the vicinity of the current vehicle position see chapter Guidance 3 63 SETUP button and NAVIGATION SETUP menu Press the SETUP button to open the SETUP menu In that menu select the me...

Page 38: ...erest POI e g petrol stations parking areas or restaurants indicated by corresponding symbols The display of POIs can be switched on off see Setting up the navigation system below A compass indicating...

Page 39: ...ated on the map display if dynamic route guidance is activated see chapter Guidance 3 63 At the bottom of the map street name of the current position At the top of the map name of the street to follow...

Page 40: ...set the GPS coordinates for new destinations by tapping on the map Detailed description 3 46 Moving the visible map section Move your finger on the screen in the desired direction Returning to the ori...

Page 41: ...rmediate destination if available on the route and or the address GPS coordinates of the final destination If the address GPS coordinates of the next waypoint are displayed select the Dest screen butt...

Page 42: ...nts are indicated by corresponding symbols on the map Map Data Information displays the name and version of the map data stored on the inserted SD card Setting up the navigation system To open the NAV...

Page 43: ...defined points of interest POI and corresponding warning messages were downloaded to the Infotainment system see User defined points of interest below Using this menu option you can define in which d...

Page 44: ...listic In demo mode the simulated vehicle speed is unrealistically high to accomplish a short execution time for a simulated trip To return to normal route guidance set the menu option to Off Set Star...

Page 45: ...e guidance 2 POI warnings POIs that you want to be warned of e g very sharp turns on a road before reaching the corresponding location For each POI you need to define the GPS coordinates longitude and...

Page 46: ...local hard drive POI warnings Create a separate text file with an arbitrary name and the file extension asc e g TomsPOIWarnings asc The further operating steps for creating a text file with POI warnin...

Page 47: ...l be opened You need to decide first if you want to add a waypoint an intermediate destination to the currently set destination or if you want to replace the currently set destination by a new destina...

Page 48: ...letters for the desired city name During this process the system will automatically block letters that cannot occur next in the city name If you need to enter a letter or special character that is not...

Page 49: ...less than 5 a list with the matching city names is automatically displayed Alternatively you can select the List screen button at any time to force the system to display a list with all city names tha...

Page 50: ...eeds to be entered or changed select the Country of dest menu item A menu with keypad for country name input is displayed Enter the desired country name After the country name input has been performed...

Page 51: ...TION menu will be displayed Continue with step 5 4 Entering the house number Enter the desired house number or if you do not know the house number select the No num screen button If you select the No...

Page 52: ...inue with step 6 If you want 1 to move the new destination to another location or 2 to store the new destination s address in the address book select the Menu screen button A message is displayed that...

Page 53: ...nter the desired name for the previously set destination Select the OK screen button to store the new destination address in the address book using the previously entered name After the address data h...

Page 54: ...e Select the Add New Entry list entry first entry in list A menu with several options for adding new addresses is displayed The following options are available New Address displays the menu for direct...

Page 55: ...Select the Save screen button A menu with keypad for name input is displayed Enter the desired name for the new address book entry and select the OK screen button to store the new address data in the...

Page 56: ...a menu with keypad for name input Enter a new name for the address book entry and select the OK screen button to confirm the new name Del all deletes all address book entries Delete deletes the selec...

Page 57: ...then select the Destination menu item to open the ENTER DESTINATION menu Select the Points of interest menu item The POINTS OF INTEREST menu is displayed The following menu options are available Rest...

Page 58: ...is displayed after selecting the menu item To find a specific POI you can search by Category or by Name Select the desired search option screen button in the message Searching by category After select...

Page 59: ...e Search in another city provides access to all POIs within a selected city To select a city see Entering an address directly steps 1 to 2 above After selecting a city you can search for POIs in that...

Page 60: ...a destination from map Press the NAV button and then select the Destination menu item to open the ENTER DESTINATION menu Select the Destination from map menu item The DESTINATION FROM MAP menu is disp...

Page 61: ...me for the new destination and select the OK screen button to store the address data of the new destination in the address book After selecting the Set as Destination screen button in the message the...

Page 62: ...operating step 5 of Entering an address directly see above If there are more than 5 crossing streets a menu with keypad for name input is displayed Enter the name of a street that crosses the previous...

Page 63: ...route guidance to that destination Description on route guidance see chapter Guidance 3 63 Entering and selecting the home address Press the NAV button and then select the Home menu item A menu is di...

Page 64: ...display Visual instructions shown in menus e g the FM1 radio menu Detailed descriptions on the map display and the visual route guidance information see chapter Usage 3 35 Voice commands Voice command...

Page 65: ...ute guidance to both the waypoint and the final destination should be cancelled or if route guidance only to the waypoint should be cancelled If you cancel route guidance only to a waypoint the naviga...

Page 66: ...zed when calculating the route to the destination Displaying the route list Press the NAV button and then select the Route menu item to open the ROUTE LIST The route list shows all streets on the calc...

Page 67: ...ments 3 20 Route displays a list of all traffic events on the current route To display detailed information on a particular traffic event select a list entry All displays all traffic events on the cur...

Page 68: ...uded streets will be indicated by a black line and a Closed road symbol see chapter Symbols overview 3 71 on the map display Avoid Road In Route List opens a menu showing the current route list Using...

Page 69: ...calculate the route from the current position to that new intermediate destination and the route from the intermediate destination to the final destination The waypoint will be indicated on the map by...

Page 70: ...e chapter Guidance 3 63 Dynamic route guidance only works if traffic information is received via the RDS TMC traffic information system The possible delay due to a traffic problem calculated by the In...

Page 71: ...card Do not use any SD card that is bent or cracked Do not put any sticker or write anything on either surface Do not store the SD card in locations exposed to direct sunlight or in high temperatures...

Page 72: ...Symbols overview Route guidance and POI symbols No Explanation 1 Current position 2 Final destination black flag 3 Waypoint Intermediate destina tion red flag 4 Hotel Motel 5 Parking area No Explanati...

Page 73: ...Narrowing 9 Accident 10 Danger 11 Uneven road TMC traffic symbols are only shown on the map display if dynamic route guidance via TMC messages is enabled To enable dynamic route guidance press the NA...

Page 74: ...will find further information on this in the operating instructions for your mobile phone or you can enquire about them at your network provider Important information for operation and traffic safety...

Page 75: ...SETUP menu pairing PIN code exchange between Bluetooth device and Phone portal and connection of Bluetooth devices to the Infotainment system are carried out To open the BLUETOOTH SETUP menu press the...

Page 76: ...o another paired device 1 In the BLUETOOTH SETUP menu select the Select Paired Device menu item A list of all Bluetooth devices currently paired to the Infotainment system is displayed The list entry...

Page 77: ...y inserted in the mobile phone 9 Warning Bear in mind that you can make and receive calls with the mobile phone if it is in a service area with a sufficiently strong signal Under certain circumstances...

Page 78: ...ecific mobile phones are possible Control elements for phone operation The most important phone specific control elements are the following On instrument panel m knob turn to adjust volume I button pr...

Page 79: ...de is activated Many functions of the mobile phone can now be controlled via the PHONE menu and associated submenus and via the phone specific controls on the steering wheel see Control elements for p...

Page 80: ...ber If the phone book contains a great number of entries you can conveniently search for the desired contact via the Search menu In the PHONEBOOK menu select the Search list item first entry in list T...

Page 81: ...r that contains special characters select the 123 screen button to change the keypad type Using the call lists All incoming outgoing or missed calls are registered in corresponding call lists In the P...

Page 82: ...r it may be required to enter a voicemail passcode on the mobile phone to get access to the voicemail box Incoming phone call If an audio mode e g the radio or CD mode is active at the time of an inco...

Page 83: ...isplayed again Phone book setup After pairing and connecting a mobile phone to the Infotainment system your mobile phone book with phone numbers and names if available will be automatically downloaded...

Page 84: ...ook entries accordingly Adjusting the display mode Typically there are two different phone books available on mobile phones the phone book on the SIM card of the mobile phone and the phone book stored...

Page 85: ...Bluetooth device 74 Control elements overview 7 D Destination input 46 Dynamic guidance 68 E Emergency call 76 G General information 4 23 28 29 32 34 73 Guidance 63 H Home address 46 I Infotainment sy...

Page 86: ...73 call lists 77 control elements 73 dialling a number 77 emergency calls 76 functions during a call 77 important information 73 phone book 77 privacy mode 77 Playing saved audio files 30 POI symbols...

Page 87: ...udio files 30 User POIs creating and downloading 35 selecting 46 Using the AUX input 28 Using the CD player 24 Using the Infotainment system 9 Using the navigation system 35 Using the radio 18 Using t...

Page 88: ...Introduction 88 Radio 102 CD Player 114 AUX input 119 USB port 120 Index 124 CD 40 USB...

Page 89: ...Owner s Manual for your car The digital sound processor provides you with several preset equalizer modes for sound optimisation Optionally the Infotainment system can be operated using controls on th...

Page 90: ...noise distortion or loss of reception due to changes in distance from the transmitter multi path reception due to reflection shadowing Theft deterrent feature The Infotainment system is equipped with...

Page 91: ...90 Introduction Overview Control elements...

Page 92: ...t function 92 Press confirm function 92 6 INFO 92 Information page 92 7 SOUND 99 Sound function programme selection 99 8 BC 90 On board computer 90 9 1 9 102 Radio number buttons station buttons 102 1...

Page 93: ...Discontinue TA and PTY31 messages 102 CD USB iPod Skip one track backwards fast reverse station memory 115 6 Turn adjust volume 90 Operation Control elements The Infotainment system is operated via f...

Page 94: ...witches itself off automatically after one hour if you switch it on with the ignition off Setting the volume Turn the e knob The Infotainment system plays at the volume last set provided the volume wa...

Page 95: ...erent types of menu pages Selection pages Feature pages Settings pages The different pages have different functionalities Selection pages Selection pages have a selection menu with a preview of each m...

Page 96: ...multifunction knob until the desired menu item is marked Press the multifunction knob The associated function is performed or another menu is displayed In the following chapters of the operating inst...

Page 97: ...tly displayed menu is overlaid with the pop up You have to confirm some of the pop ups e g traffic announcements during a telephone conversation others will automatically disappear after a short perio...

Page 98: ...e multifunction knob to the left until menu item Return is displayed on the title bar Press the multifunction knob The Audio menu is displayed Selecting the Sound menu Press SOUND button The Sound men...

Page 99: ...rd computer To enter the main menu proceed as described above The following information can be displayed On board computer information Display of on board computer information which was selected with...

Page 100: ...n the Sound menu which is called up via the SOUND button the following menu items are listed Treble and Bass Balance and Fader Sound Setting Treble and Bass The settings apply to the currently selecte...

Page 101: ...rce for example when connecting a CD player TA Volume Use this function to adjust the volume of traffic announcements Select menu item TA Volume Turn the multifunction knob until the desired value is...

Page 102: ...nu item External In Turn the multifunction knob until the desired value is set Press the multifunction knob Aux volume Use this function to adjust the volume of external audio sources such as a CD pla...

Page 103: ...st tuned in In the radio menu turn the multifunction knob to the left until menu item Return is displayed on the title bar Press the multifunction knob The Audio menu is displayed Select waveband FM A...

Page 104: ...ions is updated automatically The performance of the station list update varies depending on the waveband set Select menu item Update stations centre area For analogue radio reception FM or AM Memory...

Page 105: ...ast frequency active will be set Manual station search The manual station search is used to tune in to stations of known frequencies Station search with the rocker switch only FM AM Keep the rocker sw...

Page 106: ...mal mode not AS mode RDS on or RDS off are stored together with the station Two options are available for manual station storing Tune in to the desired station Keep the station button pressed on which...

Page 107: ...elect a memory slot with a traffic announcement station on completion of the automatic station search If on standby for traffic announcement is switched on during automatic storing then the automatic...

Page 108: ...call up stations via a menu 3 102 Radio data system RDS RDS is a service of FM stations that considerably facilitates the finding of the desired station and its fault free reception Advantages of RDS...

Page 109: ...matic tick box Programme type PTY Many RDS stations transmit a PTY code describing the type of programme broadcast e g news The PTY code allows selection of stations by programme type Programme type a...

Page 110: ...regionalisation On The radio remains tuned to the regional programme while seeking the best receivable station frequency Off The radio allows switching to another regional programme Automatic The radi...

Page 111: ...nnouncement is switched on then playback of an audio source or DAB reception are interrupted during a traffic announcement Traffic announcements are played at the preset traffic announcement volume 3...

Page 112: ...of AM or FM reception The DAB signal is reproduced at a constant volume If the DAB signal is too weak to be picked up by the receiver reception is interrupted completely This can be avoided by activat...

Page 113: ...ch starts The radio is muted until an ensemble is found The first available programme of the ensemble is played Or This function is set in the radio menu Select the arrow next to the ensemble name Sel...

Page 114: ...tting Radio text Some DAB stations additionally broadcast information e g news as text on the display Radio text is only available in the DAB waveband Not all stations broadcast radio text continuousl...

Page 115: ...mpliance with the audio CD standard may not play correctly or not at all You can also use the Infotainment system to play CDs containing MP3 music data and Mixed Mode CDs Self recorded CD Rs and CD RW...

Page 116: ...ears for audio CDs with an additional MP3 for MP3 CDs and the CD name for text CDs CD playback Switch from another audio mode or the radio mode to the CD mode as follows A CD is inserted Press the MED...

Page 117: ...ge is reached Album selection for MP3 or Mixed CDs You are listening to a track from an album Press the rocker switch c or d until the album you want appears on the display You will hear the first tra...

Page 118: ...display This track will be repeated constantly Switching off Repeat Track Hold down the rocker switch c until the i symbol is no longer displayed Repeat Off appears in the display for a few seconds O...

Page 119: ...s can be received while a CD is playing Traffic programme TP 3 107 A traffic announcement can be terminated with the TP button and the current CD will continue to play Removing a CD Press the j button...

Page 120: ...t a portable CD player with a 3 5 mm jack plug to the AUX input Usage Press the MEDIA button once or several times to activate the AUX mode The audio signal of the connected audio source is now transm...

Page 121: ...must comply with the USB Mass Storage Class specification USB MSC Devices connected via USB are supported according to USB Specification V 2 0 Maximum supported speed 12 Mbit s Only devices with a FAT...

Page 122: ...lders files that contain audio data must not be set Playing saved audio files MP3 player USB drive SD card Press the MEDIA button once or several times to activate the audio USB mode Replay of the aud...

Page 123: ...the available options for music browsing Select the desired option for music browsing Depending on the selected option a further menu for music browsing or the iPod menu is displayed The operating st...

Page 124: ...USB port 123...

Page 125: ...15 CD Extras 115 CD insert 115 CD text 115 D DAB 102 111 DAB menu 111 DAB radio text 111 Digital audio broadcasting 111 E Ensemble 111 External In 100 F Fader 99 FM 102 G General information 88 114 11...

Page 126: ...Station list 102 Station memory 102 Station menu 102 Station search 102 Store 102 Subwoofer 99 Switching the Infotainment system on or off 92 T TA volume 100 Theft deterrent feature 89 Tone settings 9...

Page 127: ...126...

Page 128: ...Introduction 128 Radio 139 CD Player 146 AUX input 150 Index 152 CD 30 CD 30 MP3...

Page 129: ...urthermore you can connect an external source such as a mobile phone to the Infotainment system An audio source connected to the AUX input of your vehicle e g a portable CD player or an MP3 player can...

Page 130: ...the vehicle is stationary Radio reception Radio reception may be disrupted by static noise distortion or loss of reception due to changes in distance from the transmitter multi path reception due to...

Page 131: ...130 Introduction Overview Control elements...

Page 132: ...t rewind 147 Change menu values 133 8 oe knob 133 Press Switch on off Infotainment system 133 Turn Adjust volume 133 9 MEDIA 147 CD MP3 mode 147 Display CD MP3 information 147 Activate deactivate rand...

Page 133: ...uter select a trip computer entry 133 2 q button 139 Radio Next stored station 139 CD Start CD playback 147 MP3 Next album 147 3 p button 147 Switch between radio CD MP3 and AUX mode 147 4 d button 13...

Page 134: ...adio and ignition is preset in the factory but this can be disabled If the automatic switch on is disabled the Infotainment system can only be switched on with the e button or by inserting a CD and of...

Page 135: ...ternal audio sources and the radio and CD can be adjusted separately Speed dependent volume control SDVC When SDVC is activated 3 136 the volume is adapted automatically to make up for the road and wi...

Page 136: ...following audio information Current waveband or AUX CD Current station name or station frequency or CD track number or CD track name If the Regional function is enabled REG is displayed 3 141 If the...

Page 137: ...the display 2 Adjust the value with m or n After a few seconds the most recent display reappears Or Press one of the function buttons TUNER MEDIA or BC to display the relevant function Sound 1 Press...

Page 138: ...lume If the TP function is switched on the system increases the volume for traffic announcements by default This function allows setting a minimum volume for traffic announcements 1 Press the SETTINGS...

Page 139: ...ly if the volume prior to switching off was higher than the maximum switch on volume and the Infotainment system has been off for at least five minutes with the ignition off Ext In Vol Use this functi...

Page 140: ...ed 3 140 The radio is on Press TUNER button briefly The radio switches between FM FM AS AM AM AS DAB and DAB AS The station last selected on the waveband is heard and displayed Station search Station...

Page 141: ...B DAB AS automatically stored DAB stations The memory slots can be selected directly in the respective wavelength via the station buttons Manual storing Tune in to the desired station Keep the station...

Page 142: ...receivable RDS stations are stored If on standby for traffic announcement is switched on prior to or during automatic storing the radio will select a memory slot with a traffic announcement station on...

Page 143: ...n currently selected is not an RDS station the radio searches automatically for the next receivable RDS station To deactivate RDS press the RDS button again If the RDS function is not switched on the...

Page 144: ...ith the strongest reception AF for a radio programme until the programme can no longer be received without interference If the reception quality of the regional programme is no longer sufficient for i...

Page 145: ...announcement remains switched on Traffic announcement whilst an external source is active The external source e g mobile phone has priority over traffic announcements During the phone call no traffic...

Page 146: ...m or n The first available programme of the ensemble is played DAB AF By setting DAB AF to On you can define that when you drive into another ensemble area the same station is received as in the previ...

Page 147: ...l You can also use the Infotainment system to play CDs containing MP3 music data and Mixed Mode CDs Self recorded CD Rs and CD RWs are more vulnerable to mishandling than prerecorded CDs Correct handl...

Page 148: ...ack 1 and the playing time or information about the track title artist With MP3 CD MP3 appears on the display and the first album name is displayed Information about the track title artist are display...

Page 149: ...ging the display type Different information can be displayed Press the CD MP3 button twice CD info appears on the display Tap on m or n to select a display type Depending on the CD type audio CD with...

Page 150: ...ted the last radio station used will automatically be played A CD can be ejected even if the appliance is turned off The appliance switches off after the CD has been removed If the CD is not removed i...

Page 151: ...he vehicle e g a portable CD player via the Infotainment system loudspeakers the audio source has to be enabled When the radio is on Connect the audio source to the AUX input of the vehicle Press the...

Page 152: ...AUX input 151...

Page 153: ...135 C CD eject 147 CD insert 147 CD text 147 D DAB 144 Digital audio broadcasting 144 E Ensemble 144 External In Volume 136 F Fader 135 FM 139 G General information 128 146 150 I Ignition logic 133 M...

Page 154: ...emory 139 Station search 139 Store 139 Switching the Infotainment system on or off 133 T TA volume 136 Theft deterrent feature 129 Tone settings 135 TP 141 Traffic announcements 141 Traffic programme...

Page 155: ...154...

Page 156: ...Introduction 156 Voice recognition 166 Index 172 Mobile phone portal...

Page 157: ...lay enables you to operate the whole portal comfortably When a telephone connection is active the radio sound is switched off When the telephone connection has ended the radio sound is switched on aga...

Page 158: ...IG You will find further information about the specification on the Internet at http www bluetooth com The Bluetooth qualification code of the Mobile phone portal is B02237 When devices are being pair...

Page 159: ...knob See Control elements on instrument panel in the relevant Infotainment system manual The Mobile phone portal can be operated optionally via the speech recognition system 3 166 Bluetooth connectio...

Page 160: ...mly selected PIN code of at least four digits should be used 4 Ensure that the Bluetooth function of the mobile telephone has been activated and set to visible 5 Select the Start searching menu item D...

Page 161: ...splay 2 Select the required mobile telephone The Bluetooth menu appears on the display 3 Deactivate Connect The message Disconnected appears followed once again by the Bluetooth menu 4 Select Remove T...

Page 162: ...e g a medical emergency is concerned In some networks it may be necessary for a valid SIM card to be properly inserted in the mobile phone 9 Warning Bear in mind that you can make and receive calls w...

Page 163: ...mobile telephone to the Infotainment system This may take some time depending on the brand of telephone During this period of time the mobile telephone can only be operated to a limited extent via the...

Page 164: ...e ignition is turned off and the ignition key removed Selecting the telephone numbers from the phone book In the telephone menu select the Phone book menu item A list of all the entries in the phone b...

Page 165: ...rs for accepting or refusing a call Accepting calls Select the Accept menu item or Press the p key Refusing calls Select the Reject menu item Ending calls Do the following in order to end the telephon...

Page 166: ...der relevant Note in the Owner s manual chapter Airbag system Seek advice on predetermined installation points for the external antenna or equipment holder and ways of using devices with a transmissio...

Page 167: ...cognition system also provides an answer to important commands and if required makes enquiries Stop the voice dialogue at any time by re pressing q Before you dial a telephone number the following pre...

Page 168: ...with voice messages and displays SIM card If no SIM card has been inserted the following message appears Please insert a SIM card Once you have inserted a SIM card you will be asked to enter the PIN...

Page 169: ...added Cancel Ending the dialling process After the request for a correction all blocks of numbers previously entered are repeated with the exception of the last block If all inputs have been deleted y...

Page 170: ...Infotainment system A maximum of 25 voice tags can be stored in the phone book If 25 voice tags are already stored the message is given The speech memory is full Voice tags are dependent on the speak...

Page 171: ...d Help The dialogue is ended and all commands available in this context are listed Example of how to dial a telephone number saved in the directory User Phonebook Voice output Karl Heinz Voice output...

Page 172: ...Voice recognition 171...

Page 173: ...s with several numbers 162 F Filtering 162 Freespeech 158 Functions during a call 162 G General information 156 H Hang up 162 L Lists 162 M Making telephone calls 162 Micro off 162 Mobile phones and C...

Page 174: ...173 V Voice recognition 166...

Page 175: ...174...

Reviews: