background image

188

Vehicle care

3. Connect the black lead to the

negative terminal 3 of the booster

battery.

4. Connect the other end of the black

lead to a vehicle grounding point,

such as the engine block 4 or an

engine mounting bolt. Connect as

far away from the discharged

battery as possible, however at

least 60 cm.

Route the leads so that they cannot

catch on rotating parts in the engine

compartment.
To start the engine:

1. Start the engine of the vehicle

providing the jump start.

2. After 5 minutes, start the other

engine. Start attempts should be

made for no longer than

15 seconds at an interval of

1 minute.

3. Allow both engines to idle for

approx. 3 minutes with the leads

connected.

4. Switch on electrical consumers

(e.g. headlights, heated rear

window) of the vehicle receiving

the jump start.

5. Operate discharged vehicle for

approx. 20 minutes to allow for

adequate battery recharging.

6. Reverse above sequence exactly

when removing leads.

Towing

Towing the vehicle

Remove the spoiler lip from the front

left-hand side of the vehicle by

unfastening the six screws located on

the underside of the vehicle. Then

attach the towing eye.
The towing eye is stowed with the

vehicle tools 

3

 173.

Summary of Contents for Antara 2014

Page 1: ...0 1 Owner s Manual Model Year 2014 Edition November 2013 KTA 2648 8 VX en VAUXHALL Antara Owner s Manual Model Year 2014 Edition November 2013 KTA 2648 8 VX en ...

Page 2: ...nd windows 18 Seats restraints 33 Storage 55 Instruments and controls 72 Lighting 105 Climate control 114 Driving and operating 122 Vehicle care 150 Service and maintenance 194 Technical data 197 Customer information 208 Index 210 Contents ...

Page 3: ...2 Introduction Introduction ...

Page 4: ...specific Vauxhall instructions The customer literature pack should always be kept ready to hand in the vehicle Using this manual This manual describes all options and features available for this model Certain descriptions including those for display and menu functions may not apply to your vehicle due to model variant country specifications special equipment or accessories The In brief section wil...

Page 5: ...tion may lead to injury Caution Text marked Caution provides information on possible damage to the vehicle Disregarding this information may lead to vehicle damage Symbols Page references are indicated with 3 3 means see page Thank you for choosing a Vauxhall We wish you many hours of pleasurable driving Your Vauxhall Team ...

Page 6: ...Introduction 5 ...

Page 7: ...the handles To open the tailgate operate button above number plate Radio remote control 3 19 Central locking system 3 20 Load compartment 3 22 Seat adjustment Seat positioning Pull handle slide seat release handle Seat position 3 34 Seat adjustment 3 35 9 Danger Do not sit nearer than 25 cm from the steering wheel to permit safe airbag deployment ...

Page 8: ...he backrest to engage audibly Do not lean on the seat backrest whilst adjusting it Seat position 3 34 Seat adjustment 3 35 Seat folding 3 36 Seat height Lever pumping motion up seat higher down seat lower Seat position 3 34 Seat adjustment 3 35 Power seat adjustment Operate switches ...

Page 9: ...rest move upper part of rear switch forwards backwards Seat position 3 34 Power seat adjustment 3 37 Head restraint adjustment Press release button adjust height and engage Head restraints 3 33 Seat belt Pull out the seat belt and engage in belt buckle The seat belt must not be twisted and must fit close against the body The backrest must not be tilted back too far maximum approx 25 To release bel...

Page 10: ...the relevant exterior mirror and adjust it Convex exterior mirrors 3 27 Electric adjustment 3 27 Folding exterior mirrors 3 27 Heated exterior mirrors 3 28 Steering wheel adjustment Unlock lever adjust steering wheel then engage lever and ensure it is fully locked Do not adjust steering wheel unless vehicle is stationary and steering wheel lock has been released Airbag system 3 43 Ignition positio...

Page 11: ...10 In brief Instrument panel overview ...

Page 12: ...Stability Control 137 Descent control system 138 Status LED for anti theft alarm system 24 Folding exterior mirrors 27 Eco button for stop start system 124 11 Infotainment system 10 12 Front passenger airbag 46 13 Status LEDs for front passenger airbag 48 Control indicator for front passenger seat belt 41 14 Glovebox 55 15 Fuse box 170 16 Climate control system 114 17 Ignition switch with steering...

Page 13: ...Headlights Press button Front fog lights r Rear fog light Lighting 3 105 Headlight flash high beam and low beam headlight flash pull lever high beam push lever low beam pull lever back towards steering wheel Automatic light control 3 105 High beam 3 106 Headlight flash 3 106 Turn and lane change signals right lever up left lever down Turn and lane change signals 3 108 Parking lights 3 109 ...

Page 14: ...rning flashers 3 107 Horn Press j Washer and wiper systems Windscreen wiper fast slow timed interval wiping or automatic wiping with rain sensor off For a single wipe when the windscreen wiper is off press the lever down Windscreen wiper 3 73 Wiper blade replacement 3 159 ...

Page 15: ...wiper and washer system Wiper on push lever Wiper off pull lever Wash press and hold button Rear window wiper and washer system 3 75 Wiper blade replacement 3 159 Washer fluid 3 155 Climate control Heated rear window heated exterior mirrors Heating is operated by pressing the RÜ button Heated rear window 3 31 Heated exterior mirrors 3 28 ...

Page 16: ...erature to highest level Set fan speed to highest level Switch on heated rear window RÜ Close centre air vents open side air vents and direct them towards the door windows Climate control system 3 114 Transmission Manual transmission Reverse with the vehicle stationary wait 3 seconds after depressing clutch pedal and engage the gear If the gear does not engage set the lever to neutral release the ...

Page 17: ... levels 3 152 All windows mirrors exterior lighting and number plates are free from dirt snow and ice and are operational Proper position of mirrors seats and seat belts 3 27 3 34 3 41 Brake function at low speed particularly if the brakes are wet Starting the engine Turn key to position ACC move the steering wheel slightly to release the steering wheel lock manual transmission in neutral operate ...

Page 18: ... key into ignition switch and removing If the vehicle is on a level surface or uphill slope engage first gear or move the selector lever to P before switching off the ignition On an uphill slope turn the front wheels away from the kerb If the vehicle is on a downhill slope engage reverse gear or move the selector lever to P before switching off the ignition Turn the front wheels towards the kerb L...

Page 19: ... free wheel if they are forcefully rotated without the correct key or if the correct key is not fully inserted To reset turn cylinder with the correct key until its slot is vertical remove key and then re insert it If the cylinder still free wheels turn the key through 180 and repeat operation Key with foldaway key section Press button to extend To fold the key first press the button Car Pass The ...

Page 20: ...oltage too low Frequent repeated operation of the radio remote control while not in range which will require reprogramming Seek the assistance of a workshop Overload of the central locking system by operating at frequent intervals the power supply is interrupted for a short time Interference from higher power radio waves from other sources Unlocking 3 20 Radio remote control battery replacement Re...

Page 21: ...e door Note In the event of an accident in which airbags or belt pretensioners are deployed the vehicle is automatically unlocked Unlocking Press button q Note If no door is opened within 5 minutes after the vehicle has been unlocked the vehicle is relocked automatically and the anti theft alarm is reactivated When button q is pressed the instrument panel illuminates for approx 30 seconds or until...

Page 22: ...applied or automatic transmission is in position P Central locking buttons Locks or unlocks all doors the load compartment and fuel filler flap from the passenger compartment Press left part of switch m to lock Press right part of switch m to unlock When the key is in the ignition switch locking is only possible if all doors are closed Fault in radio remote control system Unlocking Manually unlock...

Page 23: ... the child lock to the vertical position Doors Load compartment Tailgate Opening Operate the button above the number plate and lift the tailgate If the tailgate is open when the ignition is switched on control indicator 1 illuminates in the instrument cluster 3 90 Central locking system 3 20 Closing Use the interior handle Do not operate the button above the number plate while closing the tailgate...

Page 24: ... such as a garage door to avoid damage to the tailgate Always check the moving area above and behind the tailgate Note The installation of certain heavy accessories onto the tailgate may affect its ability to remain open Vehicle security Anti theft locking system 9 Warning Do not use the system if there are people in the vehicle The doors cannot be unlocked from the inside The system deadlocks all...

Page 25: ... Ensure the doors tailgate fuel filler flap bonnet windows and sunroof are closed Press button p on radio remote control or manually lock the driver s door The system is activated Automatically 30 seconds after locking the vehicle initialisation of the system Directly by pressing p on the radio remote control once more after locking If the hazard warning lights do not flash once upon activation or...

Page 26: ...el Control indicator o extinguishes Status LED Status LED is located in the centre console Status during the first 30 seconds of anti theft alarm system activation LED illu minates test arming delay LED flashes quickly doors tailgate or bonnet not completely closed or system fault Status after system is armed LED flashes slowly system is armed LED flashes quickly 3 times after unlocking system is ...

Page 27: ...he vehicle s battery within 15 seconds Immobiliser The system is part of the ignition switch and checks whether the vehicle is allowed to be started with the key being used The immobiliser is activated automatically after the key has been removed from the ignition switch Control indicator d illuminates in the instrument cluster when the ignition is switched on then extinguishes If d remains illumi...

Page 28: ... normal mounting position if they are struck with sufficient force Reposition the mirror by applying slight pressure to the mirror housing Manual folding Press lightly on the outside of the mirror housing to fold in the exterior mirrors Electric folding With ignition switch in positions ACC or ON press button n and both exterior mirrors will fold in Press button n again both exterior mirrors retur...

Page 29: ...perate when you are just starting the vehicle or if there is a build up of snow or ice on the exterior mirrors Do not use sharp instruments or abrasive cleaners on the exterior mirrors and avoid scratching or damaging the heating elements Automatic dimming Exterior mirror on the driver s side dims to reduce glare automatically in conjunction with the automatic anti dazzle interior mirror 3 29 Inte...

Page 30: ... behind the interior mirror are not covered with the coating Devices for electronic data recording and fee payment must be attached in these areas Otherwise data recording malfunctions may occur Windscreen stickers Do not attach stickers such as toll road stickers or similar on the windscreen in the area of the interior mirror Otherwise the detection zone of the sensor could be restricted Power wi...

Page 31: ...ear windows do not open fully Safety function If the window glass encounters resistance above the middle of the window during automatic closing it is immediately stopped and opened again Override safety function In the event of closing difficulties due to frost or the like pull the relevant window switch several times until the window is closed The window moves up with the safety function disabled...

Page 32: ...e sharp instruments or abrasive cleaners on the rear window and avoid scratching or damaging the heating elements Sun visors The sun visors can be folded down or swivelled to the side to prevent dazzling Sun visors have vanity mirrors and a ticket holder on the rear When the vanity mirror covers are opened the sun visor light illuminates The mirror covers should be closed when driving Roof Sunroof...

Page 33: ...o run off and then open sunroof Close Press and hold switch forwards Release switch when sunroof reaches desired position Tilt Press and hold switch upwards Release switch when sunroof reaches desired position To return sunroof to its original position pull and hold switch downwards Release switch when sunroof reaches desired position General hints Function standby The sunroof can be operated with...

Page 34: ...s is not possible for extremely tall people set to highest position and set to lowest position for small people Height adjustment Press release button adjust height and engage Pull head restraint up to raise Push head restraint down while pressing the release button to lower the head restraint Removal Insert a suitable tool into the small hole in the side of the guide sleeve without the release bu...

Page 35: ...ossible Adjust the distance between the seat and the pedals so that legs are slightly angled when pressing the pedals Slide the front passenger seat as far back as possible Sit with shoulders as far back against the backrest as possible Set the backrest rake so that it is possible to easily reach the steering wheel with arms slightly bent Maintain contact between shoulders and the backrest when tu...

Page 36: ...seats while driving as they could move uncontrollably 9 Warning Never store any objects under the seats Drive only with engaged seats and backrests Seat positioning Pull handle slide seat release handle Seat backrests Pull lever adjust inclination and release lever Allow the backrest to engage audibly Do not lean on the seat backrest whilst adjusting it ...

Page 37: ...ecrease lumbar support move lever forwards or backwards Seat folding Caution When seat height is in highest position push head restraints down and lift up sun visors before folding backrest forwards Push head restraint all the way down Slide seat as far back as it will go Lift release lever and fold backrest down onto seat cushion Lower lever and backrest engages in lowered position ...

Page 38: ...re is a risk of injury particularly for children Articles could become trapped Keep a close watch on the seats when adjusting them Vehicle passengers should be informed accordingly Seat lengthwise position Move front switch forwards backwards Seat height Move front of switch upwards downwards to adjust height of front part of seat cushion Move rear of switch upwards downwards to adjust height of r...

Page 39: ...ress the ß button The control indicator in the button will extinguish Prolonged use of the highest setting for people with sensitive skin is not recommended If temperature continues to rise turn seat heating off and seek the assistance of a workshop Rear seats Seat backrests To adjust seat backrests lift release lever on top of backrest and move backrest forwards backwards to desired position Do n...

Page 40: ... belts and ensure front seats are not in a reclined position Push head restraints all the way down lift backrest release lever and fold backrest forwards and down onto seat cushion Do not allow passengers to sit on a folded backrest or place any unrestrained loads on it To move backrest to its original position lift and push the backrest into place and ensure the backrest engages Armrest Fold armr...

Page 41: ...t dirt from getting into the belt retractors Seat belt reminder Front seats are equipped with a seat belt reminder indicated for driver seat by control indicator X in the instrument cluster 3 83 and for passenger seat by control indicator k on the passenger side of the instrument panel 3 41 Belt force limiters Located on the front seats Stress on the body is reduced by the gradual release of the b...

Page 42: ...to the buckle Tighten the lap belt regularly whilst driving by pulling the shoulder belt Seat belt reminder X 3 83 Loose or bulky clothing prevents the belt from fitting snugly Do not place objects such as handbags or mobile phones between the belt and your body 9 Warning The belt must not rest against hard or fragile objects in the pockets of your clothing Height adjustment 1 Squeeze release butt...

Page 43: ... It must not lie across the throat or upper arm Do not adjust while driving Removing To release belt press red button on belt buckle Using the seat belt while pregnant 9 Warning The lap belt must be positioned as low as possible across the pelvis to prevent pressure on the abdomen ...

Page 44: ... collision 9 Warning If handled improperly the airbag systems can be triggered in an explosive manner Note The airbag systems and belt pretensioner control electronics are located in the centre console area Do not put any magnetic objects in this area Do not stick anything on the airbag covers and do not cover them with other materials Each airbag is triggered only once Have deployed airbags repla...

Page 45: ...сиденье автомобиля оборудованном фронтальной подушкой безопасности если ПОДУШКА НЕ ОТКЛЮЧЕНА Это может привести к СМЕРТИ или СЕРЬЕЗНЫМ ТРАВМАМ РЕБЕНКА NL Gebruik NOOIT een achterwaarts gericht kinderzitje op een stoel met een ACTIEVE AIRBAG ervoor om DODELIJK of ERNSTIG LETSEL van het KIND te voorkomen DA Brug ALDRIG en bagudvendt autostol på et forsæde med AKTIV AIRBAG BARNET kan komme I LIVSFARE...

Page 46: ...О ТРАВМУВАННЯ ДИТИНИ HU SOHA ne használjon hátrafelé néző biztonsági gyerekülést előlről AKTÍV LÉGZSÁKKAL védett ülésen mert a GYERMEK HALÁLÁT vagy KOMOLY SÉRÜLÉSÉT okozhatja HR NIKADA nemojte koristiti sustav zadržavanja za djecu okrenut prema natrag na sjedalu s AKTIVNIM ZRAČNIM JASTUKOM ispred njega to bi moglo dovesti do SMRTI ili OZBILJNJIH OZLJEDA za DIJETE SL NIKOLI ne nameščajte otroškega ...

Page 47: ...VAPADJAGA kaitstud iste sest see võib põhjustada LAPSE SURMA või TÕSISE VIGASTUSE MT QATT tuża trażżin għat tfal li jħares lejn in naħa ta wara fuq sit protett b AIRBAG ATTIV quddiemu dan jista jikkawża l MEWT jew ĠRIEĦI SERJI lit TFAL Beyond the warning required by ECE R94 02 for safety reasons a forward facing child restraint system must only be used subject to the instructions and restrictions ...

Page 48: ...rotect Side airbag system The side airbag system consists of an airbag in each front seat backrest This can be identified by the word AIRBAG The side airbag system is triggered in the event of a side impact of a certain severity The ignition must be switched on The inflated airbags cushion the impact thereby considerably reducing the risk of injury to the upper body and pelvis in the event of a si...

Page 49: ...the head in the event of a side on impact 9 Warning Keep the area in which the airbag inflates clear of obstructions The hooks on the handles in the roof frame are only suitable for hanging up light articles of clothing without coat hangers Do not keep any items in these clothes Airbag deactivation The front passenger airbag system must be deactivated if a child restraint system is to be fitted on...

Page 50: ... are active A child restraint system must not be installed 9 Danger Risk of fatal injury for a child using a child restraint system on a seat with activated front passenger airbag Risk of fatal injury for an adult person on a seat with deactivated front passenger airbag Control indicators for the front passenger airbag system are located on the passenger side of the instrument panel As long as con...

Page 51: ...ight system The rear seats are the most convenient location to fasten a child restraint system Children should travel facing rearwards in the vehicle as long as possible This makes sure that the child s backbone which is still very weak is under less strain in the event of an accident Suitable are restraint systems that comply with valid UN ECE regulations Check local laws and regulations for mand...

Page 52: ... to 36 kg or approx 6 to 12 years X X U X 1 Child restraint system must be secured using a three point seat belt Move seat height adjustment to uppermost position and ensure that vehicle seat belt runs forwards from the upper anchorage point Adjust seat backrest inclination as far as necessary to a vertical position to ensure that the belt is tight on the buckle side Vehicle seat with ISOFIX mount...

Page 53: ...e seat Group 0 up to 10 kg or approx 10 months E ISO R1 X IL X Group 0 up to 13 kg or approx 2 years E ISO R1 X IL X D ISO R2 X IL X C ISO R3 X IL X Group I 9 to 18 kg or approx 8 months to 4 years D ISO R2 X IL X C ISO R3 X IL X B ISO F2 X IUF X B1 ISO F2X X IUF X A ISO F3 X IUF X Group II 15 to 25 kg or approx 3 to 7 years X IL X Group III 22 to 36 kg or approx 6 to 12 years X IL X ...

Page 54: ...e class and seat device A ISO F3 Forward facing child restraint system for children of maximum size in the weight class 9 to 18 kg B ISO F2 Forward facing child restraint system for smaller children in the weight class 9 to 18 kg B1 ISO F2X Forward facing child restraint system for smaller children in the weight class 9 to 18 kg C ISO R3 Rear facing child restraint system for children of maximum s...

Page 55: ... at the same time though not on the rear centre seat ISOFIX mounting brackets are indicated by a label on the backrest Top tether fastening eyes The Top tether anchors located on the rear of the backrests are designed to hold child restraints which come equipped with Top tether anchor attachments only Follow the instructions provided with the Top tether child restraint system For use of ISOFIX and...

Page 56: ...nt Glovebox The glovebox will illuminate when opened The glovebox partition can be removed from its groove Store the partition in the groove on the far left hand side of the glovebox The glovebox should be closed whilst driving Lockable glovebox Lock and unlock the glovebox with the key Cupholders Cupholders are located in the front of the centre console The cupholder is flexible allowing differen...

Page 57: ...e to open Push door firmly to close Card holder Located above the coin storage compartment A card can be retained in the slot for convenient use Sunglasses storage To open push the rear part of the cover To close pull up cover and push it until it latches into place Do not use for storing heavy objects ...

Page 58: ...rage compartment power outlet and AUX input slide the cupholder tray rearwards Power outlets 3 77 AUX input see Infotainment system manual for further information Rear carrier system The rear carrier system Flex Fix system allows bicycles to be attached to a pull out carrier integrated into the vehicle floor The transportation of other objects is not permitted The maximum load of the rear carrier ...

Page 59: ... No one should be in the extension zone of the rear carrier system risk of injury Raise release lever The system disengages and travels quickly out of the bumper Completely pull out the rear carrier system until you hear it engage Ensure that it is not possible to push in the rear carrier system without pulling the release lever again 9 Warning It is only permissible to fit objects to the rear car...

Page 60: ...then the front 2 tail lamp from the recesses Open out the bulb holder on the back of the tail lamp completely Push the clamping lever and push the bulb holder into the retainer until it hits the stop Perform this procedure for both tail lamps Check the cable and lamp position to make sure these are correctly installed and are securely located ...

Page 61: ...mping lever 2 until they stop Both clamping levers must point backwards otherwise safe functionality is not guaranteed Note Close the tailgate Unfold pedal crank recesses Fold one or both pedal crank recesses upwards until the diagonal support engages Remove the pedal crank mounts from the pedal crank recesses ...

Page 62: ... to the protrusion of the pedal crank If the bicycle has straight pedal cranks unscrew the pedal crank unit completely position 5 If the bicycle has curved pedal cranks screw in the pedal crank unit all the way position 1 Press the release lever and withdraw the wheel recesses Push the release lever on the strap retainer and remove the strap retainer ...

Page 63: ...ing left The rear bicycle must have its front wheel facing right Attaching a bicycle to the rear carrier system Put on the bicycle The pedal crank here must be placed in the pedal crank recess opening as shown in the illustration Caution Make sure that the pedal does not touch the surface of the rear end carrier Otherwise the bicycle chainset might be damaged during transport Insert pedal crank mo...

Page 64: ... of the bicycle is not ensured Disregard could lead to damage of the bicycle wheels caused by hot exhaust fumes Align the bicycle in the longitudinal direction of the vehicle Slightly loosen the pedal mount Place the bicycle upright using the rotary lever on the pedal crank recess If the two bicycles obstruct one another the relative positions of the bicycles can be adapted by adjusting the wheel ...

Page 65: ...cesses and on the rotary lever on the pedal crank recess should be noted and saved for each bicycle Correct presetting will facilitate refitting of the bicycle Note It is recommended to attach a warning sign at the rearmost bicycle to increase visibility Removing a bicycle from the rear carrier system Undo strap retainers on both bicycle tyres Hold on to the bicycle loosen the attachment screw for...

Page 66: ... as shown in the illustration Insert the strap retainer and pull tightly downwards as far as possible Press release lever and slide in wheel recesses all the way as far as they will go Disengage the locking lever on the diagonal support and fold both pedal crank recesses down 9 Warning Risk of pinching ...

Page 67: ...ver down and pull both lamp supports out of the recesses Fold in the bulb holders on the backs of the tail lamps First place the front tail lamp 1 then the rear tail lamp 2 in the recesses and push down as far as possible Push cables all the way into all guides in order to prevent damage Pull up license plate holder and fold down into horizontal position Open the tailgate ...

Page 68: ...of a workshop Load compartment Storage compartments in the load compartment Located on both sides of the load compartment floor Load compartment cover Do not place any objects on the cover Closing the cover Pull load compartment cover towards rear of vehicle using handle and insert retainers into brackets on either side of load compartment Opening the cover Remove load compartment cover from side ...

Page 69: ...lift and remove cover from the side guides Fit in reverse order Rear floor storage cover To access the rear floor storage compartment pull floor cover handle upwards Depending on version to access the rear floor storage compartment push both levers on the floor cover towards the handle and pull up the cover by the handle ...

Page 70: ... are designed to secure items against slippage e g using lashing straps or a luggage floor net Two additional lashing eyes are located in front of the rear seats Designed for carrying small light items only a luggage floor net helps keep loads from moving during sharp turns or quick starts and stops To install attach the four net hooks to the lashing eyes mounted on the load compartment floor Warn...

Page 71: ...he folded position objects must not be stacked higher than the seat backrests Secure objects with lashing straps attached to lashing eyes 3 69 Secure loose objects in the load compartment e g with a luggage floor net to prevent sliding When transporting objects in the load compartment the backrests of the rear seats must not be angled forward Do not allow the load to protrude above the upper edge ...

Page 72: ...with a roof load increases the sensitivity of the vehicle to cross winds and has a detrimental effect on vehicle handling due to the vehicle s higher centre of gravity Distribute the load evenly and secure it properly with retaining straps Adjust the tyre pressure and vehicle speed according to the load conditions Check and retighten the straps frequently Do not drive faster than 75 mph The permis...

Page 73: ...tment Unlock lever adjust steering wheel then engage lever and ensure it is fully locked Do not adjust steering wheel unless vehicle is stationary and steering wheel lock has been released Steering wheel controls The Infotainment system and a connected mobile phone can be operated via the controls on the steering wheel Further information is available in the Infotainment system instruction manual ...

Page 74: ...if the windscreen is frozen Switch off in car washes Adjustable wiper interval To set the wiping interval to a value between 1 and 10 seconds Switch on ignition Push lever down from position Wait until wiping frequency reaches the desired interval Set lever to position The interval remains stored until the next change or until the ignition is switched off Switching the ignition on and moving the l...

Page 75: ...em when the key is turned to ignition switch position ACC To turn wiper off move lever to position Keep the rain sensor area clean by activating the windscreen washer system Windscreen and headlight washer Pull lever Washer fluid is sprayed onto the windscreen If the lever is held longer the wiper operates for two cycles after the lever has been released and once more after a 3 second delay If the...

Page 76: ...ld button on end of lever Washer fluid is sprayed onto rear window and the wiper wipes a few times when the button is released Do not use if the windscreen is frozen Switch off in car washes Outside temperature A drop in temperature is indicated immediately and a rise in temperature after a time delay If outside temperature drops to 3 C the symbol illuminates in the Board Info Display as a warning...

Page 77: ...splay Board Info Display 3 91 Graphic Info Display Colour Info Display 3 93 Automatic time synchronisation Board Info Display The RDS Radio Data System signal of most VHF transmitters automatically sets the time identified by in the display Some RDS transmitters do not send a correct time signal In such cases switch off automatic time synchronisation and set the time manually ...

Page 78: ...lour Info Display With the navigation system date and time are set automatically upon receipt of a GPS satellite signal If the displayed time does not match local time it can be corrected manually or automatically by receiving an RDS time signal Some RDS transmitters do not send a correct time signal In such cases switch off automatic time synchronisation and set the time manually To set date and ...

Page 79: ...erational with ignition switch in positions ACC or ON Use of power outlets while the engine is not running will discharge the battery Additionally the power outlets are deactivated in the event of low vehicle battery voltage Electrical accessories that are connected must comply with the electromagnetic compatibility requirements laid down in DIN VDE 40 839 Do not connect any current delivering acc...

Page 80: ...displays the recorded distance in miles Trip odometer The top line displays the recorded distance since the last reset There are two independent trip odometers Press the trip odometer button once to toggle between Trip A and Trip B To reset press and hold the trip odometer button for a few seconds with the ignition on Tachometer Displays the engine speed Drive in a low engine speed range for each ...

Page 81: ...engine oil and filter change will be indicated can vary considerably Change engine oil 3 88 Transmission display Displays the mode or selected gear with automatic transmission P park position R reverse gear N neutral D drive position automatic mode 1 6 selected gear in manual mode Control indicators The control indicators described are not present in all vehicles The description applies to all ins...

Page 82: ...ssenger seat belt reminder 3 41 illuminates yellow The front passenger airbag is deactivated 3 48 9 Danger Risk of fatal injury for a child using a child restraint system together with activated front passenger airbag Risk of fatal injury for an adult person with deactivated front passenger airbag ...

Page 83: ...82 Instruments and controls Control indicators in the instrument cluster ...

Page 84: ... a warning chime and remains illuminated until seat belt is fastened Fastening the seat belt 3 40 Front passenger seat belt reminder k 3 41 Airbag and belt tensioners v illuminates red When the ignition is switched on v flashes briefly If it does not flash stays lit or flashes during driving there is a fault in the airbag system Seek the assistance of a workshop The airbags and belt pretensioners ...

Page 85: ... the engine is running Fault that could lead to catalytic converter damage 3 128 Ease up on the accelerator until the flashing stops Seek the assistance of a workshop immediately Service vehicle soon g illuminates yellow Illuminates when the engine is running to indicate a fault in the engine or transmission electronics The electronics switch to an emergency running programme fuel consumption may ...

Page 86: ... the assistance of a workshop Illuminates Electrical parking brake is operating with degraded performance 3 136 9 Warning Have the cause of the fault remedied immediately by a workshop Antilock brake system ABS u illuminates yellow The system is ready for operation when the control indicator extinguishes If the control indicator does not illuminate when the ignition is switched on stays lit or ill...

Page 87: ...escent control system 3 138 Power steering 2 illuminates yellow When the ignition is switched on 2 illuminates briefly If it does not illuminate stays lit or illuminates during driving there is a fault in the system Seek the assistance of a workshop Power steering 3 122 Ultrasonic parking assist r illuminates yellow Fault in system or Fault due to sensors that are dirty or covered by ice or snow o...

Page 88: ...t level 3 153 If there is sufficient coolant seek the assistance of a workshop Preheating illuminates yellow Preheating is activated Only activates when outside temperature is low If it illuminates during driving or if the engine cannot be started seek the assistance of a workshop as soon as possible Starting the engine 3 123 Diesel particle filter illuminates or flashes yellow The diesel particle...

Page 89: ... before seeking the assistance of a workshop 3 152 Low engine oil level S illuminates yellow When the ignition is switched on S illuminates briefly If it does not illuminate seek the assistance of a workshop Illuminates during driving Oil level is low top up oil to specified level 3 152 Change engine oil C illuminates yellow When the engine is started C illuminates briefly If it does not illuminat...

Page 90: ...te seek the assistance of a workshop Illuminates to indicate a fault in the immobiliser system The engine cannot be started Electronic immobiliser 3 26 Reduced engine power illuminates yellow Illuminates in conjunction with control indicator g the vehicle needs a service Move out of the flow of traffic as quickly as possible without impeding other vehicles stop the engine and restart after 10 seco...

Page 91: ...ator à flashes accompanied by a warning chime to warn the driver to reduce speed as appropriate Trailer indicator á illuminates green Illuminates when a trailer is connected to the vehicle 3 146 Bonnet open illuminates red Illuminates when the bonnet is open Stop start system 3 124 Door open illuminates red Illuminates when a door is open or not securely latched Tailgate open 1 illuminates red Ill...

Page 92: ...ccessed via the Info Display Functions are selected and executed in the menu on the display using the arrow buttons on the Infotainment system or the left adjuster wheel on the steering wheel If a check control warning message appears on the Info Display the display is blocked from other functions Acknowledge the message by pressing the OK button or the left adjuster wheel If there are several war...

Page 93: ...Menu item Audio then opens Call up System with the left arrow button and select with the OK button The first function of the System menu is highlighted Some of the functions appear on the display in an abbreviated form The functions are displayed in the following order Time synchronisation Time setting hours Time setting minutes Date setting day Date setting month Date setting year Ignition logic ...

Page 94: ...ation is marked with arrows Use the arrow buttons to make the required setting The setting is saved when the menu item is exited Ignition logic See Infotainment system instruction manual Language selection The display language for some functions can be selected Select the required language with the arrow buttons Setting units of measure Select the required unit of measurement with the arrow button...

Page 95: ...raphic Info Display Colour Info Display 3 101 Selecting functions The functions and settings of the Infotainment system can be accessed via the Info Display Functions are selected and executed in the menu on the display using the arrow buttons and the central multifunction knob on the Infotainment system or the left adjuster wheel on the steering wheel If a check control warning message appears on...

Page 96: ... Select using the left adjuster wheel on the steering wheel Turn the adjuster wheel to call up the required function Press the adjuster wheel to select marked items and confirm commands Press to operate the stop watch or restart measurement and calculation Trip computer 3 101 Function areas For each function area there is a main page Main which is selected at the top edge of the display Audio Navi...

Page 97: ...system date and time are set automatically upon receipt of a GPS satellite signal If the displayed time does not match local time it can be corrected manually or automatically by receiving an RDS time signal Some RDS transmitters do not send a correct time signal In such cases switch off automatic time synchronisation and set the time manually To set date and time manually select menu item Time Da...

Page 98: ...e indicated by a 6 in front of the menu item In systems with voice output when the language setting of the display is changed the system will ask whether the announcement language should also be changed see Infotainment system instruction manual Setting units of measure Select menu item Units from the Settings menu The available units are displayed Select the desired unit Selections are indicated ...

Page 99: ... a dark background Selections are indicated by a o in front of the menu item Ignition logic See Infotainment system instruction manual Vehicle messages Warning chimes When starting the engine or whilst driving Only one warning chime will sound at a time The warning chime regarding unfastened seat belts has priority over any other warning chime If seat belt is not fastened When operating the turn a...

Page 100: ...with tyre pressure monitoring system if low tyre pressures are detected relevant information appears on the information display Reduce speed and check tyre pressure at the next opportunity Tyre pressure monitoring system 3 176 Check tyre pressures 3 176 3 207 If there is a considerable loss of pressure a corresponding message appears indicating the relevant tyre Steer out of the flow of traffic as...

Page 101: ...tion Average speed Distance travelled Range Stop watch Board Info Display 3 91 Instantaneous consumption Display of the instantaneous consumption Display changes depending on speed Display in gal h below 8 mph Display in miles gal above 8 mph Average consumption Display of average consumption The measurement can be reset at any time Effective consumption Display of the amount of fuel consumed The ...

Page 102: ...atch Using the arrow buttons To start press left arrow button to select menu item Start and press OK button to start stop To reset press left arrow button to select menu item Reset and press OK button Using the left adjuster wheel on the steering wheel To start select menu item Start and press to start stop To reset select menu item Reset and press to confirm command Interruption of power supply I...

Page 103: ...ically after a brief delay If the fuel in the tank allows less than 30 miles of travel the warning Range appears on the display If the fuel in the tank allows less than 20 miles of travel the warning Refuel appears on the display Acknowledge the menu item 3 93 Instantaneous consumption Display of the instantaneous consumption Display changes depending on speed Display in gal h below 8 mph Display ...

Page 104: ...em All values After resetting is displayed for the trip computer information selected The recalculated values are displayed after a brief delay Stop watch Select menu item Timer from the Board Computer menu The Timer menu is displayed To start select menu item Start To reset select menu item Reset The desired stop watch display can be selected from the Options menu Driving Time excl Stops The time...

Page 105: ...ment of the time from manual activation via Start to manual deactivation via Reset Interruption of power supply If the power supply has been interrupted or if the battery voltage has dropped too low the values stored in the trip computer will be lost ...

Page 106: ...ditions 7 Off or deactivation of automatic light control 8 Sidelights 9 Headlights Control indicator C 3 89 Tail lights Tail lights illuminate together with low beam high beam and sidelights Automatic light control When the automatic light control function is switched on and the engine is running low beam switches on automatically depending on outside light conditions For reasons of safety the lig...

Page 107: ...or 8 cycles or more the exterior lights illuminate automatically High beam To switch from low to high beam push lever To switch to low beam pull lever back again Control indicator C 3 89 Headlight flash To activate the headlight flash pull lever Headlight range adjustment Manual headlight range adjustment With low beam switched on adapt headlight range to suit vehicle load Correct adjustment of th...

Page 108: ...If control indicator q illuminates in the instrument cluster while driving a fault has occurred Have the cause of the fault remedied immediately by a workshop Control indicator q 3 89 Headlights when driving abroad The asymmetrical headlight beam extends visibility at the edge of the road on the passenger side However when driving in countries where traffic drives on the opposite side of the road ...

Page 109: ...ance point and hold for longer indication The volume of the turn signal audible warning is dependent upon vehicle speed Switch the turn signal off manually by moving the lever to its original position Control indicators O 3 83 Front fog lights Operated with the button Control indicator illuminates in the instrument cluster when the front fog lights are switched on The front fog lights can only be ...

Page 110: ...e activated 1 Set light switch to 7 or AUTO 2 Switch off ignition 3 Move turn signal lever all the way up right parking lights or down left parking lights Confirmed by a signal tone and the corresponding turn signal control indicator To deactivate switch on the ignition or move the turn signal lever in the opposite direction Reversing lights The reversing lights come on when the ignition is on and...

Page 111: ... 3 93 Interior lights During entry and exit of the vehicle the front and rear courtesy lights automatically switch on and then off after a delay Note In the event of an accident with airbag deployment the courtesy lights are turned on automatically Front courtesy light Front and rear reading lights and the load compartment lights function as courtesy lights and illuminate when the doors or the tai...

Page 112: ...immediately by pressing button K in the roof lining Glovebox illumination Illuminates when the glovebox is opened Load compartment lighting Illuminates when a door or the tailgate is opened Reading lights Front reading lights Operated with the L and M buttons Avoid using front reading lights while driving in the dark as they can reduce driver visibility ...

Page 113: ...ior and interior lights illuminate for 20 seconds This function facilitates locating the vehicle when it is dark Exit lighting The low beam and reversing lights illuminate for 30 seconds after the driver exits the vehicle and closes the door Switching on 1 Switch off ignition 2 Remove ignition key 3 Open driver s door 4 Pull turn signal lever 5 Close driver s door If the driver s door is not close...

Page 114: ...he exterior lights turn off automatically 10 minutes after the ignition is switched off Battery discharge protection will not work if the lights are turned on 10 minutes after the ignition has been switched off the key cannot be removed from the ignition switch until the battery is recharged ...

Page 115: ...ue cold Heating will not be fully effective until the engine has reached normal operating temperature Air distribution M to head area via adjustable air vents L to head area via adjustable air vents and to foot wells K to foot wells J to windscreen front door windows and foot wells l to windscreen front door windows and head area via adjustable air vents All combinations are possible Fan speed Adj...

Page 116: ... cooling The air conditioning system cools and dehumidifies dries as soon as the outside temperature is slightly above freezing point Therefore condensation may form and drip from under the vehicle If no cooling or drying is required switch the cooling system off to save fuel Activated cooling might inhibit autostops Air recirculation system 4 Press button 4 to activate air recirculation mode Acti...

Page 117: ...l vents Demisting and defrosting Set the air distribution switch to l or J Set temperature control to warmest level Set fan to highest level Close centre air vents Open side air vents and direct them towards the door windows Switch on heated rear window Ü 3 31 Air conditioning n and air recirculation 4 are switched on automatically to improve defrosting efficiency when position l or J is selected ...

Page 118: ...tched on and the air distribution and fan speed are regulated automatically Open all air vents Set the preselected temperatures for driver s side and front passenger s side using the left and right rotary knobs Note All air vents are actuated automatically in Automatic mode The air vents should therefore always be open Temperature preselection Recommended comfort setting is 22 C Intermediate setti...

Page 119: ...able air vents and to foot wells K to foot wells J to windscreen front door windows and foot wells V to windscreen front door windows and head area via adjustable air vents All combinations are possible To return to Automatic mode Press AUTO button Automatic air recirculation t The automatic air recirculation system has an air quality sensor which switches on automatically if harmful ambient gases...

Page 120: ...d close the vents turn the horizontal adjuster wheel to the left or right Open air vents when air distribution switch is set to M or L The air supply is increased by switching on the fan Control the air temperature at the side air vents by adjusting the temperature control switch Direct the flow of air by tilting and swivelling the slats 9 Warning Do not attach any objects to the slats of the air ...

Page 121: ...eans the cabin air from dust soot pollen and spores Active carbon filter In addition to the particle filter the active carbon filter reduces odours Air conditioning regular operation In order to ensure continuously efficient performance cooling must be operated for a few minutes once a week irrespective of the weather and time of year Operation with cooling is not possible when outside temperature...

Page 122: ...Climate control 121 Cleaning of condenser and evaporator drainage Performance check ...

Page 123: ...eed is reduced Stop start system 3 124 Pedals To ensure the pedal travel is uninhibited there must be no mats in the area of the pedals Power steering Never leave the steering wheel on full lock when the vehicle is stationary as this may damage the power steering pump Control indicator 2 3 86 Starting and operating New vehicle running in Do not brake unnecessarily hard for the first few journeys D...

Page 124: ...g or to switch off the engine turn key back to LOCK Start attempts should not last longer than 15 seconds If engine does not start wait 10 seconds before repeating starting procedure The increased engine speed automatically returns to normal idling speed as the engine temperature rises Drive at a moderate speed especially in cold weather until normal engine operating temperatures have been reached...

Page 125: ...or at a standstill e g at a traffic light or in a traffic jam It starts the engine automatically as soon as the clutch is depressed A vehicle battery sensor ensures that an Autostop is only performed if the vehicle battery is sufficiently charged for a restart Activation The stop start system is available as soon as the engine is started the vehicle starts off and the conditions as stated below in...

Page 126: ...e exhaust temperature is not too high e g after driving with high engine load the ambient temperature is not too low the defrosting function is not activated the climate control system does not inhibit an engine stop the brake vacuum is sufficient the self cleaning function of the diesel particle filter is not active the vehicle has moved since the last Autostop Otherwise an Autostop will be inhib...

Page 127: ...cted to the power outlet a brief power drop during restart might be noticeable Parking Do not park the vehicle on an easily ignitable surface The high temperature of the exhaust system could ignite the surface Always apply the electrical parking brake Pull switch m For maximum force e g parking with a trailer or on inclines pull switch m twice Switch off the engine and turn the ignition key to pos...

Page 128: ...utostop is not available and fuel consumption may be higher during this period The emission of smells and smoke during this process is normal Under certain driving conditions e g short distances the system cannot clean itself automatically If cleaning of the filter is required and previous driving conditions did not enable automatic cleaning it will be indicated by control indicator 3 87 illuminat...

Page 129: ... damage the catalytic converter or electronic components Unburnt petrol will overheat and damage the catalytic converter Therefore avoid excessive use of the starter running the fuel tank dry and starting the engine by pushing or towing In the event of misfiring uneven engine running a reduction in engine performance or other unusual problems have the cause of the fault rectified by a workshop as ...

Page 130: ...celerator pedal and brake pedal at the same time When a gear is engaged the vehicle slowly begins to creep when the foot brake is released Engine braking To utilise the engine braking effect select a lower gear in good time when driving downhill see Manual mode Use of the engine braking effect as opposed to the use of the foot brake when driving downhill can extend the life of the brakes Rocking t...

Page 131: ...gear takes place at high engine revolutions Gears can be skipped by moving the selector lever repeatedly at short intervals After stopping 1st gear is automatically selected When starting on slippery surfaces tip selector lever forwards to engage 2nd gear To move back to position D move selector lever back to the right Electronic driving programmes Following a cold start the operating temperature ...

Page 132: ...e automatic transmission control indicator Z illuminates in the instrument cluster 3 84 Automatic shifting may be much harsher than normal or in the case of a serious fault cancelled altogether Have the cause of the fault remedied by a workshop If control indicator g illuminates in the instrument cluster when the engine is running this may indicate a fault in the transmission electronics 3 84 The ...

Page 133: ...transmission To engage reverse with the vehicle stationary wait 3 seconds after depressing clutch pedal and engage the gear If the gear does not engage set the lever to neutral release the clutch pedal and depress again then repeat gear selection Do not slip the clutch unnecessarily When operating depress the clutch pedal completely Do not use the pedal as a foot rest Caution It is not advisable t...

Page 134: ...is temporarily disabled If B flashes continuously there is a fault in the system seek the assistance of a workshop All wheel drive control indicator B 3 85 On road driving The increased traction of All wheel drive vehicles offers greater driving control in adverse road conditions particularly heavy snow and ice However All wheel drive vehicles are not skid proof and do not decrease stopping distan...

Page 135: ...the ingress of water into the following Brake fluid reservoir Air cleaner element Engine Transmission Axles Interior of vehicle Renew any lubricating oil or hydraulic fluid that has a milky appearance indicating contamination with water Cleaning Clean the vehicle thoroughly and as soon as possible after driving off road Do not let mud remain dry on any part of the vehicle as it becomes abrasive an...

Page 136: ...of the brake servo unit disappears once the brake pedal has been depressed once or twice Braking effect is not reduced but braking requires significantly greater force It is especially important to bear this in mind when being towed Control indicator R 3 84 Antilock brake system Antilock brake system ABS prevents the wheels from locking ABS starts to regulate brake pressure as soon as a wheel show...

Page 137: ...85 Releasing Switch on ignition Keep foot brake depressed and then push switch m If the foot brake is not depressed when attempting to release electrical parking brake a warning chime will sound and control indicator illuminates in the instrument cluster 3 89 Drive away function With the engine running selecting a forward gear manual transmission or engaging D automatic transmission and then depre...

Page 138: ...he brake pedal is depressed quickly and forcefully maximum brake force is automatically applied full braking Maintain steady pressure on the brake pedal for as long as full braking is required Maximum brake force is automatically reduced when the brake pedal is released Hill start assist The system helps prevent unintended movement when driving away on inclines When releasing the foot brake after ...

Page 139: ...o the wheels Active rollover protection If the vehicle moves in an unstable manner this function helps the vehicle maintain normal stability Trailer stability assist If the system detects snaking movements engine power is reduced and the vehicle trailer combination is selectively braked until the snaking ceases While system is working keep steering wheel as still as possible Descent control system...

Page 140: ...mperature over 400 C of friction material through severe or repeated braking It will extinguish when the temperature drops below 350 C These temperatures may differ according to vehicle conditions or outside conditions Flashing or illumination of the yellow control indicator u reminds the driver that the friction material needs to cool down drive the vehicle without braking as much as possible If ...

Page 141: ... only activate cruise control in automatic mode Control indicator m 3 90 Activation Press the e button control indicator m illuminates yellow in the instrument cluster Accelerate to the desired speed press the SET button and release it The current speed is stored and maintained Control indicator m illuminates green Accelerator pedal can be released Vehicle speed can be increased by depressing the ...

Page 142: ...ystem makes parking easier by measuring the distance between the vehicle and obstacles to the front and rear and giving acoustic signals It is the driver however who bears full responsibility for the parking manoeuvre The system consists of four ultrasonic parking sensors in both the front and rear bumpers Control indicator r 3 86 Activation With the ignition on the system must be activated manual...

Page 143: ...e are no obstacles near the front or rear bumper there is a fault in the system Have the cause of the fault remedied by a workshop Important hints for using the parking assist system 9 Warning Under certain circumstances various reflective surfaces on objects or clothing as well as external noise sources may cause the system to fail to detect obstacles Special attention has to be paid to low obsta...

Page 144: ...ge Note Use unleaded Premium fuel only for the following countries Armenia Azerbaijan Belarus Moldova Fuel for ethanol adapted engines E85 If access to E85 is limited then fuel with a different proportion of ethanol or normal RON 95 can be used for refuelling The engine s control management system is adjusted automatically according to the amount of ethanol in the fuel E85 fuel must fulfil the CWA...

Page 145: ...l water emulsions Diesel fuels must not be diluted with fuels for petrol engines Refuelling 9 Danger Before refuelling switch off engine and any external heaters with combustion chambers Switch off any mobile phones Follow the operating and safety instructions of the filling station when refuelling 9 Danger Fuel is flammable and explosive No smoking No naked flames or sparks If you can smell fuel ...

Page 146: ... 25 to 45 mpg The CO2 emission combined is within a range of 255 to 167 g km For the values specific for your vehicle refer to the EEC Certificate of Conformity provided with your vehicle or other national registration documents General information The official fuel consumption and specific CO2 emission figures quoted relate to the EU base model with standard equipment Fuel consumption data and CO...

Page 147: ... a trailer lubricate the coupling ball However do not do so if a stabiliser which acts on the coupling ball is being used to reduce snaking movements For trailers with low driving stability the use of a friction type stabiliser is strongly recommended Do not drive faster than 50 mph even in countries where higher speeds are permitted When driving uphill do not drive faster than 20 mph in 1st gear ...

Page 148: ...specified on the towing equipment identification plate and in the vehicle documents Always aim for the maximum load especially in the case of heavy trailers The vertical coupling load should never fall below 25 kg When measuring the vertical coupling load ensure the drawbar of the loaded trailer is at the same height as it will be when the trailer is coupled with the towing vehicle loaded This is ...

Page 149: ...ball bar audibly engages If it does not engage repeat fitting procedure Do not swing the coupling ball bar to the left or right or upwards and downwards to avoid disrupting correct fitting Lock coupling ball bar by turning the supplied key in the lock cylinder of the coupling ball bar Remove key Check that the coupling ball bar is correctly attached Green marking must be visible on lever Coupling ...

Page 150: ... ball bar out of coupling housing Remove any rust or dirt from area around the coupling housing and coupling ball bar connection before inserting sealing plug in the hole Place the coupling ball bar in the bag supplied fasten it with the strap and stow it below the floor cover in the load compartment Do not use steam jet cleaners or other high pressure cleaners to clean the coupling ball bar Trail...

Page 151: ...rical system e g changes of electronic control units chip tuning Caution When transporting the vehicle on a train or on a recovery vehicle the mud flaps might be damaged Vehicle storage Storage for a long period of time If the vehicle is to be stored for several months Wash and wax the vehicle Have the wax in the engine compartment and underbody checked Clean and preserve the rubber seals Change t...

Page 152: ...essure Fill up the washer fluid reservoir Check the engine oil level Check the coolant level Fit the number plate if necessary End of life vehicle recovery Information on end of life vehicle recovery centres and the recycling of end of life vehicles is available on our website where legally required Only entrust this work to an authorised recycling centre Vehicle checks Performing work 9 Warning O...

Page 153: ...ow height 20 25 cm Check that the bonnet is engaged Caution Do not press the bonnet into the latch to avoid dents Engine oil Check the engine oil level manually on a regular basis to prevent damage to the engine Ensure that the correct specification of oil is used Recommended fluids and lubricants 3 195 Check with the vehicle on a level surface The engine must be at operating temperature and switc...

Page 154: ...ioned out Capacities 3 206 Engine oil quality viscosity 3 195 Fit the cap on straight and tighten it Control indicators for engine oil pressure I 3 87 low engine oil S 3 88 and engine oil life C 3 88 Once the engine oil has been changed the engine oil life monitor needs to be reset Seek the assistance of a workshop Engine coolant The coolant provides freeze protection down to approx 28 C In northe...

Page 155: ...ed and have the cause of the coolant loss remedied by a workshop Engine coolant temperature control indicator W 3 87 Power steering fluid Caution Extremely small amounts of contamination can cause steering system damage and cause it to not work properly Do not allow contaminates to contact the fluid side of the reservoir cap dipstick or from entering the reservoir Open the cap and remove Wipe the ...

Page 156: ... enough room for expansion if the fluid freezes and to prevent damage to the reservoir Brakes In the event of minimum thickness of the brake lining a squealing noise sounds during braking Continued driving is possible but have the brake lining replaced as soon as possible Once new brake linings are installed do not brake unnecessarily hard for the first few journeys Brake fluid 9 Warning Brake flu...

Page 157: ...t a lead acid battery The vehicle battery is maintenance free provided that the driving profile allows sufficient charging of the battery Short distance driving and frequent engine starts can discharge the vehicle battery Avoid the use of unnecessary electrical consumers Batteries do not belong in household waste They must be disposed of at an appropriate recycling collection point Laying up the v...

Page 158: ... the instructions given in this paragraph may lead to a temporary deactivation of the stop start system When the vehicle battery is being replaced please ensure that there are no open ventilation holes in the vicinity of the positive terminal If a ventilation hole is open in this area it must be closed off with a dummy cap and the ventilation in the vicinity of the negative terminal must be opened...

Page 159: ...tains sulfuric acid which could cause blindness or serious burn injuries See the Owner s Manual for further information Explosive gas may be present in the vicinity of the vehicle battery Diesel fuel filter Drain diesel fuel filter of residual water at every engine oil change Place a container underneath the filter housing Turn drain plug anticlockwise using a suitable screwdriver to drain off the...

Page 160: ...at least 10 seconds before trying again If the engine fails to start seek the assistance of a workshop Wiper blade replacement Wiper blades on the windscreen Lift wiper arm press and hold retaining clip and detach wiper blade Attach the wiper blade slightly angled to the wiper arm and push until it engages Lower wiper arm carefully Bulb replacement Switch off the ignition and turn off the relevant...

Page 161: ...ensure locating dowel aligns with its socket Do not overtighten bolts or retainers Halogen headlights Halogen headlights A can be identified from Xenon headlights B by the different lens layout Low and high beam Halogen headlights have separate systems for high beam 1 inner bulbs and low beam 2 outer bulbs 1 Remove headlamp assembly 3 159 2 Remove headlamp cap 3 Release bulb retaining spring and r...

Page 162: ... clockwise 5 Reinstall bulb holder in lamp assembly by rotating it clockwise 6 Reinstall headlamp assembly Sidelights 1 Remove headlamp assembly 3 159 2 Remove headlamp cap and withdraw bulb holder located next to high beam bulb from lamp assembly 3 Remove bulb from bulb holder by pulling it straight out 4 Insert new bulb using a lint free cloth to hold bulb 5 Reinstall bulb holder in lamp assembl...

Page 163: ... it from bulb holder 4 Insert new bulb into bulb holder by pressing and rotating it clockwise 5 Reinstall bulb holder in lamp assembly by rotating it clockwise 6 Reinstall headlamp assembly Sidelights 1 Remove headlamp assembly 3 159 2 Rotate bulb holder anticlockwise and withdraw bulb holder from lamp assembly 3 Remove bulb from bulb holder by pulling it straight out 4 Insert new bulb using a lin...

Page 164: ...ctor 6 Reinstall panel to underside of vehicle using 2 screws removed earlier Tail lights Rear brake tail turn signal reverse and fog tail light 1 Open the tailgate and remove 2 screws and lamp assembly 2 Remove bulb holder by rotating it anticlockwise 3 Remove bulb from bulb holder by pressing the bulb in and rotating it anticlockwise 4 Insert new bulb into bulb holder 5 Reinstall bulb holder int...

Page 165: ...d brake light Have bulbs replaced by a workshop Number plate light 1 Remove 4 screws arrowed and remove lamp covers 2 Remove bulb holder from lamp assembly by rotating it anticlockwise 3 Pull bulb straight out of bulb holder 4 Insert new bulb 5 Reinstall bulb holder into lamp assembly rotate bulb holder clockwise and ensure it is secure 6 Replace lamp covers using the 4 screws removed earlier Inte...

Page 166: ...l system Fuses Data on the replacement fuse must match the data on the defective fuse There are two fuse boxes in the vehicle in the engine compartment next to the coolant reservoir in the instrument panel on the left hand side of the front passenger seat foot well or in right hand drive vehicles on the left hand side of the driver s seat foot well Before replacing a fuse turn off the respective s...

Page 167: ...t of spare fuses Spare fuses can be stored in the engine compartment fuse box Fuse extractor A fuse extractor may be located in the engine compartment fuse box Place the fuse extractor on the various types of fuse from the top or side and withdraw fuse ...

Page 168: ...Vehicle care 167 Engine compartment fuse box The fuse box is located next to the coolant reservoir in the engine compartment To open disengage cover and tilt upwards ...

Page 169: ...168 Vehicle care ...

Page 170: ...og lights FRT WPR Front wiper FUEL VAC Fuel pump vacuum pump HDLP WASHER Headlight washer HI BEAM LH High beam left hand HI BEAM RH High beam right hand HORN Horn HTD WASH MIR Heated washer fluid heated exte rior mirrors IGN COIL A Ignition coil IGN COIL B Ignition coil LO BEAM LH Low beam left hand Fuse Circuit LO BEAM RH Low beam right hand PRK LP LH Parking light left hand PRK LP RH Parking lig...

Page 171: ...ngages If the fuse box cover is not closed correctly malfunctions may occur Instrument panel fuse box The fuse box is located on the left hand side of the front passenger seat foot well or in right hand drive vehicles on the left hand side of the driver s seat foot well Release latch to open cover ...

Page 172: ...Vehicle care 171 ...

Page 173: ...le CLSTR Instrument cluster DRL Daytime running lights DR LCK Driver door lock DRVR PWR SEAT Driver power seat DRV PWR WNDW Driver power window F DOOR LOCK Fuel filler flap FRT WSR Front washer FSCM Fuel system FSCM VENT SOL Fuel system vent solenoid HEATING MAT SW Heating mat switch HTD SEAT PWR Seat heating Fuse Circuit HVAC BLWR Climate control air conditioning fan IPC Instrument panel cluster ...

Page 174: ...te radio climate control data link connection After changing of defective fuses close the fuse box cover and press until it engages If the fuse box cover is not closed correctly malfunctions may occur Vehicle tools Tools Vehicles with spare wheel In vehicles with a spare wheel a jack and vehicle tools kit are available The jack and vehicle tools have been specially developed for your vehicle and m...

Page 175: ...he tailgate opening Remove wing bolt from the jack by rotating it anticlockwise and remove the jack and wheel wrench bag Remove straps holding the bag containing the wheel wrench Remove wheel wrench from the bag Vehicles with tyre repair kit In vehicles with a tyre repair kit there may not be a jack and vehicle tool kit The tyre repair kit is in a storage compartment below the floor cover in the l...

Page 176: ...eels Tyres of size 215 70 R 16 are recommended as winter tyres In accordance with country specific regulations affix the speed sticker in the driver s field of view If winter tyres are installed that have not been approved for your vehicle Electronic Stability Control ESC system performance may be affected 3 137 Seek the assistance of a workshop regarding availability of approved winter tyres If w...

Page 177: ...r vehicle or other national registration documents The driver is responsible for correct adjustment of tyre pressure 9 Warning If the pressure is too low this can result in considerable tyre warm up and internal damage leading to tread separation and even to tyre blow out at high speeds If the tyre pressure shall be reduced or increased on a vehicle with tyre pressure monitoring system switch off ...

Page 178: ...the left rear tyre is shown together with the current tyre pressure slight pressure deviation Reduce speed Check tyre pressure at next opportunity with an appropriate gauge and correct if necessary On the Colour Info Display this message will appear in yellow A graphic indicating the front left tyre is shown together with the current tyre pressure significant pressure deviation or direct pressure ...

Page 179: ...ary by more than 2 mm The legally permissible minimum tread depth 1 6 mm has been reached when the tread has worn down as far as one of the tread wear indicators TWI Their position is indicated by markings on the sidewall If there is more wear at the front than the rear swap round front wheels and rear wheels Ensure that the direction of rotation of the wheels is the same as before Tyres age even ...

Page 180: ...han 15 mm to the tyre tread and the inboard sides including chain lock 9 Warning Damage may lead to tyre blowout Tyre chains are permitted only on 16 inch wheels We recommend you consult your service partner If the use of tyre chains is required after suffering a flat front tyre fit the temporary spare wheel on the rear axle and transfer one of the rear wheels to the front axle General The use of ...

Page 181: ...over handle upwards 3 68 Vehicle tools 3 173 Caution Do not allow objects to protrude above the top of the rear floor storage compartment to avoid damage to the storage area and the load compartment floor 1 Release the sealant filler hose 1 and the power plug 2 2 Unscrew valve cap from defective tyre Screw the sealant filler hose onto the tyre valve 3 Connect the power plug to the power outlet Unp...

Page 182: ... continue the filling procedure for 10 minutes If the prescribed tyre pressure is still not obtained the tyre is too badly damaged Seek the assistance of a workshop Drain excess tyre pressure with the button next to the pressure gauge Do not run the compressor for longer than 10 minutes 8 Detach the tyre repair kit and replace the tyre valve cap 9 Remove any excess sealant using a cloth 10 Take th...

Page 183: ...least 30 minutes Note the expiry date of the kit After this date its sealing capability is no longer guaranteed Pay attention to storage information on sealant canister Replace the used sealant canister To remove sealant canister release sealant filler hose and air hose slide canister out of housing and unscrew hose from canister Dispose of the canister as prescribed by applicable laws The accesso...

Page 184: ...ges Never exceed jack maximum working load 900 kg If the ground on which the vehicle is standing is soft a solid board max 1 cm thick should be placed under the jack Do not raise the vehicle more than is necessary to change a wheel No people or animals may be in the vehicle when it is jacked up Never crawl under a jacked up vehicle Do not start the engine when it is raised on the jack Clean wheel ...

Page 185: ...tely and reposition the jack Raise the vehicle until the wheel is just clear of the ground 6 Unscrew wheel nuts completely and wipe clean with a cloth Do not grease the threads Put wheel nuts somewhere where the threads will not be soiled 7 Change the wheel Notes on spare wheel 3 185 8 Screw on the wheel nuts and tighten slightly by hand by turning clockwise until wheel is held against the hub 9 R...

Page 186: ...r use on your vehicle only If mounting a spare wheel which is different from the other wheels this wheel might be classified as a temporary spare wheel and the corresponding speed limits apply even though no label indicates this Seek the assistance of a workshop to check the applicable speed limit Use of the temporary spare wheel could affect driveability particularly if using winter tyres Have th...

Page 187: ... is not permitted on the temporary spare wheel Tyre chains 3 179 Directional tyres Fit directional tyres such that they roll in the direction of travel The rolling direction is indicated by a symbol e g an arrow on the sidewall The following applies to tyres fitted opposing the rolling direction Driveability may be affected Have the defective tyre renewed as soon as possible and have the wheel bal...

Page 188: ...hen handling a battery Use a booster battery with the same voltage 12 Volts Its capacity Ah must not be much less than that of the discharged battery Use jump leads with insulated terminals and a cross section of at least 16 mm2 25 mm2 for diesel engines Do not disconnect the discharged battery from the vehicle Switch off all unnecessary electrical consumers The Infotainment system may be damaged ...

Page 189: ...s start the other engine Start attempts should be made for no longer than 15 seconds at an interval of 1 minute 3 Allow both engines to idle for approx 3 minutes with the leads connected 4 Switch on electrical consumers e g headlights heated rear window of the vehicle receiving the jump start 5 Operate discharged vehicle for approx 20 minutes to allow for adequate battery recharging 6 Reverse abov...

Page 190: ...ded to brake and steer Keep tow rope clear of front bumper and ensure it is securely fixed to the towing eye at both ends Pull on the tow rope to check To prevent the entry of exhaust gases from the towing vehicle switch on the air recirculation system 3 115 and close the windows Vehicles with manual transmission The vehicle must be towed facing forwards The maximum speed is 55 mph In all other ca...

Page 191: ...revent damage do not take up slack in the tow rope too quickly After towing unscrew the rear towing eye attachment clockwise to remove and reinstall the cover Appearance care Exterior care Locks The locks are lubricated at the factory using a high quality lock cylinder grease Use de icing agent only when absolutely necessary as this has a degreasing effect and impairs lock function After using a d...

Page 192: ...hts Headlight and other light covers are made of plastic Do not use any abrasive or caustic agents do not use an ice scraper and do not clean them dry Polishing and waxing Wax the vehicle regularly at the latest when water no longer beads Otherwise the paintwork will dry out Polishing is necessary only if the paint has become dull or if solid deposits have become attached to it Paintwork polish wi...

Page 193: ...ith a steam jet or high pressure jet cleaner at least once a year Operate the rear carrier system once in a while if not in regular use in particular during winter Interior care Interior and upholstery Only clean the vehicle interior including the instrument panel fascia and panelling with a dry cloth or interior cleaner Clean the leather upholstery with clear water and a soft cloth In case of hea...

Page 194: ...er parts Plastic and rubber parts can be cleaned with the same cleaner as used to clean the body Use interior cleaner if necessary Do not use any other agent Avoid solvents and petrol in particular Do not use high pressure jet cleaners ...

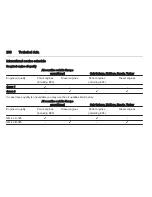
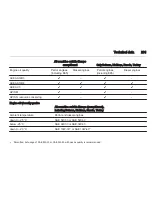
Page 195: ... The European service intervals are valid for the following countries Andorra Austria Belgium Cyprus Czech Republic Denmark Estonia Finland France Germany Greece Greenland Hungary Iceland Ireland Italy Latvia Lithuania Luxembourg Malta Netherlands Norway Poland Portugal Serbia Slovakia Slovenia Spain Sweden Switzerland United Kingdom Service display 3 80 International service intervals Main servic...

Page 196: ...n on the containers Engine oil Engine oil is identified by its quality and its viscosity Quality is more important than viscosity when selecting which engine oil to use The oil quality ensures e g engine cleanliness wear protection and oil ageing control whereas viscosity grade gives information on the oil s thickness over a temperature range Dexos is the newest engine oil quality that provides op...

Page 197: ... antifreeze Consult a workshop The system is factory filled with coolant designed for excellent corrosion protection and frost protection down to approx 28 C In northern countries with very low temperatures the factory filled coolant provides frost protection down to approx 37 C This concentration should be maintained all year round The use of additional coolant additives that intend to give addit...

Page 198: ...cle data 199 Vehicle identification Vehicle Identification Number The Vehicle Identification Number is visible through the windscreen The Vehicle Identification Number is also engraved on the top right hand side of the bulkhead near the centre of the engine firewall ...

Page 199: ...ed the permissible gross vehicle weight For example if the front axle is bearing its maximum permissible load the rear axle can only bear a load that is equal to the gross vehicle weight minus the front axle load The technical data is determined in accordance with European Community standards We reserve the right to make modifications Specifications in the vehicle documents always have priority ov...

Page 200: ...nes including E85 Diesel engines Petrol engines including E85 Diesel engines dexos 1 dexos 2 In case dexos quality is unavailable you may use max 1 litre engine oil quality ACEA C3 once between each oil change Engine oil viscosity grades All European countries and Israel except Belarus Moldova Russia Turkey Ambient temperature Petrol and diesel engines down to 25 C SAE 5W 30 or SAE 5W 40 below 25 ...

Page 201: ...ngines including E85 Diesel engines Petrol engines including E85 Diesel engines dexos 1 dexos 2 In case dexos quality is unavailable you may use the oil qualities listed below All countries outside Europe except Israel Only Belarus Moldova Russia Turkey Engine oil quality Petrol engines including E85 Diesel engines Petrol engines including E85 Diesel engines GM LL A 025 GM LL B 025 ...

Page 202: ...A A3 B3 ACEA A3 B4 ACEA C3 API SM API SN resource conserving Engine oil viscosity grades All countries outside Europe except Israel including Belarus Moldova Russia Turkey Ambient temperature Petrol and diesel engines down to 25 C SAE 5W 30 or SAE 5W 40 below 25 C SAE 0W 30 or SAE 0W 40 down to 20 C SAE 10W 301 or SAE 10W 401 1 Permitted but usage of SAE 5W 30 or SAE 5W 40 with dexos quality is re...

Page 203: ...ype Petrol Petrol Diesel Diesel Cetane requirement CN 49 D 49 D Octane rating RON recommended2 95 95 possible 98 913 98 913 Additional fuel type E85 E85 Oil consumption l 1000 km 0 6 0 6 0 6 0 6 2 Use unleaded Premium fuel only for the following countries Armenia Azerbaijan Belarus Moldova 3 Use of 91 RON fuel reduces power and torque If no unleaded Premium fuel is available 91 RON can be used tak...

Page 204: ...Automatic transmission 109 123 113 119 Front wheel drive Engine A 24 XF A 30 XF A 22 DM A 22 DMH Maximum speed4 mph Manual transmission 118 117 Automatic transmission 114 4 The maximum speed indicated is achievable at kerb weight without driver plus 200 kg payload Optional equipment could reduce the specified maximum speed of the vehicle ...

Page 205: ...ine All wheel drive Front wheel drive A 24 XF 1825 1885 1845 1905 1750 1810 A 30 XF 1875 1935 A 22 DM 1911 1971 1936 1996 1836 1896 1861 1921 A 22 DMH 1911 1971 1936 1996 Vehicle dimensions Length mm 4596 Width mm 1850 Height with roof rails mm 1761 Height without roof rails mm 1717 Wheelbase mm 2707 Track width mm Front 1569 Rear 1576 ...

Page 206: ...Technical data 205 Turning circle diameter wall to wall m 12 78 Turning circle diameter kerb to kerb m 11 87 Maximum wading depth mm at 3 mph 450 Approach angle 20 Ramp angle 18 Departure angle 24 ...

Page 207: ...206 Technical data Capacities Engine oil Engine A 24 XF A 30 XF A 22 DM A 22 DMH including filter l 4 7 5 7 5 6 5 6 between MIN and MAX l 1 0 1 0 1 0 1 0 Fuel tank Petrol diesel nominal capacity l 65 ...

Page 208: ...ont rear kPa bar psi kPa bar psi kPa bar psi kPa bar psi kPa bar psi kPa bar psi All 215 70 R 165 235 65 R 17 235 55 R 18 235 50 R 19 240 2 4 35 240 2 4 35 260 2 6 38 260 2 6 38 240 2 4 35 280 2 8 41 T 155 90 R 166 Temporary spare 420 4 2 60 420 4 2 60 420 4 2 60 420 4 2 60 5 Spare wheel or winter tyres 6 Spare wheel only ...

Page 209: ...bsite Vehicle data recording and privacy Event data recorders Data storage modules in the vehicle A large number of electronic components of your vehicle contain data storage modules temporarily or permanently storing technical data about the condition of the vehicle events and errors In general this technical information documents the condition of parts modules systems or the environment Operatin...

Page 210: ...ta are deleted from the error storage module or they are constantly overwritten When using the vehicle situations may occur in which these technical data related to other information accident report damages on the vehicle witness statements etc may be associated with a specific person possibly with the assistance of an expert Additional functions contractually agreed upon with the client e g vehic...

Page 211: ...90 Apply footbrake 89 Armrest 39 Armrest storage 57 Automatic anti dazzle 29 Automatic dimming 28 Automatic headlight levelling system 89 Automatic level control 106 139 Automatic light control 105 Automatic transmission 84 128 AUX input 57 B Battery 83 Battery discharge protection 113 Battery jump starting 187 Belt pretensioners 40 Belts 40 Bicycle rack 57 Board Info Display 91 Bonnet 152 Bonnet ...

Page 212: ... fuel filter 89 Drink holders 55 Driver assistance systems 140 Driving characteristics and towing tips 146 Driving hints 122 E Electric adjustment 27 Electrical parking brake 85 136 Electrical parking brake fault 85 Electrical system 165 Electronic climate control system 116 Electronic driving programmes 130 Electronic Stability Control 86 137 Electronic Stability Control off 87 End of life vehicl...

Page 213: ...itions 123 Immobiliser 26 89 Indicators 79 Information displays 91 Instrument cluster 79 Instrument panel fuse box 170 Instrument panel illumination 165 Instrument panel illumination control 110 Instrument panel overview 10 Interior care 192 Interior lighting 110 Interior lights 110 164 Interior mirrors 28 Interruption of power supply 131 Introduction 3 ISOFIX child restraint systems 54 J Jump sta...

Page 214: ...Rear fog lights 109 Rear seats 38 39 Rear window wiper washer 75 Recommended fluids and lubricants 195 199 Reduced engine power 89 Refuelling 144 Remote control 19 Reversing lights 109 Roof 31 Roof load 70 Roof rack 70 S Safety belts 40 Seat adjustment 6 35 Seat belt 8 Seat belt reminder 41 83 Seat belts 40 Seat folding 36 Seat heating 38 Seat position 34 Selector lever 129 Service 120 194 Service...

Page 215: ...sure monitoring system 99 176 Tyre pressures 207 Tyre repair kit 179 Tyres and wheel size changing 178 U Ultrasonic parking assist 86 141 Underseat storage 57 Upholstery cleaning 192 Upshift 85 Using this manual 3 V Vehicle battery 156 Vehicle checks 151 Vehicle data 199 Vehicle data recording and privacy 208 Vehicle dimensions 204 Vehicle Identification Number 197 Vehicle jack 173 Vehicle securit...

Reviews: