background image

EN

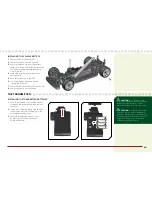
dynamIte tazer waterproof 45a sensorless brushless esC 

 / / / / / / / / / / / / / / / / / / / / / / / / / / / / / / / / / / / / / / / / / / / / / 

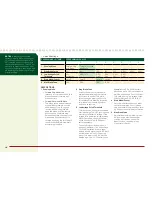
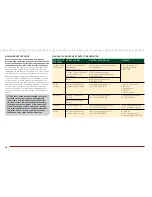
technical SPecificationS

type


Sensorless Brushless/Waterproof

constant/Peak


45A/290A

resistance


0.0012 Ohms

function


Forward Only with Brake 

Forward/Reverse with Brake

operation


Proportional forward, proportional 

reverse with braking delay

Battery type/ input Voltage


2–3 cell Li-Po/Li-Fe or  

4–9 cell Ni-MH/Ni-Cd

Bec output


6V/3A

overload Protection 

Thermal

dimensions (lxWxh) 

1.89 x 1.39 x 1.39 in  

(48 x 35.2 x 35.2mm)

Weight


2.61 oz (74 g) with wires
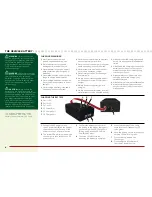
eSc led StatuS


»

No ESC LEDs will glow when there is 

no throttle input from the transmitter.


»

The red ESC LED glows when there is 

any throttle input from the transmitter.

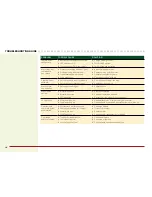
audiBle WarninG toneS

1  input voltage:

 The ESC checks the  

in put voltage when it is powered ON. 

If a voltage problem is detected, the 

ESC continuously sounds 2 beeps 

with a 1 second pause (xx-xx-xx). 

Power OFF the ESC and ensure the 

connections are secure and that  

the battery power is not too low  

for safe operation. 

2  radio connection:

 The ESC checks 

radio signal input when it is powered 

ON. If a problem is detected, the ESC 

continuously sounds 1 beep with a 2 

second pause (x--x--x). Power OFF 

the ESC and ensure the radio  

system is operating correctly.

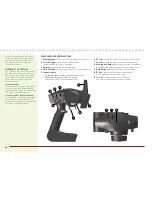
eSc caliBration Procedure

Ensure proper ESC function by calibrat-

ing the ESC to your transmitter inputs.

1

  Power OFF the ESC.

2

  Ensure your transmitter is powered 

ON, the throttle is not reversed, the 

throttle trim is neutral and the throttle 

travel range is at 100%. 

3

  Press the SET button while powering 

ON the ESC. Release the button as 

soon as the green LED starts to flash.

4

  Calibrate the throttle points by  

pressing the SET button once  

after each step.

• 

neutral 

Leave the throttle 

(1 flash)  

at rest, untouched

• 

full throttle

  Pull the throttle  

(2 flashes)

   fully back

• 

full brake/

  Push the throttle 

reverse


fully forward 

(3 flashes)

5

  The motor vibrates for 3 seconds 

after the last step is completed. 

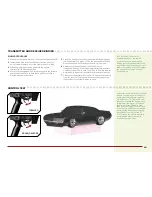
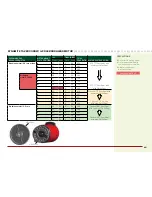
eSc functionS and ModeS

The ESC includes programming  

options so you can adjust the way your 

vehicle performs. Refer to the included 

settings table to adjust the ESC for  

your driving conditions.

eSc ProGraMMinG Procedure

Programming is accomplished using the 

SET button on the ON/OFF switch.

Programming the eSc
1

  Connect a fully charged battery  

to the ESC.

2

  Power ON the ESC.

3

  Hold the SET button for 1 second  

until the green LED blinks, then  

release the SET button to enter  

programming mode.

4

  Press and release the SET button  

as needed to get to the desired  

menu option (the green LED will  

blink corresponding to the menu  

item number).

5

  When at the desired menu item,  

hold the SET button for 3 seconds 

until the red LED blinks.

6

  Press the SET button to move among 

the settings based on how many 

times the red LED blinks (Refer  

to the table for more information).

7

  Save the setting by holding the  

SET button for 3 seconds.

8

  Power OFF the ESC and repeat  

the instructions above to change 

other settings.

tip:

 If desired, the ESC programming 

can be returned to default settings  

by powering ON the ESC and holding 

the SET button for 5 seconds.

Summary of Contents for Vaterra 1969 Chevrolet Camaro SS

Page 1: ...owner s manual bedienungsanleitung manuel de l utilisateur manuale dell utente 1969 Chevrolet CAMARO SS...

Page 2: ...2...

Page 3: ...EN...

Page 4: ...nual to become familiar with the features of the product before operating Failure to operate the product correctly can result in damage to the product personal property and cause serious injury This i...

Page 5: ...and gently rinse the mud and dirt off with a garden hose Avoid rinsing the bearings and transmission NOTICE Never use a pressure washer to clean your vehicle Use an air compressor or a can of compress...

Page 6: ...s Quick Start Please read the entire manual to gain a full understanding of the V100 sedan fine tuning the setup and performing maintenance 1 Read the safety precautions found in this manual 2 Charge...

Page 7: ...20C Li Po Battery Dynamite 10W Li Po AC Balance Charger 4 AA Batteries for transmitter Components required tools Hobby grade knife Needle nose pliers Side cutting pliers Safety goggles Soldering iron...

Page 8: ...battery in approximately 2 2 hours WARNING Failure to exercise caution while using this product and comply with the following warnings could result in product malfunction electrical issues excessive h...

Page 9: ...itter Installing The Transmitter Batteries 1 Push in the battery cover a small amount to release the retaining tab then remove the cover 2 Install 4 AA batteries taking care to align the battery polar...

Page 10: ...tter into Bind Mode 10 ST REV reverses the function of the steering when the wheel is turned left or right 11 TH REV reverses the function of the speed control when pulled back or pushed forward For m...

Page 11: ...sh after 4 seconds when the transmitter is in bind mode 6 Release the bind button after the red LED on the transmitter flashes Continue holding the failsafe positions until the receiver LED is solid T...

Page 12: ...before driving the vehicle again Remove the body of the vehicle to reduce cooling time run time Examine your vehicle on a regular basis Use a brush to remove dirt and dust Look for damage to the suspe...

Page 13: ...ottle trim is neutral and the throttle travel range is at 100 3 Press the SET button while powering ON the ESC Release the button as soon as the green LED starts to flash 4 Calibrate the throttle poin...

Page 14: ...tery pack is higher than 9 0V it will be treated as a 3 cell Li Po battery pack if it is lower than 9 0V it will be treated as a 2 cell Li Po battery pack Example for a 8 0V Ni MH battery pack used wi...

Page 15: ...7 12 32 8 93 C 24 77 12 32 8 56 D 25 77 12 32 8 21 Brushless motor 3300Kv E 26 77 12 32 7 90 F 27 77 12 32 7 60 STD 77T Spur Gear with max Pinion Gear G 28 77 12 32 7 33 H 29 77 12 32 7 08 I 30 77 12...

Page 16: ...ll the way Replace or repair servo Won t turn in one direction Servo gears damaged Replace servo Motor does not run Motor plugs loose Motor wire broken ESC damaged Plug in completely Repair or replace...

Page 17: ...w These terms are governed by Illinois law without regard to conflict of law principals This warranty gives you specific legal rights and you may also have other rights which vary from state to state...

Page 18: ...be responsible for arranging return shipment of the un serviced Product through a carrier of the sender s choice and at the sender s expense Horizon will hold non compliant Product for a period of 60...

Page 19: ...MC Directive 2004 108 EC and LVD Directive 2006 95 EC EN 300 328 V1 7 1 2006 EN301 489 1 V1 9 2 2012 EN301 489 17 V2 1 1 2009 EN60950 1 2006 A11 2009 A1 2010 A12 2011 EN55022 2010 AC 2011 EN55024 2010...

Reviews: