background image

10

7

4

1

2

5

6

3

8

9

10

11

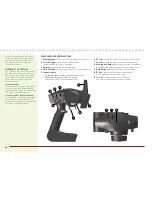
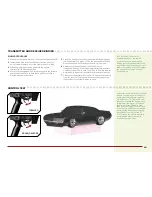
SPektruM dX2e radio SySteM 

1


Steering Wheel

 controls direction (left/right) of the model

2


throttle trigger

 controls speed and direction  

(forward/brake/reverse) of the model

3


antenna

 transmits the signal to the model

4


on/off Switch

 turns the power ON/OFF for the transmitter

5


indicator lights


• 

Solid green light

 indicates adequate battery power 

• 

Flashing green light

 indicates the battery  

voltage is critically low. Replace batteries.

6


St. trim

 adjusts the “hands off” direction of the model

7


th. trim

 adjusts the motor speed to stop at neutral

8


Steering dual rate

 adjusts the amount the front wheels  

move when the steering wheel is turned left and right

9


Bind Button 

puts the transmitter into Bind Mode

10


St. reV

 reverses the function of the steering  

when the wheel is turned left or right

11


th. reV

 reverses the function of the speed  

control when pulled back or pushed forward

For more information on the trans- 

mitter, go to www.horizonhobby.com  

and click on the support tab for the 

Spektrum DX2E to download the  

instruction manual.

chanGinG the rf Mode

The DX2E has a France RF Mode that 

complies with French regulations. The 

DX2E must be in France mode when 

used outdoors in France. At all other 

times, the transmitter should be in 

Standard mode.

france mode on 

Turn the wheel full left, pull the trigger 

full throttle and hold down the bind 

button while turning on the transmitter. 

The green LED will flash twice.

france mode off (Standard Mode) 

Turn the wheel full right, pull the trigger 

full throttle and hold down the bind 

button while turning on the transmitter. 

The green LED will flash once.

/ / / / / / / / / / / / / / / / / / / / / / / / / / / / / / / / / / / / / / / / / / / / / / / / / / / / / / / / / / / / / / / / / / / / / / / / / / / / / / / / / / / / / / / / / / / / / / / / / / / / /
Summary of Contents for Vaterra 1969 Chevrolet Camaro SS

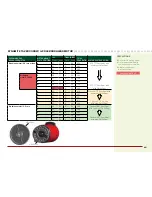
Page 1: ...owner s manual bedienungsanleitung manuel de l utilisateur manuale dell utente 1969 Chevrolet CAMARO SS...

Page 2: ...2...

Page 3: ...EN...

Page 4: ...nual to become familiar with the features of the product before operating Failure to operate the product correctly can result in damage to the product personal property and cause serious injury This i...

Page 5: ...and gently rinse the mud and dirt off with a garden hose Avoid rinsing the bearings and transmission NOTICE Never use a pressure washer to clean your vehicle Use an air compressor or a can of compress...

Page 6: ...s Quick Start Please read the entire manual to gain a full understanding of the V100 sedan fine tuning the setup and performing maintenance 1 Read the safety precautions found in this manual 2 Charge...

Page 7: ...20C Li Po Battery Dynamite 10W Li Po AC Balance Charger 4 AA Batteries for transmitter Components required tools Hobby grade knife Needle nose pliers Side cutting pliers Safety goggles Soldering iron...

Page 8: ...battery in approximately 2 2 hours WARNING Failure to exercise caution while using this product and comply with the following warnings could result in product malfunction electrical issues excessive h...

Page 9: ...itter Installing The Transmitter Batteries 1 Push in the battery cover a small amount to release the retaining tab then remove the cover 2 Install 4 AA batteries taking care to align the battery polar...

Page 10: ...tter into Bind Mode 10 ST REV reverses the function of the steering when the wheel is turned left or right 11 TH REV reverses the function of the speed control when pulled back or pushed forward For m...

Page 11: ...sh after 4 seconds when the transmitter is in bind mode 6 Release the bind button after the red LED on the transmitter flashes Continue holding the failsafe positions until the receiver LED is solid T...

Page 12: ...before driving the vehicle again Remove the body of the vehicle to reduce cooling time run time Examine your vehicle on a regular basis Use a brush to remove dirt and dust Look for damage to the suspe...

Page 13: ...ottle trim is neutral and the throttle travel range is at 100 3 Press the SET button while powering ON the ESC Release the button as soon as the green LED starts to flash 4 Calibrate the throttle poin...

Page 14: ...tery pack is higher than 9 0V it will be treated as a 3 cell Li Po battery pack if it is lower than 9 0V it will be treated as a 2 cell Li Po battery pack Example for a 8 0V Ni MH battery pack used wi...

Page 15: ...7 12 32 8 93 C 24 77 12 32 8 56 D 25 77 12 32 8 21 Brushless motor 3300Kv E 26 77 12 32 7 90 F 27 77 12 32 7 60 STD 77T Spur Gear with max Pinion Gear G 28 77 12 32 7 33 H 29 77 12 32 7 08 I 30 77 12...

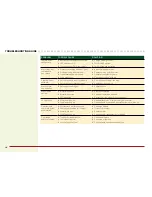
Page 16: ...ll the way Replace or repair servo Won t turn in one direction Servo gears damaged Replace servo Motor does not run Motor plugs loose Motor wire broken ESC damaged Plug in completely Repair or replace...

Page 17: ...w These terms are governed by Illinois law without regard to conflict of law principals This warranty gives you specific legal rights and you may also have other rights which vary from state to state...

Page 18: ...be responsible for arranging return shipment of the un serviced Product through a carrier of the sender s choice and at the sender s expense Horizon will hold non compliant Product for a period of 60...

Page 19: ...MC Directive 2004 108 EC and LVD Directive 2006 95 EC EN 300 328 V1 7 1 2006 EN301 489 1 V1 9 2 2012 EN301 489 17 V2 1 1 2009 EN60950 1 2006 A11 2009 A1 2010 A12 2011 EN55022 2010 AC 2011 EN55024 2010...

Reviews: