


5. Acquisizione delle immagini CBCT
Manuale d'istruzioni Green X
(
PHT-75CHS
)
59
Ita
lia
no
5. Acquisizione delle immagini CBCT
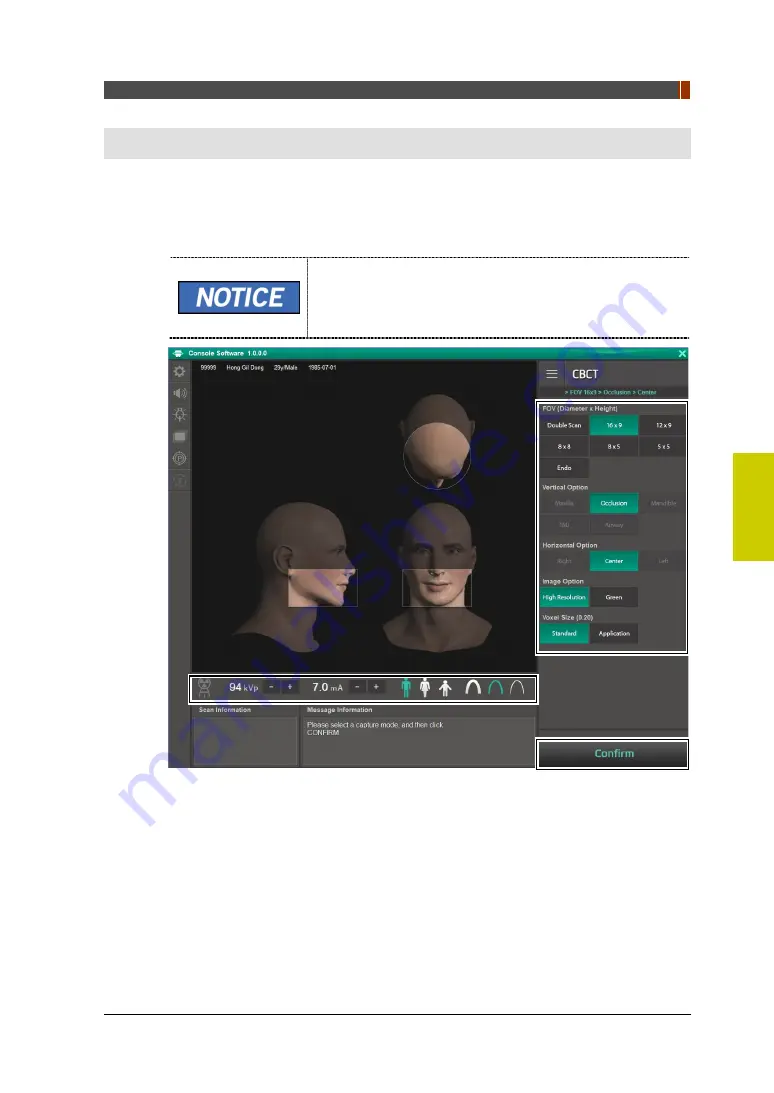
5.1
Configurazione parametri esposizione
Per acquisire le immagini CBCT, è necessario completare prima
È possibile impostare i parametri di acquisizione
dell'immagine sul software per la console avviato su PC.
Sono sincronizzati e mostrano le medesime impostazioni
ambientali.
Summary of Contents for Green X PHT-75CHS
Page 1: ...User manual Model PHT 75CHS Version 1 12 English Fran ais Deutsch Espa ol Italiano T rk e...
Page 2: ......
Page 4: ...Notice iv Green X PHT 75CHS User Manual Left blank intentionally...
Page 8: ...Conventions in this Manual 2 Green X PHT 75CHS User Manual Left blank intentionally...
Page 22: ...2 Getting Started 16 Green X PHT 75CHS User Manual Left blank intentionally...
Page 66: ...4 Acquiring CEPH Images Optional 60 Green X PHT 75CHS User Manual Left blank intentionally...
Page 96: ......
Page 98: ...Avis iv Green X PHT 75CHS Manuel d utilisation Cette page est volontairement laiss e vierge...
Page 190: ......
Page 192: ...Hinweis iv Green X PHT 75CHS Handbuch Absichtlich freigelassen...
Page 196: ...Konventionen in diesem Handbuch 2 Green X PHT 75CHS Handbuch Absichtlich freigelassen...
Page 210: ...2 Erste Schritte 16 Green X PHT 75CHS Handbuch Absichtlich freigelassen...
Page 254: ...4 Erstellen von CEPH Bildern optional 60 Green X PHT 75CHS Handbuch Absichtlich freigelassen...
Page 284: ......
Page 286: ...Avviso iv Manuale d istruzioni Green X PHT 75CHS Lasciato intenzionalmente in bianco...
Page 304: ...2 Per cominciare 16 Manuale d istruzioni Green X PHT 75CHS Lasciato intenzionalmente in bianco...
Page 378: ......
Page 380: ...Aviso iv Manual de usuario de Green X PHT 75CHS Se ha dejado en blanco intencionadamente...
Page 476: ......
Page 478: ...iv Green X PHT 75CHS...
Page 480: ...vi Green X PHT 75CHS 6 3D MODEL 83 6 1 83 6 2 MODEL 86 6 3 87 6 4 88...
Page 481: ...Green X PHT 75CHS 1...
Page 482: ...2 Green X PHT 75CHS...
Page 485: ...1 Green X PHT 75CHS 5 IEC 60601 1 6 1 IPX0 1 1 5 2D 3D 1 6...
Page 489: ...1 Green X PHT 75CHS 9 1 6 2...
Page 490: ...1 10 Green X PHT 75CHS 1 6 3...
Page 491: ...2 Green X PHT 75CHS 11 2 2 1 1 2 ON OFF...
Page 494: ...2 14 Green X PHT 75CHS 2 2 2 1 Patient Search Search 2...
Page 495: ...2 Green X PHT 75CHS 15 2 3 1 2 ACQUISITION CT Panorama Cephalo 3 3 6...
Page 496: ...2 16 Green X PHT 75CHS...
Page 497: ...3 PANO Green X PHT 75CHS 17 3 PANO 3 1 PANO 2 2...
Page 503: ...3 PANO Green X PHT 75CHS 23 3 2...
Page 504: ...3 PANO 24 Green X PHT 75CHS 1 2 3 Column UP DOWN CEPH CEPH Column UP DOWN...
Page 506: ...3 PANO 26 Green X PHT 75CHS CEPH Column UP DOWN 4 5...
Page 507: ...3 PANO Green X PHT 75CHS 27 1 2 B 3 4 Column UP DOWN CEPH CEPH Column UP DOWN B...
Page 508: ...3 PANO 28 Green X PHT 75CHS 5 6...
Page 509: ...3 PANO Green X PHT 75CHS 29 1 2 3 1 READY 2 3 3...
Page 510: ...3 PANO 30 Green X PHT 75CHS 3 2 2 SPECIAL LAT PA 1 2 A 3 4 Column UP DOWN CEPH...
Page 511: ...3 PANO Green X PHT 75CHS 31 CEPH Column UP DOWN 5 6 5 7...
Page 512: ...3 PANO 32 Green X PHT 75CHS 1 2 1 READY 2 3 3...
Page 513: ...3 PANO Green X PHT 75CHS 33 LAT PA 1 Do you want to capture a TMJ Close image OK 2 3 5 4...
Page 514: ...3 PANO 34 Green X PHT 75CHS LAT PA 1 2 A 3 Temple Supports OPEN CLOSE...
Page 515: ...3 PANO Green X PHT 75CHS 35 4 5 Column UP DOWN CEPH CEPH Column UP DOWN 6 7 5...
Page 516: ...3 PANO 36 Green X PHT 75CHS 8 1 2...
Page 517: ...3 PANO Green X PHT 75CHS 37 1 Temple Supports OPEN CLOSE READY 2 READY 3 3 3...
Page 518: ...3 PANO 38 Green X PHT 75CHS 3 3 1 2...
Page 519: ...3 PANO Green X PHT 75CHS 39 3 Image capturing is completed 3 4 1 2 3 READY...
Page 520: ...3 PANO 40 Green X PHT 75CHS 3 5 DICOM EzDent i EzDent i 1 EzDent i 2 Save 3 Patient List...
Page 521: ...4 CEPH Green X PHT 75CHS 41 4 CEPH 4 1 CEPH 2...
Page 522: ...4 CEPH 42 Green X PHT 75CHS 1 CEPH CEPH CEPH 2 3 CEPH Examination CEPH 4 VATECH 2 12 12...
Page 524: ...4 CEPH 44 Green X PHT 75CHS 4 2 1 2 3 Column UP DOWN CEPH CEPH Column UP DOWN...
Page 526: ...4 CEPH 46 Green X PHT 75CHS 5 Column UP DOWN CEPH CEPH Column UP DOWN 6...
Page 527: ...4 CEPH Green X PHT 75CHS 47 7 8 9 READY 10 4 3...
Page 528: ...4 CEPH 48 Green X PHT 75CHS 4 2 2 PA 1 PA Waters view Carpus 2 PA 3 CEPH 4...
Page 529: ...4 CEPH Green X PHT 75CHS 49 5 Column UP DOWN CEPH CEPH Column UP DOWN 6 7 8...
Page 530: ...4 CEPH 50 Green X PHT 75CHS 9 READY 10 4 3 4 2 3 SMV 1 SMV 2 SMV 3 CEPH 4...
Page 531: ...4 CEPH Green X PHT 75CHS 51 5 Column UP DOWN CEPH CEPH Column UP DOWN 6 7 8...
Page 533: ...4 CEPH Green X PHT 75CHS 53 CEPH Column UP DOWN 6 7 30 40 8 READY 9 4 3...
Page 534: ...4 CEPH 54 Green X PHT 75CHS 4 2 5 Carpus Carpus 1 PA Waters view Carpus 2 Carpus 3 CEPH 4...
Page 535: ...4 CEPH Green X PHT 75CHS 55 1 2 3 READY 4 4 3...
Page 536: ...4 CEPH 56 Green X PHT 75CHS 4 3 1 2...
Page 537: ...4 CEPH Green X PHT 75CHS 57 3 Image capturing is completed...
Page 539: ...5 CBCT Green X PHT 75CHS 59 5 CBCT 5 1 CBCT 2...
Page 540: ...5 CBCT 60 Green X PHT 75CHS 1 CBCT CEPH CEPH 2...
Page 544: ...5 CBCT 64 Green X PHT 75CHS 5 2 16 9 16 x 15 CBCT 5 2 1 2 1 CBCT Double Scan...
Page 546: ...5 CBCT 66 Green X PHT 75CHS 6 CONFIRM CONFIRM Scan Information DAP 7 5 3 8 READY 9 5 4 10...
Page 548: ...5 CBCT 68 Green X PHT 75CHS 5 READY 6 5 4 7 8 5 5...
Page 549: ...5 CBCT Green X PHT 75CHS 69 5 3...
Page 550: ...5 CBCT 70 Green X PHT 75CHS 1 2 3 Column UP DOWN CEPH CEPH Column UP DOWN...
Page 551: ...5 CBCT Green X PHT 75CHS 71 1 2 Temple Supports OPEN CLOSE 3...
Page 552: ...5 CBCT 72 Green X PHT 75CHS 4 Column UP DOWN CEPH CEPH Column UP DOWN 5 6...
Page 553: ...5 CBCT Green X PHT 75CHS 73 7...
Page 554: ...5 CBCT 74 Green X PHT 75CHS 1 2 Temple Supports OPEN CLOSE 3 4 Column...
Page 555: ...5 CBCT Green X PHT 75CHS 75 UP DOWN CEPH CEPH Column UP DOWN 5 6...
Page 556: ...5 CBCT 76 Green X PHT 75CHS 9 3 54 1 2 A 3 Temple Supports OPEN CLOSE...
Page 557: ...5 CBCT Green X PHT 75CHS 77 4 5 Column UP DOWN CEPH CEPH Column UP DOWN 6...
Page 558: ...5 CBCT 78 Green X PHT 75CHS 7 1...
Page 559: ...5 CBCT Green X PHT 75CHS 79 1 Temple Supports OPEN CLOSE READY 2 READY 3 5 4...
Page 560: ...5 CBCT 80 Green X PHT 75CHS 5 4 1 2...
Page 561: ...5 CBCT Green X PHT 75CHS 81 3 Image capturing is completed...
Page 563: ...6 3D MODEL Green X PHT 75CHS 83 6 3D MODEL 6 1 3D MODEL 2...
Page 564: ...6 3D MODEL 84 Green X PHT 75CHS 1 MODEL CEPH CEPH 2 Model 3 VATECH 2 12 12 4...
Page 566: ...6 3D MODEL 86 Green X PHT 75CHS 6 2 MODEL MODEL 1 2 MODEL 1 MODEL 2 3 READY...
Page 567: ...6 3D MODEL Green X PHT 75CHS 87 4 6 3 6 3 1 2 3 Image capturing is completed 4...
Page 568: ...6 3D MODEL 88 Green X PHT 75CHS 6 4 DICOM STL EzDent i 1 EzDent i 2 Save 3 Patient List 4 STL...
Page 570: ......
Page 572: ...Not iv Green X PHT 75CHS Kullan m K lavuzu Maksatl olarak bo b rak lm t r...
Page 590: ...2 Ba larken 16 Green X PHT 75CHS Kullan m K lavuzu Maksatl olarak bo b rak lm t r...
Page 664: ......


