background image


- 4 - 

After the motor has been mounted on the rod, secure the gear against the proper lens ring 
and tighten the dovetail clamp. Mount your TOC receiver and attach the antenna.   
First plug the lens motor into TOC receiver (yellow to yellow) 
Then plug power from camera into TOC receiver (red to red). Do not plug lens motor 
into receiver while it is already powered up – this is called ‘hot swapping’ and it can lead 
to minor malfunctions – always plug power into receiver LAST. 
 
Now put the battery in the hand unit, attach the antenna and turn on the power by holding 
down the power button for at least two seconds.  All five LED lights on both the receiver 
and the hand unit should now be solid orange. 


Assuming your lens has mechanical end stops (like most broadcast or cine lenses), the 
TOC motors will calibrate most accurately in “Auto” mode.  Note: If using a lens that 
doesn’t have end stops (e.g., DSLR lenses), you must manually calibrate the lens 
motors.  This will be addressed in chapter 3.


To execute auto calibration from the hand 

unit, select “Calibrate” from the home menu, then select “Automatic”.  The motor will 
start moving automatically, and will also automatically stop once resistance is met.  Do 
not touch the lens motor during calibration
.  Also note that the power required to 
move the lens rings properly may vary depending on the lens used.   The system defaults 
to 50% power and can be adjusted. (see page 8 for more details) 
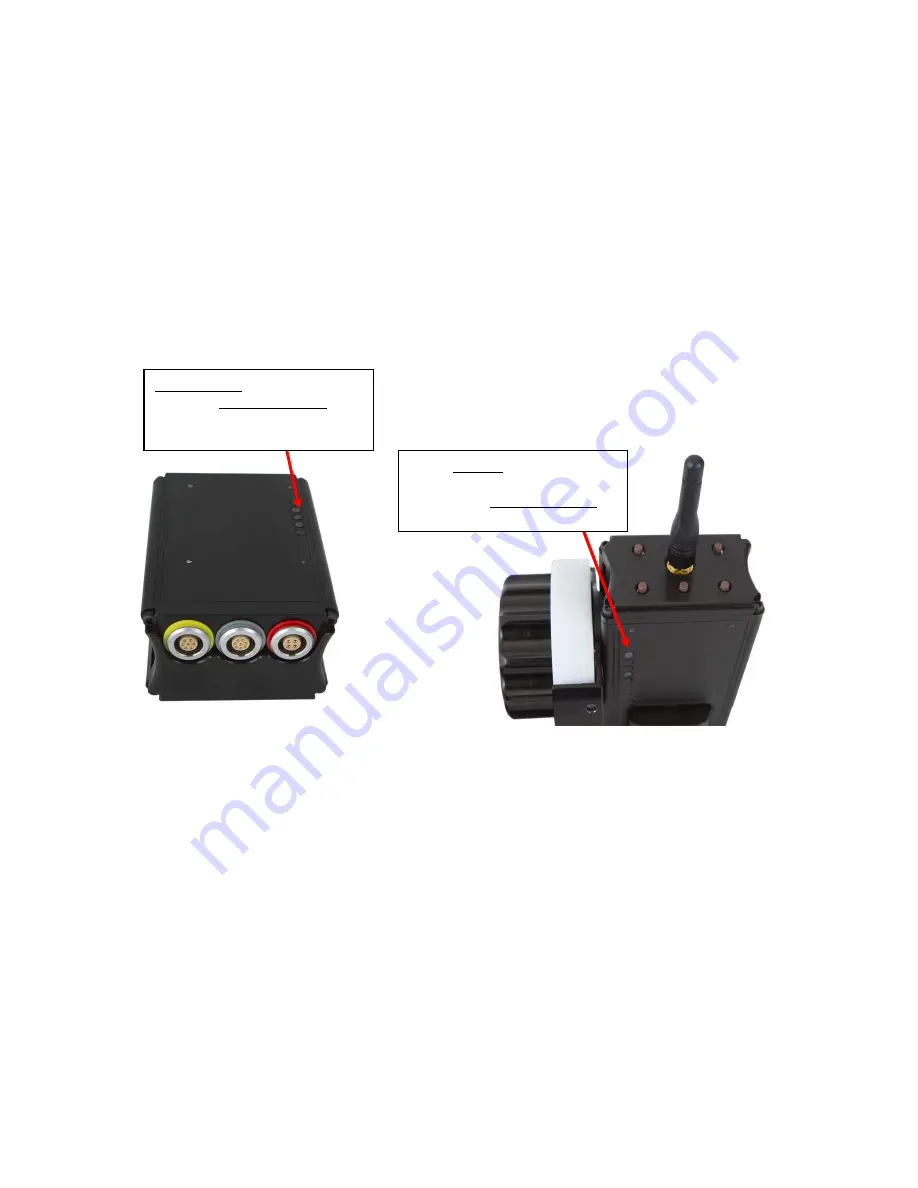


1

st

 & 2

nd

 LED = connection to 

hand unit; 3

rd

 4

th

 & 5

th

 LEDs = 

signal strength meter 

LEDs: 1

st

 LED = connection to 

receiver; 2

nd

 LED = hand unit 

transmitting; 3

rd

 4

th

 & 5

th

 LEDs = 

signal strength meter 

Summary of Contents for TOC F1

Page 1: ...1 TOC F1 Operations Manual...

Page 2: ...system can be used on most broadcast or cinema lenses The TOC F1 includes a hand held controller transmitter rechargeable battery lens drive motor single channel receiver universal gear set and batte...

Page 3: ...lens servo switches Check with the lens or camera manufacturer s user manual to ensure that this won t interfere POWERING THE RECEIVER Only use a VariZoom supplied cable to power the TOC receiver It i...

Page 4: ...g your lens has mechanical end stops like most broadcast or cine lenses the TOC motors will calibrate most accurately in Auto mode Note If using a lens that doesn t have end stops e g DSLR lenses you...

Page 5: ...r easy menu navigation Most operation will be done from this screen To reset the TOC parameters to their defaults select System from the home menu Then select Reset All It will then ask you to confirm...

Page 6: ...s set the Set Limit button will then read Clear Limit Tap this button to clear the limit Motor and knob response direction is changed by selecting the Dir button located under either Motor or Knob Thi...

Page 7: ...will now be used to run the motor until the first end point of the lens is reached The farther you move the slider the faster the motor will go so when you get close to the stopping point slow the mo...

Page 8: ...will allow the hand unit and receiver to communicate wirelessly Wired will disable the wireless card on the hand unit and allow the hand unit and receiver to communicate through an optional communicat...

Page 9: ...d tap the button to clear the limits Solution 4 Under the System menu tap the Reset All button This will clear all limits Solution4 Check to make sure the lens motor didn t get set to zero calibration...

Page 10: ...ly illuminated with no green light the motor has stalled Solution 1 Try disconnecting and reconnecting power to the receiver Solution 2 If that doesn t work you may need to disengage the motor from th...

Reviews: