background image

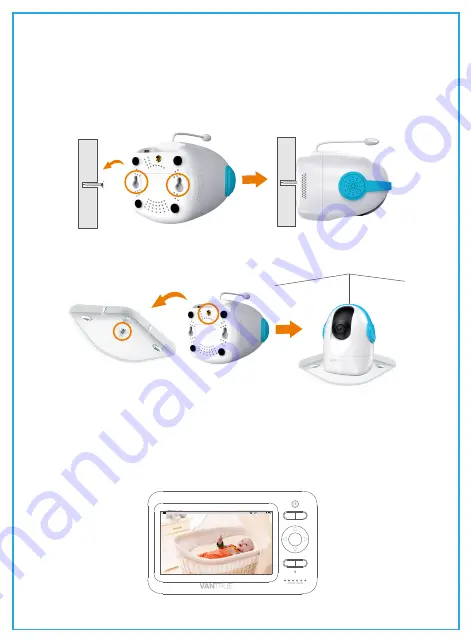
3.5 Wall Mounting Camera

4. Basic Operation & Function

Select the spot to mount the camera, keeping it beyond your 

baby's reach.

Method 1:

 Insert the screw (not included), pre-installed on wall 

into the mounting hole of the camera.

Method 2:

 Choose the short screw(not included), adjusting 

universal 1/4 screw length fits the baby monitor. Put the screw into 

this 1/4 threaded hole and screw it.

It's strongly recommended to use a screw and screw anchor(not 

included). Don't release the camera until you're sure it is firmly 

mounted.

- 10 -

82

OK

MENU

SLEEP

TALK

SHORT

CUT

2020/05/21    11:24:35

F

Summary of Contents for AngelGuard A1

Page 1: ...www vantrue net EU Environmental Protection Waste electrical products shuld not be disposed of with household waste Please recycle where facilities exist Check with your local authority or retailer fo...

Page 2: ...AngelGuard A1 2 4GHz Wireless Video Baby Monitor User Manual...

Page 3: ...Camera 3 5 Wall Mounting Camera 4 1 Monitor Settings 4 2 Audio Alarm Settings 4 3 Temperature Alarm 4 4 Lullabies 4 5 Sleep Mode 4 6 Settings 4 7 Zoom 4 8 Pan n Tilt 4 9 Volume Adjustment 4 10 Bright...

Page 4: ...or metal objects Do not allow water damage to the monitor unit charging port or charging cable which cause overheat of the charging components Do not use unofficial third party charging cables and ada...

Page 5: ...d after changing camera location Check reception regularly Obstacles such as concrete walls may shorten the wireless signal transfer range This product is not intended to replace proper adult vision o...

Page 6: ...A Camera 2 2 Baby Monitor Overview 3 1 Camera Sensor 2 Lens 3 Microphone 4 Speaker 5 Temperature Sensor 6 Indicator LED 7 Set Pair Button 8 Micro USB Port 9 Mounting Hole 9 9 9 5 6 7 8 1 2 3 4...

Page 7: ...6 Confirm Button Zoom button 7 Turn Right Volume 8 Turn Down Brightness 9 Turn Left Volume 10 Shortcut Button 11 Dialogue Key Talking Key 12 Microphone 13 Status Indicator 14 Antenna 15 RESET Button 1...

Page 8: ...adapter Then insert the adapter into the socket After being powered on the camera will automatically turn on The green light on the base of the camera is on for a few seconds At this point the camera...

Page 9: ...or is too close to the camera This is normal phenomenon and can be resolved when camera is moved away from the monitor Please keep them at least 3m 9 8ft apart NOTE 3 3 Pairing Adding Deleting Camera...

Page 10: ...When the device prompts camera is No paired press to confirm 4 When the device prompts Start pairing please short press the camera SET key press the SET key of the camera shortly to enter the pairing...

Page 11: ...in green 1 Select icon and press to enter 2 Select the channel to be deleted press to confirm select and press to confirm You can add up to 4 cameras per baby monitor only one camera can be viewed at...

Page 12: ...Camera is paired Can be deleted Press to confirm When the device prompts Deleting is OK the camera is successfully deleted Do not place the camera unit within the baby s reach If there is interferenc...

Page 13: ...nto the mounting hole of the camera Method 2 Choose the short screw not included adjusting universal 1 4 screw length fits the baby monitor Put the screw into this 1 4 threaded hole and screw it It s...

Page 14: ...o camera is added or the camera is disconnected from receiver Icon Icon Description Audio alarm Temperature alarm Sleep mode enabled Show you which camera on display Note This icon will not appear on...

Page 15: ...cond to the fifth green indicators slowly flash from low to high indicating the received volume The second to the fifth green indicators slowly flash simultaneously indicating that the alarm signal is...

Page 16: ...sound setting page press to turn on the audible alarm The audible alarm will last for 1 minute The audible alarm notification can be switched off by pressing any button on the receiver and the notifi...

Page 17: ...will play the selected lullaby press button again to pause the lullaby Selecting All to play all the lullabies in a loop When the setup is complete press to return You can set the receiver to auto sl...

Page 18: ...me Settings 4 6 Settings This setting includes time settings factory reset viewing hardware version and warning sound setting 1 Select and press button to enter the setting page 2 Select and press but...

Page 19: ...ce will prompt Restore to default settings Select YES and press button to confirm The device will start resetting to default settings 4 After the default settings are restored the receiver will automa...

Page 20: ...r will display corresponding version information Press to return after reviewing the version information This setting controls the sound alarm for sound detection alarm and temperature alarm 1 Select...

Page 21: ...hear the sounds from the baby camera Please release the button allow on to hear the sounds from the baby s room again Note 4 9 Volume Adjustment Press Shortcut button button to select the desired vol...

Page 22: ...97x87x111 mm Black White image up to 5m clear range Night Vision Power Supply DC 5V 1A Monitor 5 TFT LCD monitor LCD Number of Pixels 1280 720P 2 4GHz FHSS Wireless Transmission Way Battery 2000mAH 2...

Page 23: ...stions regarding your product please do not hesitate to contact us via Amazon or drop us an email at support vantrue net Queries are typically answered within 12 24 hours Your opinion matters THANK YO...

Page 24: ...t the interference by one or more of the following measures Reorient or relocate the receiving antenna Increase the separation between the equipment and receiver Connect the equipment into an outlet o...

Page 25: ...lares that this device is in compliance with the essential requirements and other relevant provisions of Directive 2014 53 EU Notice Observe the national local regulations in the lacation where the de...

Reviews: