Thank You
For Choosing VantecUSA Product.
We are committed to providing you with the
best service and support. If you have a
problem with installing, getting the product
to function or other product related
question, please feel free to write to us.
We will help you answer your question.
You can write to us at :
For the latest Drivers, Manual and
Frequently Asked Questions (FAQ), they are
available at our website at vantecusa.com
or write to us.
Thank you,
VantecUSA Support Team.
NST-387S3-BK
Copyright © 2019 Vantec Thermal Technologies. All Rights Reserved.
All Registered Trademarks Belong to Their Respective Compaines.
Printed on
Recycled Paper.
Information in this document is subject to change without notice.
Reproduction of these materials in any manner whatsoever without
written permission is strictly forbidden.
For detail, instruction refers to the FAQ
"How to preparing a New storage, Hard Drive, or
SSD for use with a system"
on our website support
section at
www.vantecusa.com
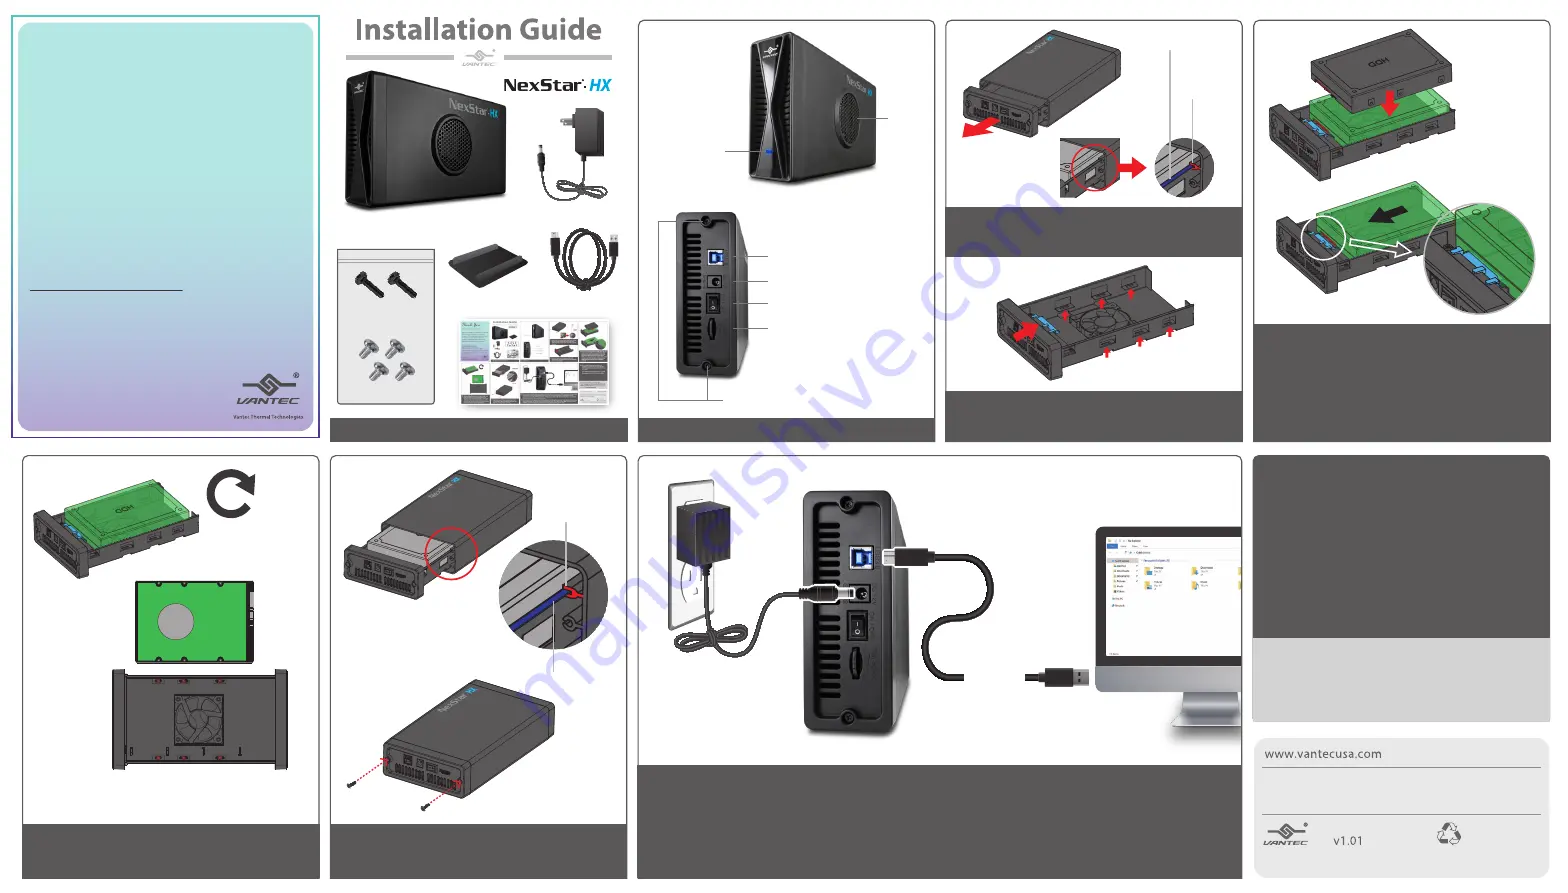
4.
Note the Parts layout, location of the SATA
connector on the inside of the Tray and the hard
drive mounting hole.
5.
Place your 3.5” Hard drive horizontally down
shown by the arrow. Note the orientation of the
SATA connector on the drive. Once place down
push the drive in the direction of the arrow for
the SATA connector on the Tray to mate with the
SATA connector on the drive. Make sure it is
making good contact for the SATA drive to
function correctly.
6.
While holding the drive to the Tray, flip over to the
underside of the tray and secure using the provided
screws to 4 of the aligned holes.
7.
Align the tray with the mounted drive to the
casing guide to the tray rail and slide back the
Tray and secure using the 2 screws.
3.
Slide out the tray from the enclosure casing.
Note the guide on the casing where the tray rail
slide out.
1.
Verify the package contents.
10.
All NEW hard drive needs to be initialized,
partitioned and formatted for the Operating
System you are using before it can store data.
For the Windows Operating System, use Disk
management and for OS X, use Disk Utility.
8.
The Enclosure with the drive is now ready to be used. Connect the provided USB cable to the enclosure and
your System. Connect the Ac Adapter to the enclosure and to your wall power outlet. Make sure your
computer is power ON and OS loaded. Turn ON the power switch on the rear of the enclosure, you should
hear your drive in the enclosure spinning up.
9.
At this point, your system OS should acknowledge a USB storage is connected. If your Hard Drive is not new
and contains data, you can use the OS File Explorer to check. If your Hard Drive is NEW, you need to prep
(initialize, partition and format) the Hard Drive using your Operating System tools.
2.
Parts Layout.
3.5" SATA III Hard Drive Enclosure USB 3.0 with Fan
USB 3.0 Port ( Type B )
Power ON/OFF Switch
Fan Speed dial
Tray/Casing mounting Screws
Power Port ( 12VDC, 2A )
Activity &
Power LED
Fan
Casing
guide
Tray
rail
Casing guide
Enclosure stand
NST-387S3-BK
AC Adapter
Screws Kit
HDD Mounting Screws
Tray / Casing
Mounting Screws
USB 3.0 cable
USB Cable
Tray rail


