background image

www.ivankyo.com                                                                                                                                                                                                                                                    2018-2019 VanTop, Inc. All rights reserved. 


20

  / 

32


button to return to the parent directory; 

2.


All the folders will be shown in the USB disk or microSD card, but you can only play the text after you select 

TEXT

 in the main interface. 

3.


Your projector can play the text files with a format of TXT. 

Connecting to the Computer 

When you're in a conference room and need to project slides, videos, music and so on, please connect your computer to the projector. 
 

Option 1:

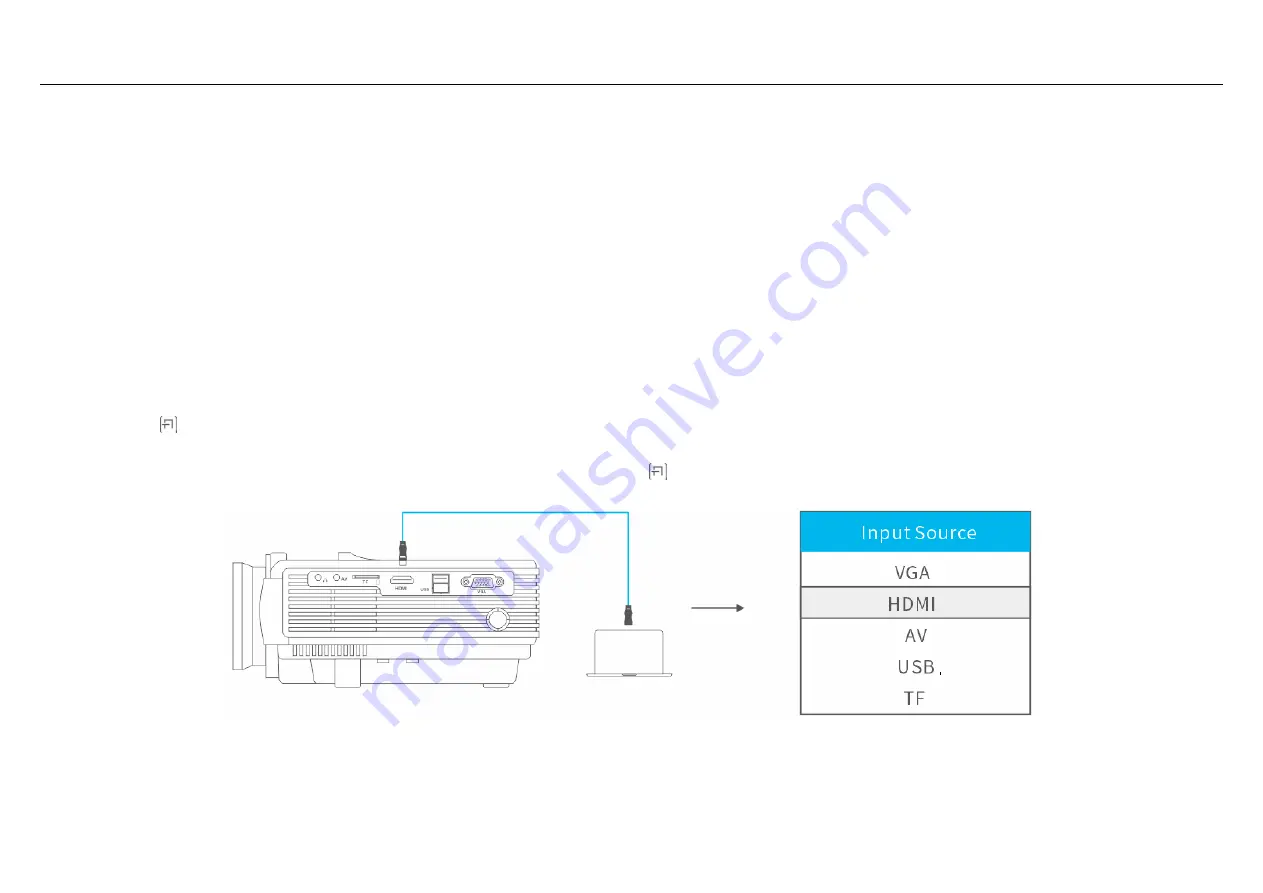
 Connect the projector to your computer by using the HDMI cable in the package. An HDMI connection is recommended for projecting movies, videos, and other files which 

need to be HD. 

Step 1:

 Turn on your computer and the projector; 

Step 2:

 Connect the HDMI cable to your computer's HDMI port;   

Step 3:

 Connect the other end to any available HDMI port on your projector; 

Step 4: 

Press the


button to enter the interface of 

Input Source

Step 5:

 Select 

HDMI

 to project any files on your computer by pressing the

 Up/Down

 or the


button. 


Option 2: 

You can also connect the projector to your computer by using a VGA computer cable in the package. 

Step 1: 

Turn on your computer and the projector; 

Summary of Contents for Leisure 3

Page 1: ...www ivankyo com 2018 2019 VanTop Inc All rights reserved 1 32 Leisure 3 User Manual V1 01 ...

Page 2: ...n Options 6 Projection Distance and Size 7 Projector Connections 8 Connecting to the External Storage Device 8 Playing the Video 9 Playing the Music 12 Playing the Photo 14 Playing the Text 17 Connecting to the Computer 20 Connecting to the Mobile Device 23 Connecting to the DVD Player 25 Using the Basic Projector Features 26 Picture Settings 26 Sound Settings 27 Option Settings 28 After Using You...

Page 3: ... the projector for a long time make sure its power is turned off and the plug is disconnected from the outlet 7 When shipping the projector place it in its original packing materials or use equivalent materials with cushioning around the projector 8 If the projector is mounted on a ceiling or wall it should be installed by the safe mounting hardware 9 If the projector is damaged do not attempt to ...

Page 4: ...www ivankyo com 2018 2019 VanTop Inc All rights reserved 4 32 AV cable HDMI cable VGA cable Power cable If there is any part missing please contact Vankyo Support Team Projector Overview ...

Page 5: ...www ivankyo com 2018 2019 VanTop Inc All rights reserved 5 32 Important When you use the remote please make sure to point at the IR in the front of the Leisure 3 Projector Specification ...

Page 6: ...modes There are following modes for different installing options 0 means Front In this mode the projector must be placed in front of the wall screen and image will be directly projected to the wall screen 1 means Rear In this mode the projector can be placed behind the screen and a compatible screen which supports rear projector will be required 2 means Rear On Ceiling In this mode the projector i...

Page 7: ...ition it squarely in front of the center of the screen or the wall not at an angle if possible Projection Distance and Size The distance at which you place the projector from the screen determines the approximate size of the image The projection size increases when the projector is father from the screen Locate the projector at an appropriate position then adjust the focus ring and Keystone manual...

Page 8: ...l show a screen with No Signal Insert the device cables into the correspondingly ports on the projector Step 6 Press the button to enter the interface of Input Source Step 7 Press the Up Down or the Source button to select then press the OK button to select the correct input source Step 8 Adjust the focus ring and keystone to get the best image performance Tips 1 After you plug the power cord into...

Page 9: ...then press the OK Enter button of the projector remote to confirm For USB Hard Disk or microSD TF card please select input source USB or TF Playing the Video After selecting USB or TF in the interface of Input Source you will enter the main interface which shows the options of PHOTO MUSIC MOVIE and TEXT Step 1 Select MOVIE in the main interface by pressing the UP Down Left Right buttons and the se...

Page 10: ...y in the directory Step 4 Press the button on the projector or the Play Pause button on the remote to play the selected video into full screen mode Tips 1 Select the Return icon and press the OK button to return to the root directory shown in Step 1 no matter in which directory while select the Up Folder icon and press the OK button to return to the parent directory 2 Hover the cursor on the selec...

Page 11: ... to play the current video all the time R_OFF has the options of R_OFF and R_ON Press the OK button to switch among these options R_OFF means turning off the repeat to play the videos randomly while R_ON means turning on the repeat Set A Set B None selects Set A by pressing the OK button to set a time point and select Set B by pressing OK button to set another time point when playing the video the...

Page 12: ...B or TF in the interface of Input Source you will enter the main interface which shows the options of MOVIE MUSIC PHOTO and TEXT Step 1 Select MUSIC in the main interface by pressing the UP Down Left Right buttons and the selected frame will be highlighted to be blue with font in yellow Then press the OK button to enter the following interface Step 2 Select the disk C then press the OK button to e...

Page 13: ...ss the OK button to return to the root directory shown in Step 1 no matter in which directory while select the Up Folder icon and press the OK button to return to the parent directory 2 Hover the cursor on the selected music for more than 3 seconds to preview the music It will show a bottom bar with different settings when playing the music Press the Down button or the Back button to hide it Press...

Page 14: ...p to play the music fragment between these points Select None to get back to the normal playing mode R_OFF has the options of R_OFF and R_ON Press the OK button to switch among these options R_OFF means turning off the repeat to play the music randomly while R_ON means turning on the repeat Mute mutes or unmutes the current music Playlist a list of music files that can be played from the current f...

Page 15: ...uttons and the selected frame will be highlighted to be blue with font in yellow Then press the OK button to enter the following interface Step 2 Select the disk C then press the OK button to enter the disk Step 3 Select the photo or click the folder to enter the next directory till you find the photo you would like to play in the directory ...

Page 16: ...nt settings when playing the photo Press the Down button or the Back button to hide it Press the OK button to show it again Play Pause plays or pauses the current photo Prev Previous goes back to the previous photo Next goes to the next photo Stop exits from the current photo R_ALL has the options of Repeat 1 RepeatAll and RepeatNONE Press the OK button to switch among these options RepeatAll loop...

Page 17: ...e and time rotates the photo by 90 degrees clockwise rotates the photo by 90 degrees counterclockwise zooms in the photo size up to 8X zooms out the photo size down to1 4 Mov after zooming in the photo press the OK button when selecting the MOVE icon You can view more details of the current photo by pressing the Up Down Left Right buttons Slide Slide Show the animation modes for switching the phot...

Page 18: ...buttons and the selected frame will be highlighted to be blue with font in yellow Then press the OK button to enter the following interface Step 2 Select the disk C then press the OK button to enter the disk Step 3 Select the text or click the folder to enter the next directory till you find the text you would like to play in the directory ...

Page 19: ...t Next goes to the next text Stop exits from the current text MUSIC after you tick some music files under the MUSIC category go to the TEXT category Press the OK button when selecting the MUSIC icon in the interface of the text playing it will play the music files you ticked for text background Playlist a list of text files that can be played from the folder If you did not tick the texts by pressi...

Page 20: ...1 Connect the projector to your computer by using the HDMI cable in the package An HDMI connection is recommended for projecting movies videos and other files which need to be HD Step 1 Turn on your computer and the projector Step 2 Connect the HDMI cable to your computer s HDMI port Step 3 Connect the other end to any available HDMI port on your projector Step 4 Press the button to enter the inte...

Page 21: ...ng the Up Down or the button Notes 1 To connect a Mac Surface that includes only a Mini DisplayPort Thunderbolt port or Mini DVI port you need to obtain an adapter that allows you to connect to the projector s HDMI or VGA port Contact Apple Microsoft for compatible adapter or get from any store by yourself For example here is a Mini DP cable which can be used as a reference insert on end of the HD...

Page 22: ... options shown below PC screen only This option displays the contents of your computer screen on the computer only This is a great option to choose when your presentation hasn t yet started or if you want to use the computer for another reason and don t want the contents of the screen displayed through the projector for all to see Duplicate This option simultaneously displays the contents of the c...

Page 23: ...s to invoke and switch the display mode might vary depending on different computer brands or models Link with detailed information http kb mcgill ca portalid 2 articleid 1750 tab homeTab crumb 8 artId 1751 src article For the Windows XP system please refer to https www youtube com watch v fV6PQu1VzFg For the Mac system Choose Apple menu System Preferences click Displays then select the Arrangement...

Page 24: ...p up window on your mobile device then you can project any files on the mobile device 2 When it shows the screen with some QR codes butterfly icon and so on after selecting please do not scan any QR code and just wait for a moment 3 Never directly insert your Lightning cable Micro USB cable or the Type c cable to the USB port on the projector Instead use an adapter mentioned above to transmit the ...

Page 25: ...ctor and a DVD player you can use the AV cable in the package Step 1 Turn on your DVD player and the projector Step 2 Connect the colorful Female connectors to your DVD player s RCA cable Step 3 Connect the yellow Male connector to the AV In port on the projector Step 4 Press the to enter the interface of Input Source Step 5 Select the correct input source AV to project the DVD in your DVD player ...

Page 26: ...ights reserved 26 32 Using the Basic Projector Features You can use the projector s Menu system to adjust the settings to control how your projector works Picture Settings 1 Press the Menu button it will display the PICTURE settings shown below ...

Page 27: ...een and Blue for the image after you select User mode Aspect Ratio is the ratio of its sizes in different dimensions It has 4 3 16 9 and Auto Noise Reduction sets up the intensity of noise reduction when the projected contents have sound It includes Off Low Middle High and Default Reduce Display Size 100 to proportionally reduce the image size being range from 75 to 100 2 Press the Up and Down but...

Page 28: ...ce the sound of the left and right channel of the speaker Auto Volume to intelligently adjust volume 2 Press the Up and Down buttons to select the option you would like to change then press the OK button to enter the submenu to set up 3 When you finish changing settings on a menu press the Back button to exit Option Settings 1 Press the Left and Right buttons to enter the Option Settings ...

Page 29: ... button to enter the submenu to set up 3 When you finish changing settings on a menu press the Back button to exit After Using Your Projector Please turn off the projector after using it 1 Press the On Off button once the projector displays a shutdown confirmation screen below Press Power again to power off or press another button to cancel 2 Turn off the projector by another press To leave it on ...

Page 30: ...f with only audio playing the lamp is defective Please contact seller for a replacement Try another HDMI cable if you select the HD input source 3 Why Does the Projection Screen Show No Signal Make sure all cables are plugged correctly and firmly Make sure you select the right input source For example if you insert a USB drive please select USB in the interface of Input Source USB 2 0 disk is supp...

Page 31: ...How Should I do if There are Small Dots on Display Tap the projector slightly to shake off the dust which may be caused during installing or shipping Clean the lens with clean non woven fabrics 10 How Should I Do if There is Expanding Dark Spot or Smoke when Using the Projector Check if the fan noise increases or the fan stops working Unplug the projector and contact Vankyo Team for assistance Mak...

Page 32: ...t My Smart Phone to the Projector HDMI adapter is needed to delivery display from smart phones Adapters vary depending on smart phones 17 What kind of Screws do I need for mounting this Projector M4 Screw 18 What Kind of Cable do I Need when Connecting TV BOX TV Firestick and DVD Player to the Projector HDMI cable for all devices mentioned above For some TV without HDMI port VGA cable will work Ce...

Reviews: