background image

www.vanco1.com

800.626.6445

5

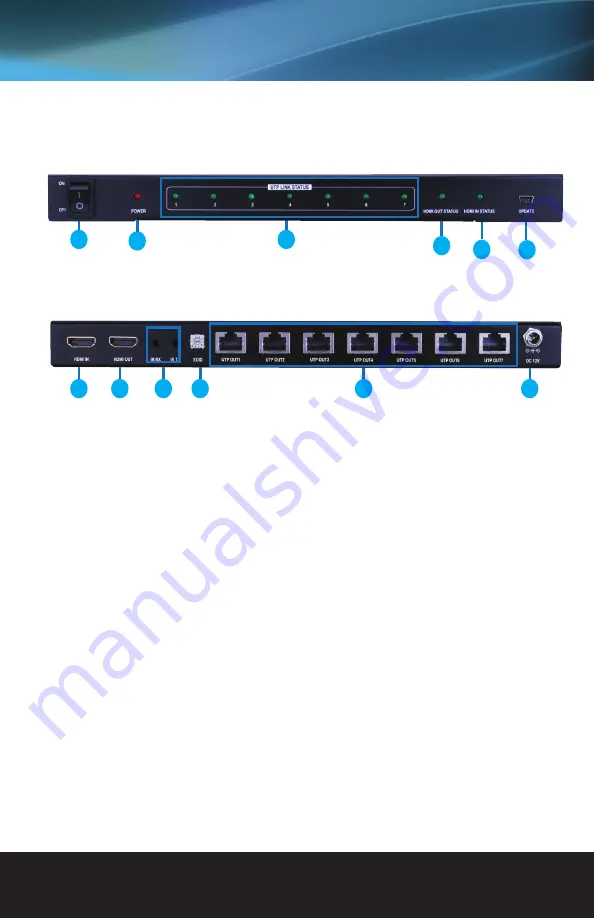
1.  POWER SWITCH: Toggle switch that turns the splitter unit ON or OFF
2.  POWER LED: Illuminates when the splitter is connected to power
3.  UTP LINK STATUS: Illuminates when the UTP outputs are connected to the EVRX2006 or EVWP2006RX 

receiver units (sold separately)

4.  HDMI OUT STATUS: Illuminates when a display is connected to “HDMI OUT” port and is powered on
5.  HDMI IN STATUS: Illuminates when the source is connected and is powered on
6.  UPDATE: Firmware update port (available f/w updates will be available on the product page on www.

vanco1.com, under the “downloads” tab)

7.  HDMI IN: Connect a source such as a Set Top Box, Game Console, or media player/streamer
8.  HDMI OUT: Connect an HDMI display such as an HDTV or Projector; this port can also be used to cascade 

or daisy-chain to another splitter, to create additional outputs

9.  IR RX/IR TX: Connect the included IR accessories to the correct IR ports; see IR section for setup and 

explanation

10. EDID: Adjustment dial for EDID management, see EDID section for setup and explanation
11. UTP OUTPUT PORTS 1-7: Connect a single Cat5e/6 home run cable to the EVRX2006 or EVWP2006RX 

receiver; connect the EVRX2006 or EVWP2006RX receiver to an HDMI display such as an HDTV or 
Projector

12. DC 12V IN: Connect the included power supply to power the unit

PANEL DESCRIPTIONS

1

2

3

5

6

7

8

9

10

11

12

4

Summary of Contents for Evolution EVSP1017

Page 1: ...Vanco Part Number EVSP1017 1X7 HDMI Splitter over Single Cat5e 6 Cable www vanco1 com 800 626 6445 1x7 HDMI Splitter over Single Cat5e 6 Cable ...

Page 2: ...cularly at the plugs 9 Use unit only with accessories specified by the manufacturer 10 Refer all servicing to qualified personnel CAUTION HDMI is a very complex technology requiring continuous authentication of the signal and the same video resolution and audio settings on all electronic equipment in the system When there are multiple sources and displays the video resolution and audio setting on ...

Page 3: ...The compatible receivers part EVRX2006 EVWP2006RX are sold separately and include an IR RX pigtail for IR for control over UTP FEATURES 1x7 HDMI Splitter over Single Cat5e 6 Cable Part EVSP1017 Allows 1 HDMI source to be displayed on up to 7 HDMI displays over a single Cat5e or Cat6 cable Transmission Range Extends 1080p resolutions up to 164ft 50m to receiver units EVRX2006 or EVWP2006RX sold sep...

Page 4: ... Signal Green Link status Green HDMI interface standard HDMI 1 3 standard and HDMI 1 4 3D HDCP 1 4 EDID Remote IR 20 60KHz wide frequency carrier Maximum HDMI input cable length 15m AWG26 cable at maximum video resolution 1080p60 Maximum HDMI output cable length 15m AWG26 cable at maximum video resolution 1080p60 ESD level HBM 4kv contact discharge Temperature Range 0 40 degrees C Operating mode 2...

Page 5: ...ads tab 7 HDMI IN Connect a source such as a Set Top Box Game Console or media player streamer 8 HDMI OUT Connect an HDMI display such as an HDTV or Projector this port can also be used to cascade or daisy chain to another splitter to create additional outputs 9 IR RX IR TX Connect the included IR accessories to the correct IR ports see IR section for setup and explanation 10 EDID Adjustment dial ...

Page 6: ...HD 1080p 60 1080p 30 1080p 24 1080i 60 720p 60 24bit 2D video 7 1ch audio 1 EDID Full HD 1080p 60 24bit 2D video 2ch audio 2 EDID Full HD 1080p 60 24bit 3D video 7 1ch audio 3 EDID Full HD 1080p 60 24bit 3D video 2ch audio 4 EDID HD 1080p 30 1080i 60 720p 60 24bit 2D video 7 1ch audio 5 EDID HD 1080p 30 1080i 60 720 60 24bit 2D video 2ch audio 6 EDID Full HD 1080p 60 24bit 2D video 7 1ch audio EDI...

Page 7: ...ect the provided power supply IR RX IR TX Single HDMI Source HDTV HDTV HDTV HDMI HDMI Use with EVWP2006RX or EVRX2006 Sold Separately Cat5e 6 HDMI Cat5e 6 Cat5e 6 At this point the display connected should display the source signal connected to the extender set If no signal is being displayed connect a shorter Cat5e 6 cable jumper or patch cable If a display is having difficulty receiving a signal...

Page 8: ...w for placement tips Or placed at the display to control the display from the source IR BLASTER TX To control the source Plug IR Blaster into IR TX port of transmitter unit place blaster in front of the IR eye of the source To control the display Plug IR Blaster into IR TX port of receiver unit place blaster in front of the IR eye of the display Note Placement of the IR Blaster is important and ca...

Page 9: ...port of transmitter unit place receiver in position where it is able to receive remote signals To Control the Source 1 Plug the IR Blaster into the IR TX Port on the Splitter 2 Plug the IR Receiver into the IR RX Port on the EVRX2006 receiver The IR RX port allows for IR control for the lone HDMI output port simply connect the included IR Receiver and lead to the local display location ...

Page 10: ...order and results in a signal being plugged into a device that is on and will attempt to connect the signal 5 Most of the major source and display manufacturers employ a proprietary control channel to communicate between devices from the same manufacturer Sometimes this can interfere with the HDMI control circuit or the authentication of the signal Call the manufacturer if you experience this issu...

Page 11: ...ical Support by dialing 1 800 626 6445 You can also email technical support issues to techsupport vanco1 com When calling please have the Model Number Serial Number affixed to the bottom of the unit and Invoice available for reference during the call Please read this Instruction Manual prior to calling or installing this unit since it will familiarize you with the capabilities of this product and ...

Page 12: ...Vanco International 506 Kingsland Drive Batavia Illinois 60510 call 800 626 6445 fax 630 879 9189 visit www vanco1 com ...

Reviews: