www.vanco1.com
800.626.6445
6
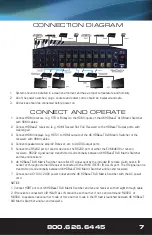
BACK PANEL DESCRIPTIONS
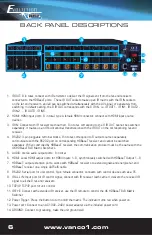
1. IR OUT: 8 in total, connect with IR emitters to deliver the IR signal sent from the far-end receivers
connected to the HDBaseT ports. These IR OUT sockets make up an IR matrix with the IR IN sockets
on the far-end receivers, and all can be switched simultaneously with the AV signal, or separately from
switching. In default setting, the 8 IR OUT corresponds with the 8 IR IN, i.e. IR OUT1 - IR IN1, IR OUT2 -
IR IN2, …IR OUT8 - IR IN8.
2. HDMI: HDMI input ports, 8 in total, type A female HDMI connector, connect with HDMI input source
devices.
3. IR IN: Connect with IR receiver (with carrier), 8 in total, correspond to the 8 IR OUT, cannot be switched
separately. It makes up an IR bi-directional transmission with the IR OUT on the corresponding far-end
receiver.
4. RS232: 3-pin pluggable terminal blocks, 8 in total, correspond to 8 output sources separately,
communicate with the RS232 port on corresponding HDBaseT receiver, and cannot be switched
separately. When controlled by HDBaseT receiver, the communication protocol must be the same with the
4K HDBaseT 8x8 Matrix Switcher’s.
5. AUDIO: stereo audio output ports, 8 in total
6. HDMI: Local HDMI output ports for HDMI Inputs 1~8, synchronously switched with HDBaseT Output 1~8
7. HDBaseT: output extension ports, works with HDBaseT receivers to extend signals and energize far-end
HDBaseT receiver on a single CAT5e/6 cable.
8. RS232: Serial port for unit control, 9-pin female connector, connects with control device such as a PC.
9. IR ALL IN: Input port for IR control signal, connect with IR receiver (with carrier), delivers the received IR
signal to all the 8 far-end receivers.
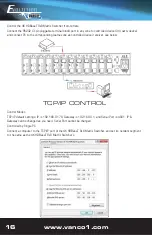
10. TCP/IP: TCP/IP port for unit control
11. IR EYE: Connect with extended IR receiver, use the IR remote to control the 4K HDBaseT 8x8 Matrix
Switcher.
12. Power Trigger: Press the button to turn on/off the matrix. The indicator turns red when power on.
13. Power port: Connect to an AC 100V~240V power adapter via the included power cord
14. GROUND: Connect to grounding, make the unit ground well.
2
1
4
7
6
8
3
5
9
10
14
12
13
11

