background image

PAGE 5

SECTION 2

INSTALLATION

2.7  SETTING THE CONTROLLER

The controller was factory set for normal operation.  The
factory settings are as follows:

RELAY 1

SET POINT

35

O

F

DIFFERENTIAL

10

O

F

MODE

COOLING

Turn on the main power to the FP-4 control.

If the settings have been changed, set them to the factory
settings following the procedures below .  The controller will
retain the setting if the power is disconnected.

PROGRAMMING PROCEDURES

1. Press MENU key, then press RIGHT arrow key three
times.  Use the UP and DOWN arrow to select the
SETPOINT.  Press the RIGHT arrow to store the setpoint in
memory.

2. Press the RIGHT arrow to set the DIFFERENTIAL.  Use
the UP and DOWN arrow to set the differential.  Press the
RIGHT arrow to store the differential in memory.

3. Press the RIGHT arrow key to set the HEATING / COOL-
ING 
mode.  Use the UP or DOWN arrow to select the
desired mode.  Press the RIGHT arrow to store the mode in
memory.

4. Press RIGHT arrow three times to exit the program mode.

SECTION 3

OPERATION

3.1 OPERATION

Once the kit is installed and set properly, just energize the
controller and it will operate automatically.

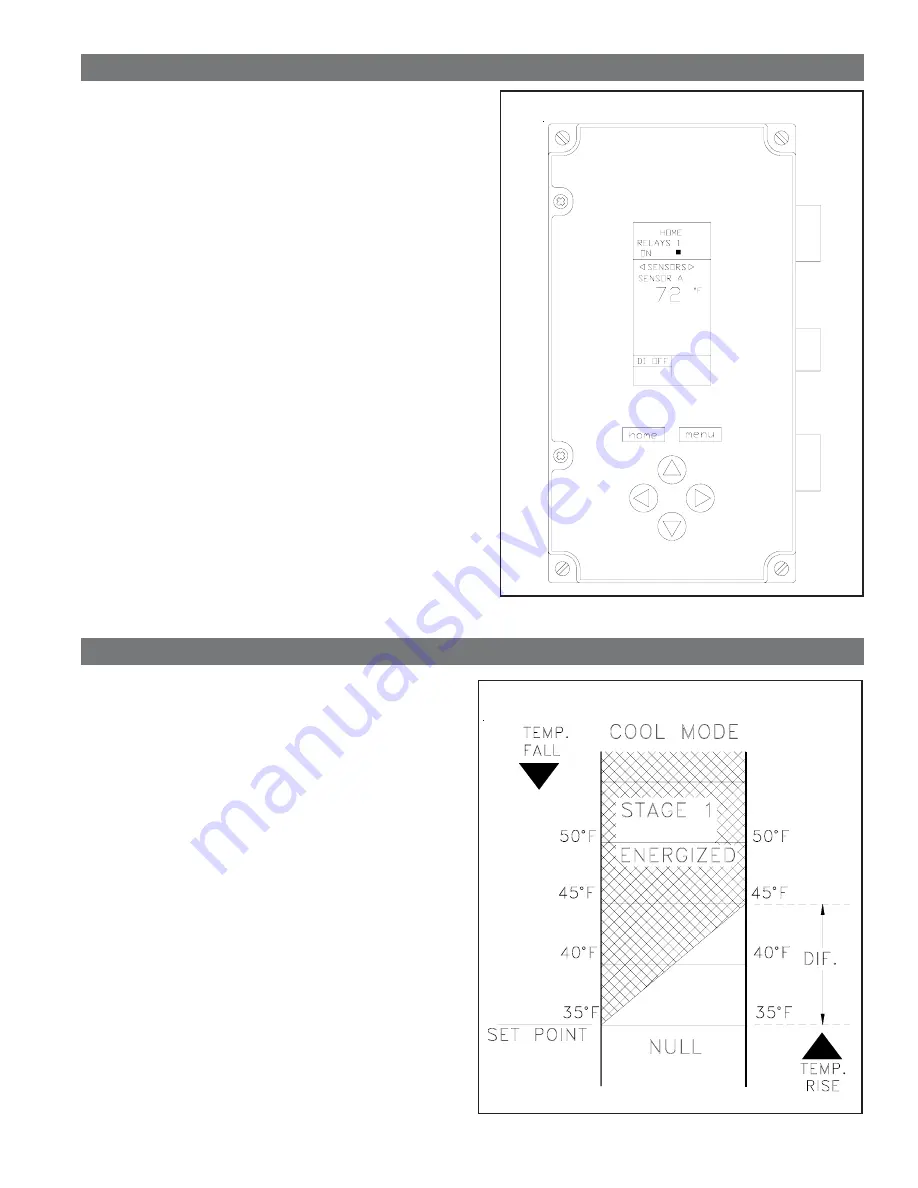
The controller will turn off half of the aftercooler fan when the
temperature of system air at the outlet of the aftercooler falls
to 35

O

F.  The fan will turn on when the system temperature

rises to 45

o

F.  Reference chart in Figure 3-A .

The heat tape is controlled by its own internal thermostat.
Power is supplied to the heat tape as long as the control box
is energized.

The temperature controller is equipped with a LCD display.
During normal operation when the fan are operating,
(temperature above set points) the sensor temperature and
RELAYS 1 ON will be displayed on the controller.

NOTE:  The cover on the control box must be opened to view
the temperature controller display.

FIGURE 3-A OPERATION SEQUENCE

FIGURE 2-G CONTROLLER DISPLAY

Summary of Contents for FP-4

Page 1: ...HER APPLICABLE FEDERAL STATE AND LOCAL CODES SECTION 1 INTRODUCTION 1 1 DESCRIPTION OF OPERATION The FP 4 freeze protection kit is designed to prevent aftercooler freeze up when the ambient temperatur...

Page 2: ...ushing if required into a connection between the aftercooler outlet and the separator Place some heat conductive compound into the thermowell Place the sensor into the thermowell and fasten it in plac...

Page 3: ...T IN SERIOUS PERSONAL INJURY AND OR DAMAGE TO THE UNIT WHEN INSTALLING THIS KIT ALWAYS COMPLY WITH THE NATIONAL ELECTRICAL CODE AND ALL OTHER APPLICABLE FEDERAL STATE AND LOCAL CODES A 7 8 hole in the...

Page 4: ...DIRECTION REFERENCE THE AFTERCOOLER OPERATOR S MANUAL FOR PROPER ROATION DIRECTION IF IT DOES NOT THE ROTATION CAN BE CORRECTED BY SWITCHING TWO OF THE POWER LEADS TO THE MOTOR SECTION 2 INSTALLATION...

Page 5: ...or DOWN arrow to select the desired mode Press the RIGHT arrow to store the mode in memory 4 Press RIGHT arrow three times to exit the program mode SECTION 3 OPERATION 3 1 OPERATION Once the kit is in...

Page 6: ...IONS 1 Aftercooler fan motor continues to operate system temperature below 35O F Check the controller settings as outlined in Section 2 7 The controller may be set in the heat mode or the set points s...

Page 7: ...CONNECTOR 3 8 90O ELBOW CONDUIT CONNECTOR 1 X 1 2 NPT BUSHING 12 14 x 1 SELF TAPPING SCREW TEMPERATURE CONTROLLER MOTOR RELAY TRANSFORMER 1 AMP FUSE 6 AMP FUSE GRAY TERMINAL YELLOW TERMINAL GREEN TERM...

Page 8: ...TATIVE IS NAME COMPANY ADDRESS CITY STATE ZIP PHONE FAX ATTACH BUSINESS CARD HERE 2950 Mechanic Street Lake City PA 16423 USA Phone 800 840 9906 Service Fax 814 774 0778 Order Entry Fax 814 774 3482 w...

Page 9: ...ck option Description Replaces SPDT Relay Outputs Analog Mod Outputsb b The modulating analog outputs are 4 20 mA 0 10 Vdc 2 10 Vdc or Series 90 selectable Floating Outputsc c Each floating output eli...

Page 10: ...ng sensor with wiring box C7046D1008 8 inch duct probe with mounting flange C7100D1001 12 inch fast response duct averaging sensor with flange C7130B1009 Room mount sensor Accessories 107324A Bulb Hol...

Page 11: ...ion using the four mounting holes provided on the back of the enclosure using 6 or 8 screws screws are not provided and must be obtained separately Use controller dimensions in Fig 1 on page 2 as a gu...

Page 12: ...d use shielded cable NOTE Each T775 controller must be wired to its own sensor s However a benefit of the T775 controller s accuracy is that there is no more than a 2 F differential between any two T7...

Page 13: ...e used only for sensor and low voltage wiring Knockouts C D and E can be used to gain access to the load relay output terminals and 120 240 Vac power wiring Controller Wiring Method Wire the sensors a...

Page 14: ...NO NC C NO NC C NC NO C NC NO T T T T B R W B R W SENSOR A SENSOR B MOD 2 MOD 1 KNOCKOUT A DIGITAL INPUT POWER 120 240 VAC OUTPUT RELAY 2 KNOCKOUT D POWER 24 VAC OUTPUT RELAY 1 KNOCKOUT C KNOCKOUT E...

Page 15: ...COM NO COM NO SENSOR A C NO NC C NO NC T T COM LOAD 2 LOAD 1 NO COM NO COM 120V M24477A 1 1 FOR 240 VAC LOAD CONNECT TO 240 TERMINAL C 120 COM 240 POWER SUPPLY L1 HOT L2 SENSOR A 1 FOR 240 VAC LOAD C...

Page 16: ...0 mA MODULATING INPUT T1 T2 C R POWER OUTPUT USE SEPARATE TRANSFORMER FOR T775R WHEN USING 24 VAC 1 HONEYWELL MODUTROL MOTOR WITH VOLTAGE CONTROL INPUT 1 F M24483 MODULATING OUTPUT TERMINAL MOD 1 B R...

Page 17: ...IF COMMON TRANSFORMER IS USED ALL MOTORS MUST BE IN PHASE CONNECT THE SAME TRANSFORMER LEAD TO T1 ON EACH MOTOR CONNECT THE OTHER TRANSFORMER LEAD TO T2 ON EACH MOTOR USE TEMPERATURE CONTROLLER SUCH...

Page 18: ...ion value in the table exceeds the controller s calibration limits of 10 F 6 C you must use a heavier gauge wire For example with a wire run of 1 000 feet you must use 20 AWG wire or heavier in order...

Page 19: ...nd forward X through the Program and Setup menus Up and Down Arrow Buttons S and T Use these buttons to move your selection up and down through a menu or list When the desired item is highlighted you...

Page 20: ...he menus use the Left arrow button W to scroll backward through the menus Right arrow button X to select the highlighted menu item and display its content Up and Down arrow buttons S and T to scroll u...

Page 21: ...ribes the relationship between setpoint and differential for heating and cooling These settings are programmed for each output relay Heating Mode Setpoint and Differential In heating mode the differen...

Page 22: ...NU button select PROGRAM then select RELAY 1 or MOD 1 to view the parameters Fig 27 shows RELAY 1 NOTE For MOD 1 and 2 THROT RNG replaces DIFFRNTL NOTE The Setback parameter displays only if schedul i...

Page 23: ...elay energizes The Throttling Range brackets the setpoint setting e g if the setpoint is 72 F and the throttling range is 10 F then the effective throttling temperature range is 67 F to 77 F This appl...

Page 24: ...ecrease the desired setpoint temperature Default 60 F 16 C Range 40 F to 248 F 40 C to 120 C 3 Press the X button to accept the value and display the menu 1 2 6 Program Next Output Mod or Relay For th...

Page 25: ...s Right arrow button X to select the highlighted menu item and display its content Up and Down arrow buttons S and T to scroll up and down through a list of items or to increase or decrease the value...

Page 26: ...Use the S and T buttons to increase decrease the desired calibration degrees Default 0 0 Range 10 F 6 C 4 Press the X button to accept the value and return to the Sensor A selections Fig 39 Setup Sens...

Page 27: ...ture limit the LIMIT item displays on the Sensor B menu 1 From the Sensors menu use the T button to high light SENSOR B 2 Press the X button to display the Sensor B menu 2 2 3 1 CALIBRATE Setting the...

Page 28: ...tinue with 2 3 Setting up the Outputs on page 21 Fig 43 Setup Sensors Sensor B Hi Low Limit showing Hi Limit 2 2 4 1 HI LIMIT or LOW LIMIT Sensor B only Fig 43 shows the Hi Limit Heat mode but the pro...

Page 29: ...menu NOTE The menus e g the Outputs menu shown here can display only those relays that are defined in Setup see page 24 For example if you config ure only two relays then only two relays display on th...

Page 30: ...econds 4 Press the X button to accept the seconds and return to the Mod menu NOTES 1 The Integral time is factory set for 400 seconds This is a good middle range and should satisfy many applications T...

Page 31: ...is set to Yes see page 24 1 From the Mod menu use the S and T buttons to highlight SCHEDULE 2 Use the S and T buttons to highlight YES or NO Default YES 3 Press the X button to accept the selection an...

Page 32: ...use the Sand T buttons to highlight OPTIONS 2 Press the X button to display the Options menu Fig 55 Setup Outputs Options Schedule 2 3 3 1 USE SCHED 1 Press the X button to display the schedule selec...

Page 33: ...SETBACK or IGNORE Default DISABLE 3 Press the X button to accept the value and display the SHOW RT option When the digital input DI closes all outputs follow the DI option value Disable Setback or Ign...

Page 34: ...Relay Type 2 3 4 1 TYPE standard or floating The Floating option is only available on the T775B2016 T775B2024 T775B2032 and T775B2040 models For these models this selection displays only for Relay 1 a...

Page 35: ...RAL option The actuator run time is defined as the time needed to move the actuator from the fully closed to fully open position and visa versa Fig 64 Setup Outputs Floating Relay Integral 2 3 4 1 1 2...

Page 36: ...the X button to accept the value and return to the Relay menu An individual output can be selected to be controlled or not controlled by the schedule If NO is selected the Setback selection does not...

Page 37: ...he selected relay set up and return to the Outputs menu To setup the next relay output go to 2 3 4 Setting up the Relays on page 26 If you are finished setting up the relay outputs press the HOME butt...

Page 38: ...me screen 2 If you press the MENU button you exit Scheduling mode and return to the menu To create or change a schedule you use the Left arrow button W to scroll backward through the Schedule menus Ri...

Page 39: ...e S and T buttons to highlight SET DATE 2 Press the X button to display the current system date setting 3 Use the X button to cycle between the month day and year values 4 Use the S and T buttons to i...

Page 40: ...1 E1 SETPT setpoint for event 1 The following figures show the MON FRI menu but the menu selections are the same for any time period Fig 75 Schedule Event 1 Setpoint 3 3 1 E1 SETPT setpoint for event...

Page 41: ...lished the same way as the first event See 3 3 1 E1 SETPT setpoint for event 1 on page 32 above 3 3 4 E2 TIME time for event 2 Creating the time for event 2 is accomplished the same way as the first e...

Page 42: ...gnostic status as described below Error Message There is a two character error code that displays in response to controller software problems EE EEPROM Failure The values read back from the EEPROM are...

Page 43: ...l device pursuant to Part 15 of the FCC rules These limits are designed to provide reasonable protection against harmful interference in residential installations This equipment generates uses and can...

Page 44: ...tions Honeywell International Inc Honeywell Limited Honeywell Limit e 1985 Douglas Drive North 35 Dynamic Drive Golden Valley MN 55422 Toronto Ontario M1V 4Z9 customer honeywell com U S Registered Tra...

Reviews: