Valor L1 Series Installation Manual Download Page 5

L’Encadrement 1530CIK s’installe au moment de l’encastre-

ment du foyer. Les matériaux de 

fi

 nition du mur sont ensuite 

appliqués et abouttés directement à l’encadrement.
Cet encadrement n’est pas conçu et 

ne peut être l’installé 

avec d’autres bordures.

Voir le Guide d’installation fourni avec le foyer pour plus 

d’information sur la finition autour de l’encadrement.
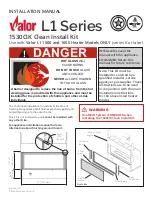
Profondeur

15/16”

[24 mm]

15

-1

3/

16

[4

01

 m

m

]

41” [1041 mm]

8-

9/

16

[2

18

 m

m

]

Porte

gauche

Couvercle

Pare-étincelles

Concept

Porte

droite

Bordure

Foyers 1500K 

ou 1600K

Encadrement 1530CIK

Utilisez sur les

 foyers Valor L1 1500K et 1600K SEULEMENT

GUIDE D’INSTALLATION

Série L1

Note : Ce kit doit être 

installé ou réparé par un 

installateur qualifié, une 

agence de service certifiée 

ou un fournisseur de gaz. 

Ces instructions doivent être 

utilisées conjointement avec 

les instructions d’installation 

du modèle de foyer Valor 

indiqué ci-dessus.

VITRE CHAUDE - 

RISQUE 

DE BRÛLURES.

NE TOUCHEZ PAS 

UNE 

VITRE NON REFROIDIE.

NE LAISSEZ JAMAIS 

UN 

ENFANT TOUCHER LA VITRE.

L’écran pare-étincelles fourni avec ce foyer réduit le risque 
de brûlure en cas de contact accidentel avec la vitre chaude 
et doit être installé pour la protection des enfants et des 
personnes à risques.

DANGER

!

INSTALLATEUR : Laissez cette 

notice avec l’appareil.
CONSOMMATEUR : Conservez 

cette notice pour consultation 

ultérieure.

AVERTISSEMENT

Le Système HeatShift EST EXIGÉ lorsque 

l’Encadrement 1530CIK est utilisé.

5

Summary of Contents for L1 Series

Page 1: ...mation about finishing around this kit Depth 15 16 24 mm 15 13 16 401 mm 41 1041 mm 8 9 16 218 mm Left hand door Cover plate Barrier screen Right hand door CIK assembly 1500K or 1600K engine WARNING HeatShift System IS REQUIRED when installing the 1530CIK Clean Install Kit Overview Note This kit must be installed or serviced by a qualified installer service agency or gas supplier These instruction...

Page 2: ... with tin snips These tabs are only for use with kits other than the 1530CIK 2 File or trim any remaining sharp edges Be careful not to allow material to fall into the appliance 3 Slide CIK frame into the opening as shown pushing it as far in as it will travel 4 Screw the CIK frame to the interior of the opening 4 screws The fireplace and kit are now ready for wall finishing to take place Cement b...

Page 3: ...e side doors 6 Identify left hand door and its orientation according to the images below 7 Insert the left hand door top hinge pin in the hole at the top of the CIK frame then the bottom hinge in the hole of the cover panel Turn the door in toward the back of the fireplace 8 Repeat for right hand door 9 Place the magnetic barrier screen into the CIK frame opening with the tabs at the bottom Assemb...

Page 4: ...vement details may vary slightly from those given in this publication Maintenance To clean the fireplace trim use mild soap and water To clean the barrier screen dust with a soft brush If the barrier becomes damaged the barrier shall be replaced with the manufacturer s barrier for this appliance To clean the window and ceramics inside the firebox see the Homeowner s Manual supplied with the firepl...

Page 5: ...ALLATION Série L1 Note Ce kit doit être installé ou réparé par un installateur qualifié une agence de service certifiée ou un fournisseur de gaz Ces instructions doivent être utilisées conjointement avec les instructions d installation du modèle de foyer Valor indiqué ci dessus VITRE CHAUDE RISQUE DE BRÛLURES NE TOUCHEZ PAS UNE VITRE NON REFROIDIE NE LAISSEZ JAMAIS UN ENFANT TOUCHER LA VITRE L écr...

Page 6: ...nt en les pliant et dépliant mais aussi avec un ciseau à métal 2 Limez ou coupez les bords coupants Faites atten tion de ne pas laisser tomber de morceau de métal dans l appareil 3 Insérez le cadre dans l ouverture et poussez le jusqu à ce qu il touche la caisse 4 Fixez le cadre à la caisse du foyer 4 vis Les matériaux de finition du mur peuvent être maintenant appliqués Le panneau de béton la tui...

Page 7: ...ifiez la porte gauche et son orientation selon les images ci dessous 7 Place la porte gauche en insérant la cheville du haut dans le cadre puis insérez la cheville du bas 8 Répétez pour la porte droite 9 Fixez le pare étincelles aimanté dans le cadre avec les onglets en bas Encadrement installé HAUT de porte cet espace est plus large HAUT de porte onglet à l arrière Porte gauche BAS de porte cet e...

Page 8: ...ls de la présente publication peuvent varier Entretien Pour nettoyer le pare étincelles utilisez une brosse à poils doux Si le pare étincelles est endommagé il doit être rem placé par le pare étincelles conçu par le manufacturi er pour cet appareil Pour nettoyer la vitre de la fenêtre et l intérieur du foyer consultez le Guide du propriétaire fourni avec le foyer 1 2 3 4 5 AVERTISSEMENT NE TOUCHEZ...

Reviews: