Valencia Euro EDPR60SS Instruction Manual Download Page 13

10

It is dangero us to open the do or when was hing, because the hot water may s cald you.

When the wo rking cycle has fi nished, the buzzer of the dishwasher will soun d for 8 seconds, then stop. Turn off
t he appliance using the ON/OFF button, shut off the wa ter supp ly and open the door of the dishwashe r.
Wait for a few minutes bef ore unlo ading th e dishwasher to avoid ha ndlin g the dishes and utensils while th ey
are still hot and more susceptible to break age. The y will also dry better.

Switch Off the Dishwasher

The running indicator light is off, only in this case the programme has ended.
1.Switch off the dishwasher by pressing the ON/OFF button.
2.Turn off the water tap!

Open the door carefully.

Hot dishes are sensitive to knocks. The dishes should therefore be allowed to cool down around 15 minutes
before removing from the appliance.
Open the dishwasher's door, leave it ajar and wait a few minutes before removing the dishes. In this way they
will be cooler and the drying will be improved.

Unloading the dishwasher

It is normal that the dishwasher is wet inside.
Empty the lower basket first and then the upper one. This will avoid water dripping from the upper Basket onto
the dishes in the lower one.

If you open the door

, the machine will pause. The pr ogram light will

stop blinking and the buzzer will mooing every minute unless you close the door . After
you close the door ,the machine will keep on working after 10 seconds.

during a wash cycle

Premi se:

A cycle that is underway ca n on ly be modified if it has only been running fo r a short time. Otherwise, the

detergent may have alread y been re leased, a nd the appliance may have already drained the wash water.
If this is the case, the detergent disp enser mu st be refilled (see the section ent itled " Loading the
Detergent " ).
Press the start/reset button

, the machine will be in standb y state, then you can

change the progr am to the desi red cycle setting (see the section entitled " Star ting a wash cycle. . ." ).
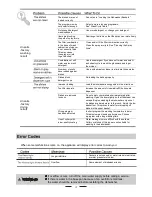
The program lights show the state of the dishw asher:
a) All p rogram lights off--------------------- ------------ -----------stand by
b) One of the program lights on------------------------ --------------pause
c) One of the program lights blinking -----------------------------------run
c) Some of the up thre e pro gram ligh ts bl inking fleetly------------error

more than 3 seconds

1

2

3

When you pr ess the Star t/Reset button to pause during washing, the program light will
stop blinking and the dishwash er will mooin g every minute unless yo u press the
Start/Reset button to sta rt.

A forgotten dish can be added any time before the detergent cup opens.

Add forgotten dishes.

Close the door

After the spray arms stop working,you can open the door
completely.

2

3

Open the door a little to stop the washing.

1

4

5

6

Press the start/reset button

Press the start/reset button, the dishwasher will run
after 10 seconds.

Summary of Contents for EDPR60SS

Page 1: ...EDPR60SS EDPR60WH...

Page 2: ...s then stop Turn off the appliance using the ON OFF button Switch on the appliance Press the On Off button to switch on the appliance Open the door Electric indicator on control panel if provided For...

Page 3: ...for the help of professional technicians Dishwasher Features 2 Attention before or after loading the Dishwasher Baskets 6 Filtering System 11 Caring for the Dishwasher 12 A Fill the Rinse Aid Dispens...

Page 4: ...st not be excessively or dangerously bent or flattened Do not tamper with controls Do not operate your dishwasher unless all enclosure panels are properly in place Open the door very carefully if the...

Page 5: ...performance from your dishwasher read all operating instructions IMPORTANT IMPORTANT 1 7 2 3 6 4 5 1 1 Power indicator light To show the power supply 2 Power switch To turn on off the power supply St...

Page 6: ...g Dishwasher cleaning agent liquid detergent This would damage the appliance To open the dispenser turn the cap to the open left arrow and lift it out Pour the rinse aid into the dispenser being caref...

Page 7: ...d can achieve the same results that can otherwise only be achieved using intensive programs Detergent tablets of different brands dissolve at different speeds For this reason some detergent tablets ca...

Page 8: ...marking indicates the dosing levels as illustrated on the right The place of main wash cycle detergent placed The place of pre wash cycle detergent placed Please observe the manufacturers dosing and...

Page 9: ...s glasses pans etc With the opening facing downwards so that water cannot collect in the container or a deep base Use a mild detergent that is described as kind to dishes If necessary seek further inf...

Page 10: ...es cups bowls upside down The upper rack is for more delicate and lighter dishware such as glasses coffee tea cups saucers plates bowls and shallow pans provided these are not too dirty Note Your dish...

Page 11: ...dles down But place knives and other potentially dangerous utensils are placed handles up 2 4 5 2 5 4 2 3 2 1 1 1 1 1 5 55 4 5 55 4 3 2 3 3 2 3 4 5 5 5 1 1 1 1 1 5 4 2 2 3 3 3 3 3 3 2 3 2 2 1 4 4 4 4...

Page 12: ...HZ the specification of the socket is 10A 250VAC Make sure that the water supply is turned on to full pressure Close the door press the ON OFF button and the ON OFF light will turn on Press the progra...

Page 13: ...ght will stop blinking and the buzzer will mooing every minute unless you close the door After you close the door the machine will keep on working after 10 seconds during a wash cycle Premise A cycle...

Page 14: ...ter2 Fine filter 3 2 3 1 Filter assembly The filter efficiently For best performance and results the filter must be cleaned regularly this reason it is a good idea to remove the larger food particles...

Page 15: ...semble the filter parts as shown in the figures on the last page and reinsert the entire assembly in the dishwasher positioning it in its seat and pressing downwards The entire filter assembly should...

Page 16: ...ent This appliance is equipped with a cord having an equipment earthing conductor and an earthing plug The plug must be plugged into an appropriate outlet that is installed and earthed in accordance w...

Page 17: ...inimum diameter of 4 cm or let it run into the sink making sure to avoid bending or crimping Use the special plastic support that comes with the appliance The free end of the hose must be at a height...

Page 18: ...uced 1 The dishwasher is level and fixed properly 2 The inlet valve is open 3 There is a leakage at the connections of the conducts 4 The wires are tightly connected 5 The power is switched on 6 The i...

Page 19: ...re obstructing the sp ay arm r Interrupt the programme and rearrange the items of crockery This has no influence on the dishwasher function if in doubt contact a suitably qualified plumber Detergent w...

Page 20: ...leaning performance Choose a program with a long washing time Water drainage is more difficult with these items Cutlery or dishes of this type are not suitable for washing in the dishwasher The progra...

Page 21: ...18 Height 850mm Width 600mm Depth 580mm Voltage connected Load see rating label Water pressure 0 04 1 0MPa Power supply see rating label Capacity 12 Place settings...

Reviews: