background image

Valcom Master Clock 

(V2)


Page 16 

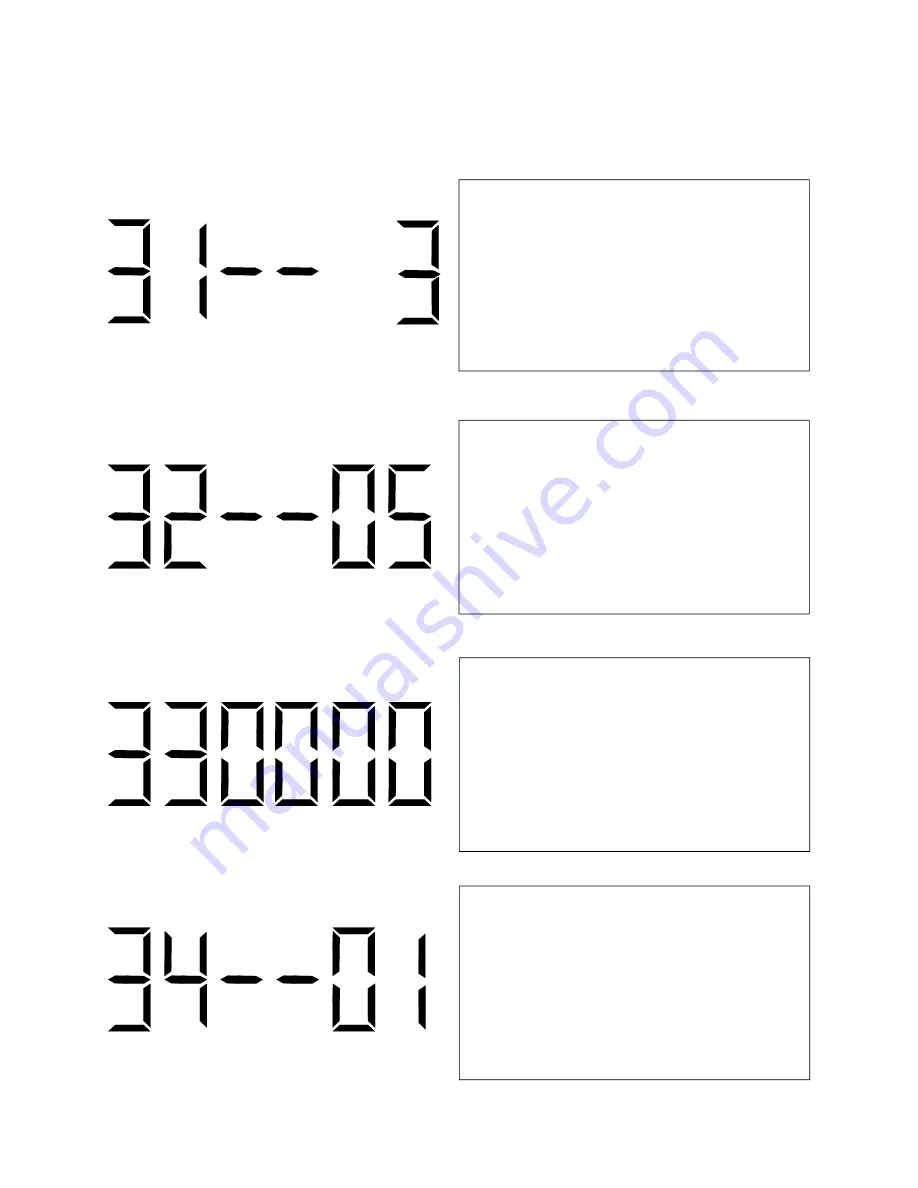
Press the top button to enter option 33.  The num-
ber “33” will appear on the left side of the LED 

display.  This option allows the user to set the bias 
seconds which allows the user to adjust the input’s 
time plus or minus 7500 seconds.  Press the bot-
tom button to scroll through “-9999 to 7500”.   

Press the top button to enter option 34.  The num-
ber “34” will appear on the left side of the LED 

display.  This option allows the user to set the hour 
that the time is to go to when Once A Day Pulse is 
selected.  Press the bottom button to scroll through 
“00-23”. 
 

*This option is only available if option 30 or 31 is 
set to 11. 

Press the top button to enter option 31.  The number 
“31” will appear on the left side of the LED display.  

This option allows the user to select the secondary 
auxiliary input.  Press the bottom button to scroll 
between “1-13” to select the input. 


Press the top button to enter option 32.  The num-
ber “32” will appear on the left side of the LED 

display.  This option allows the user to set the offset 
of the user’s time zone location.  Press the bottom 
button to scroll through “-12 to 12”.  See Fig 3.1 
on page 23 for examples of common offsets. 

01 - SNTP  
02 - 59 Minute Correction 
03 - 58 Minute Correction (1) 

04 - 58 Minute Correction (2) 
05 - 58 Minute Correction (3) 
06 - 58 Minute Correction (4) 
07 - National Time/Rauland 

08 - Dukane 
09 - Rauland Digital 
10 - Wireless Repeater 

11 - Once a Day Pulse* 
12 - GPS 
13 - RS485 
* - Selecting this allows access to options 34-36 

Summary of Contents for V-WMCA

Page 1: ...Valcom Master Clock V2 V WMCA V GPSA V GPS TX Valcom Inc 5614 Hollins Road Roanoke VA 24019...

Page 2: ...Output Setting Clock 2 Relay Output Setting the Primary Input Setting the Secondary Input Setting the Offset Setting the Bias Seconds Setting Once a Day Pulse Input Sending Diagnostics Sync Wire Proto...

Page 3: ...at the designated markings from step 1 4 Install the four anchors in the holes that were just drilled 5 Install the first two screws in the top holes leaving 1 8 of the thread exposed 6 Line up the t...

Page 4: ...32 port is used for debugging only Power Input This power outlet is used to power up the Valcom master clock 1 2 3 4 5 6 7 8 9 1 2 3 4 5 6 7 9 10 Installing the Master Clock with the Line Cord Recepta...

Page 5: ...nections Wired Systems 2 Wire Communication V CCU V C6124P 24 volt outputs 24 VDC IN DATA IN 19 18 2 Wire Digital Output to Clocks V D2425 or V D2440 V A2412 or V A2416 Orange Yellow Black White V C61...

Page 6: ...Valcom Master Clock V2 Page 6 System Connections Wired Systems Sync Wire Communication via Clock 1 or 2 10 Amp Contact Rating...

Page 7: ...Hot 24VAC Neutral 24VAC Hot N O COM This system can accommodate both a primary and secondary for backup auxiliary time synchronization input The following protocols cannot be used simultaneously 59 mi...

Page 8: ...ts Sync Wire Inputs Installation National Time Rauland Rauland Digital Dry Contact Closure 110VAC Interface 24VAC Interface 7 17 8 12 16 17 15 17 110VAC Neutral 110VAC Hot 24VAC Neutral 24VAC Hot N O...

Page 9: ...Valcom Master Clock V2 Page 9 Inputs Sync Wire Inputs Installation Dukane Digital Once a Day Pulse Dry Contact Closure 7 17 8 12 N O COM 7 17 14 8 Minute Pulse Ground 13 Reset...

Page 10: ...Patch Cable Installation Wall Jack to Network Fig 1 1 1 Connect a patch cable to the RJ45 port on the Valcom Master Clock as shown in Fig 1 1 2 Connect the other end of the patch cable to an Ethernet...

Page 11: ...on the left side of the LED display This prompt allows the user to set the month Use the bottom button to scroll between 01 12 Programming the Valcom Master Clock Press both buttons on the front pane...

Page 12: ...ry hour Press the top button to enter option 12 The num ber 12 will appear on the left side of the LED display This option allows the user to enable or disable Daylight Savings Time Press the bottom b...

Page 13: ...side of the LED display This option allows the user to set the min utes at which the relay will close Press the bottom button to scroll through 00 59 Press the top button to enter option 20 The num be...

Page 14: ...on the left side of the LED display This option allows the user to set the hour at which the relay will close Press the bottom button to scroll through 00 23 Press the top button to enter option 23 Th...

Page 15: ...02 59 Minute Correction 03 58 Minute Correction 1 04 58 Minute Correction 2 05 58 Minute Correction 3 06 58 Minute Correction 4 07 National Time Rauland 08 Dukane 09 Rauland Digital 10 Wireless Repea...

Page 16: ...et to 11 Press the top button to enter option 31 The number 31 will appear on the left side of the LED display This option allows the user to select the secondary auxiliary input Press the bottom butt...

Page 17: ...A 00 will appear on the right side if it is not receiving an Internet Connec tion This option is a read only option Press the top button to enter option 35 The num ber 35 will appear on the left side...

Page 18: ...ss the bottom button to scroll be tween E d Setting the option to E will enable the option and will enter diagnostic mode Setting the option to d will disable the option and upon depressing the top bu...

Page 19: ...47 05 5 59th minute The hourly correction for 8 seconds every hour from XX 57 54 to XX 58 02 The daily correction 5 a m 5 p m is a 14 second pulse from 5 57 54 to 5 58 08 6 National Time Rauland_1 Th...

Page 20: ...and editing events and schedule changes The default password for the user level is 1111 It can be changed in the technician level The technician level password is 6063 and gives you full access to al...

Page 21: ...ered in 24 hour format HH MM SS After typing in the desired time click the Submit button to set the time on the unit if there is no input connected Date This field is where the current date is display...

Page 22: ...24 hour mode enabling or disabling Daylight Savings Time and editing the standard durations for each zone Database Maintenance This link when clicked will bring the user to the Database Maintenance s...

Page 23: ...Valcom Master Clock V2 Page 23 Web Browser Programming System Settings Page 1 1 2 3 4 5 6 7...

Page 24: ...MT Offset This field sets the positive or negative offset for GMT time For instance eastern time zone is a nega tive five hour offset See Fig 3 1 for typical offsets Submit This button when pressed wi...

Page 25: ...Valcom Master Clock V2 Page 25 System Settings Page 2 Web Browser Programming 1 2 3 4 5 6 7 8...

Page 26: ...Digital and once a day Pulse An example of a configuration would be SNTP being the primary input and 58 minute correction being a secondary input Setting the primary source to 59 minute sync and the...

Page 27: ...Valcom Master Clock V2 Page 27 IP Settings Page 1 Web Browser Programming 1 2 3 4 5 6 7 8 9...

Page 28: ...may be needed for certain networks IP Address This field allows the user to set the IP address for the device DHCP This drop down list allows the user to turn DHCP on or off DHCP allows the master cl...

Page 29: ...which NTP servers that the master clock will try to acquire time from Submit This button when pressed will save all of the information to the master clock Cancel This button when pressed will clear o...

Page 30: ...he master clock IP Address This display the IP address for the master clock Device Name This displays the device name for the master clock Menu This button when pressed will bring the user back to the...

Page 31: ...option they want The option can be disabled pre 2007 and post 2007 Pre 2007 has the old style daylight savings time format that was enacted prior to 2007 Post 2007 daylight savings time is the current...

Page 32: ...for backup purposes Choose File This button when pressed will allow the user to browse for the saved db file that contains the saved events and schedules Download This button when pressed will downloa...

Page 33: ...r through a cross over cable Yes the Valcom Master Clock can be accessed through a cross over cable or via a LAN connection What is the maximum length I can go with the GPS cable When the GPS option i...

Page 34: ...an unobstructed area that is in complete view of the sky Also check to make sure the connections on each end of the cable are securely tightened Lastly verify that there are no kinks or breaks in the...

Reviews: