background image


15 

5. Click the 

Capture

 button or press the 

‘C’

 key and the 

image will be displayed in the window. If the image is 

acceptable, click the 

Save

 button or press the 

‘S’


key to send the image to your application. If the 

image is not acceptable click the 

Capture

 button to 

take another capture. All image settings will be 

saved to the 

Portable.ini

 file and remembered 

sessions. 


NOTE

: The 

‘C’

 and 

‘S’ 

are short keys for capturing 

the image 


6. Once the settings are optimized, the 

Capture

 button 

can be clicked without clicking the 

Preview 

check 

box or clicking the 

Lamp On

 button. 


Taking a Capture without using the Lamp 


1. Make sure that the 

Use Lamp Off

 radio button is 

enabled


2. Adjust


exposure using the brighter 

 and darker 

 buttons. Note that the preview window exposure 

will change immediately. 


3. Click the 

Adjustments

 button to open the Adjust 

Dialog box. Verify the Lamp is off and adjust settings 

Summary of Contents for VALCam Laptop Pro with CamLite

Page 1: ...ted for increased operator efficiency In addition to hands free control the VALCam Laptop uses Video Associates Lab s technology A high intensity light is automatically fired with each capture The VALCam will automatically adjust for perfect captures Software adjustments are provided for exposure color intensity and flesh tone control High quality captures with perfect skin tones can be obtained e...

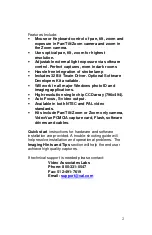
Page 2: ...d imaging applications High resolution single chip CCD array 796x494 Auto Focus S video output Available in both NTSC and PAL video standards Kits include Pan Tilt Zoom or Zoom only camera VideoVue PCMCIA capture card Flash software drivers and cables Quick start instructions for hardware and software installation are provided A trouble shooting guide will help resolve installation and operational...

Page 3: ... sub cable RS 232 Multi cable wiring harness 9 pin to 25 pin adapter 110v power cord Universal mounting bracket for lamp Instruction Manual 6500 688 VALCam Laptop Zoom with CamLite High resolution S video zoom camera VideoVue PCMCIA capture card with software S video to PCMCIA cable CamLite external power transformer Lamp with trigger cable 9 pin male to 9 pin female D sub cable RS 232 Multi cable...

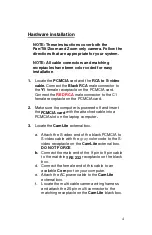
Page 4: ... the computer is powered off and insert the PCMCIA card with the attached cable into a PCMCIA slot on the laptop computer 3 Locate the CamLite external box a Attach the S video end of the black PCMCIA to S video cable with the gray color code to the S video receptacle on the CamLite external box DO NOT FORCE b Connect the male end of the 9 pin to 9 pin cable to the matching RS 232 receptacle on th...

Page 5: ...ector on the multi cable to the matching S video connector on the Pan Tilt camera Verify the cable connector is properly oriented and gently insert connector DO NOT FORCE THE CONNECTION f Connect the red Visca connector to the matching red Visca connector on the Pro camera g Connect the yellow DC connector on the multi cable to the yellow matching DC connector on the Pro camera h Connect the white...

Page 6: ...Zoom camera 5 Attach the AC power cable for the external box to a power source Verify that the power switch on the Pan Tilt camera is in the on position Verify that the power indicators on the external box and the Pan Tilt and Zoom or Zoom only camera are illuminated The VALCam Laptop hardware is now installed ...

Page 7: ... drive Drivers for Win 2000 XP and 98SE are provided Be sure to use the floppy that matches your operating system 4 After the drivers are installed reboot the computer and restart Windows Insert the floppy disk select Start Run and select Setup exe from the floppy This will install the ValCam LT Zoom 32 bit Twain driver NOTE Contact Video Associates for Win 95 98FE and NT drivers Verify operation ...

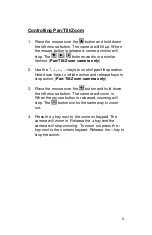
Page 8: ...ion Hold down keys to initiate action and release keys to stop action Pan Tilt Zoom camera only 3 Place the mouse over the button and hold down the left mouse button The camera will zoom in When the mouse button is released zooming will stop The button works the same way to zoom out 4 Press the key next to the numeric keypad The camera will zoom in Release the key and the camera will stop zooming ...

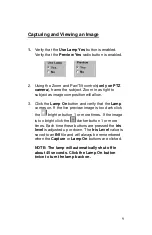
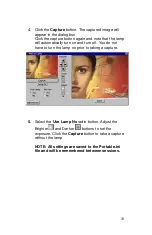
Page 9: ...n and verify that the Lamp comes on If the live preview image is too dark click the brighter button 1 or more times If the image is too bright click the darker button 1 or more times Each time these buttons are pressed the iris level is adjusted up or down The Iris Level value is saved to an INI file and will always be remembered when the Capture or Lamp On buttons are clicked NOTE The lamp will a...

Page 10: ...omatically turn on and turn off You do not have to turn the lamp on prior to taking a capture 5 Select the Use Lamp No radio button Adjust the Brighter and Darker buttons to set the exposure Click the Capture button to take a capture without the lamp NOTE All settings are saved to the Portable ini file and will be remembered between sessions ...

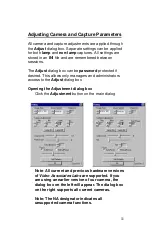
Page 11: ... be password protected if desired This allows only managers and administrators access to the Adjust dialog box Opening the Adjustment dialog box Click the Adjustment button on the main dialog Note All current and previous hardware versions of Video Associates Labs are supported If you are using an earlier version of our camera the dialog box on the left will appear The dialog box on the right supp...

Page 12: ... decrease Red If the image is green increase Blue and increase Red 5 Adjust the Cam Sharp control for the desired sharpness A value between 6 and 9 is recommended If the value is too high the image will look edgy and over enhanced If the value is too low the image will look soft and unfocused 6 Adjust the Color scroll bar for the proper color intensity If the color intensity it too high the card p...

Page 13: ...ments in exposure settings 9 Adjust the Image Size control to set the resolution of the captured image The default is 400x300 but 640x480 should also be tried 10 Adjust the Sharpness control to set post capture image processing A value of 2 is the default 11 Click the Restore Defaults button to restore settings to factory defaults If desired the Default settings can be customized by the administra...

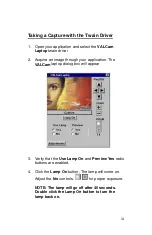
Page 14: ...hrough your application The VALCam laptop dialog box will appear 3 Verify that the Use Lamp On and Preview Yes radio buttons are enabled 4 Click the Lamp On button The lamp will come on Adjust the Iris controls for proper exposure NOTE The lamp will go off after 40 seconds Double click the Lamp On button to turn the lamp back on ...

Page 15: ...e and remembered sessions NOTE The C and S are short keys for capturing the image 6 Once the settings are optimized the Capture button can be clicked without clicking the Preview check box or clicking the Lamp On button Taking a Capture without using the Lamp 1 Make sure that the Use Lamp Off radio button is enabled 2 Adjust exposure using the brighter and darker buttons Note that the preview wind...

Page 16: ...ocated in the Windows folder or sub folder 2 The file will open in Notepad Scroll down and locate the Password None entry 3 Modify this entry with a password of your choice Example Password 007 4 Restart the VALCam application and click the Adjust button 5 You will be prompted to enter your password Enter 007 to open the Adjust Dialog box ...

Page 17: ...at the external power box and camera have their green LED illuminated d Run the Black Box Tester utility under Programs VALCam Laptop e Verify that the Com port is enabled in the BIOS and that another application is not using the Com port Some applications can grab the COM port during boot up In this case an available COM port may not be available for the VALCam application In most cases these app...

Page 18: ... to verify that the hardware is properly installed There should be an entry for Video Associates Labs in the Sound Video Game Controller section Verify that there are no error indicators next to the Video Associates Labs section 3 The application runs fine when started on its own but cannot make it run from my application ...

Page 19: ...lected the VALCam as the twain source for your application Consult the your application instructions for selecting a Twain source if you do not know how this is done b Verify that the file Twain_32 dll is in your Windows directory ...

Reviews: