background image

4.2 グラフ表示

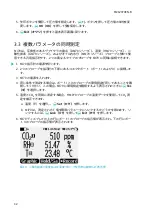
グラフ表示では、測定値がグラフとして表示されます(基本表示画面で一番上に表示され

るパラメータのグラフ)。このグラフから、データ傾向や過去数分間の履歴を確認できま

す。
グラフ表示を開くには、基本表示画面で Graphic(グラフヒョウ)を選択するか、Main menu

(メインメニュー) > Display(ディスプレイ) > Graphic history(グラフヒョウジ) > Show(ヒョウジ)

選択します。
グラフ領域に関する統計情報(最小値、最大値、および平均値)を取得するには、Info(ジョ

ウホウ)を押します。
選択した他のパラメータのグラフを取得するには、Next(ツギヘ)を押します。すべてのパ

ラメータのグラフを取得するには、テキスト All(スベテ)が表示されるまで Next(ツギヘ)

を押し、All(スベテ)を選択します。
拡大または縮小するには、上下矢印ボタンを押します。
時間を前後に移動するには、左右矢印ボタンを使用します。

4.3 メインメニュー

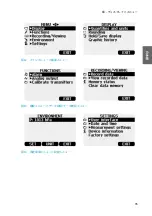
メインメニューでは、MI70 の設定と基本表示オプションの設定、プローブに関する情報の

表示、記録へのアクセス、メモリの消去、アラームの設定、調整の開始、および MI70 指示

計のアナログ出力オプションの使用が行えます。
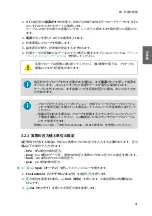
メインメニューを開いてメニュー内を移動するには、以下の手順に従います。

1. 基本表示画面に移動します。
2. 矢印ボタンを押し、 Open(オープン)を選択します(5 秒以内に押さない場合、指示

計が基本表示画面に戻ります)。

3.

   ボタンでメニューの中を移動します。

4.

ボタンで選んだ項目に進みます。

5.

を押すと前の表示画面へ戻れます。

6.

Exit(オワリ)で基本表示画面に戻ります。

M212070EN-B

34

Summary of Contents for HUMICAP HM70

Page 1: ...EN JA M212070EN B Quick Guide Vaisala HUMICAP Handheld Humidity and Temperature Meter HM70...

Page 2: ...ange without prior notice Local rules and regulations may vary and they shall take precedence over the information contained in this document Vaisala makes no representations on this document s compli...

Page 3: ...Table of contents by language English 5 23 3...

Page 4: ...M212070EN B 4...

Page 5: ...12 3 1 MI70 first start up settings 12 3 2 Basic measuring steps with HM70 12 3 2 1 Setting actual pressure value and unit 13 3 3 Measuring multiple parameters simultaneously 14 4 Displays and menus...

Page 6: ...n2 Saturation water vapor pressure pws hPa lb in2 Enthalpy h kJ kg Btu lb Water activity aw aw aw 1 Td f shows dew point temperature above the freezing point 0 C 32 F and frost point temperature Tf de...

Page 7: ...2 HMP75 HMP76 and HMP77 probe features Probe model Overview HMP75 Basic probe for relative humidity and temperature measurement Preheat and chemical purge options available with model HMP75B HMP76 Ru...

Page 8: ...re the same Even a small temperature difference between the environment and the probe causes an error A temperature difference of a few degrees can also cause water to condense on the sensor surface T...

Page 9: ...or parts 1 Charger socket 2 Function key shortcut buttons The functions change according to what you are doing with the indicator 3 Arrow buttons Move up in a menu Move down in a menu Enter a sub menu...

Page 10: ...d on a notification about not being able to charge the battery is shown on the MI70 screen You can order replacement batteries from Vaisala item code 26755 Recording icon Shows that the measurements a...

Page 11: ...rger to a wall socket An animated battery icon in the left corner of the display indicates that the battery is charging The recharge duration typically 4 5 h depends on the charge level of the battery...

Page 12: ...the time return to the Settings menu by pressing 10 Select Time and press Set Change the time by using the arrow buttons Confirm the selection by pressing OK As a default the time format is based on...

Page 13: ...when installing the probe The feature is available in HM70 series probe versions B See the HM70 User Guide M210297EN for more information 3 2 1 Setting actual pressure value and unit When measuring in...

Page 14: ...II are the same if you are taking measurements from the same condition In this case select Yes when MI70 prompts you to check the environment settings 5 When measuring humidity and CO2 simultaneously...

Page 15: ...6 4 Function key Graphic shows the readings as a curve 5 Function key Hold Save freezes the display and you can save the reading in the MI70 memory 6 Function key Record gives quick access to the Reco...

Page 16: ...right arrow buttons 4 3 Main menu In the main menu you can configure the MI70 settings and basic display options view information about the probe access recordings and clear the memory set alarms sta...

Page 17: ...Figure 6 Functions menu and Recording Viewing menu Figure 7 Environment menu and Settings menu Chapter Displays and menus 17 ENGLISH...

Page 18: ...condensed water in the probe let the probe dry before resuming measurement In case of constant error contact Vaisala see Technical support page 20 5 3 Changing the rechargeable battery pack New recha...

Page 19: ...wires are on the upper edge of the connector Do not push the connector with conducting material 4 Place the battery pack in the compartment 5 Close the back plate and tighten the screw 6 Recharge the...

Page 20: ...at least the following supporting information as applicable Product name model and serial number Software Firmware version Name and location of the installation site Name and contact information of a...

Page 21: ...21 ENGLISH...

Page 22: ......

Page 23: ...1 HM70 24 1 1 25 1 2 26 2 MI70 27 2 1 MI70 27 2 2 MI70 28 2 3 MI70 28 3 30 3 1 MI70 30 3 2 HM70 30 3 2 1 31 3 3 32 4 33 4 1 33 4 2 34 4 3 34 5 36 5 1 36 5 2 36 5 3 36 38 38 38 38 23...

Page 24: ...2O ppm ppm pw hPa lb in2 pws hPa lb in2 h kJ kg Btu lb aw aw aw 1 Td f 0 C 32 F Td Tf 2 Td MI70 HM70 HM70 User Guide M210297EN www vaisala com hm70 HM70 HMT120 HMT140 HMT330 PTU300 HMT310 HMP155 HM70...

Page 25: ...2 and TMD62 User Guide M212016EN HMD65 User Guide M212243EN GMW90 Series User Guide M211659EN 1 1 2 1 8 HMP75 HMP76 HMP77 1 2 5 HMP75 HMP76 HMP77 HMP75 HMP75B HMP76 HMP76B HMP77 180 C 356 F HMP77B HM7...

Page 26: ...1 2 HUMICAP M212070EN B 26...

Page 27: ...2 MI70 MI70 MI70 DM70 GM70 HM70 MM70 2 1 MI70 6 5 4 3 2 1 9 MI70 1 2 3 4 On Off 5 6 I II 2 MI70 27...

Page 28: ...2 2 MI70 MI70 6 MI70 0 8 0 40 C 32 104 F 8 8 MI70 26755 PC PC 2 3 MI70 M212070EN B 28...

Page 29: ...MI70 MI70 6 28 1 MI70 2 4 5 3 MI70 MI70 MI70 29...

Page 30: ...Open 3 Settings 4 User interface 5 Language Set 6 Select 7 Settings 8 Date Set OK OK Date format Set 3 Select 9 Settings 10 Time Set OK OK 24 hour clock 12 12 hour clock On 11 Exit 3 2 HM70 HM70 31 MI...

Page 31: ...2 MI70 HMP75 HMP76 HMP77 MI70 3 MI70 4 5 6 33 HM70 B HM70 B HM70 User Guide M210297EN 3 2 1 HM70 hPa hPa barg bar bara bar psia psi 1 Open 2 Environment 3 Unit hPa 4 Set 31...

Page 32: ...5 OK OK 6 Exit 3 3 MI70 DM70 HM70 GM70 MM70 2 MI70 1 MI70 2 2 I II 3 MI70 4 I II MI70 Yes 5 CO2 HMP70 CO2 a T Set b MI70 T Link Exit 6 MI70 I II 10 M212070EN B 32...

Page 33: ...3 1 2 4 5 6 11 HM70 1 2 3 3 Main menu Display Quantities and units 4 24 4 Graphic 5 Hold Save MI70 6 Record Recording Viewing Graphic Hold Save Record Main menu Settings User interface Program shortc...

Page 34: ...4 2 Graphic Main menu Display Graphic history Show Info Next All Next All 4 3 MI70 MI70 1 2 Open 5 3 4 5 6 Exit M212070EN B 34...

Page 35: ...12 13 14 35...

Page 36: ...5 5 1 5 2 HM70 38 5 3 MI70 1 2 M212070EN B 36...

Page 37: ...3 4 5 6 HM70 User Guide M210297EN www vaisala com hm70 37...

Page 38: ...www vaisala com calibration jpstore vaisala com www vaisala com contactus japan support vaisala com www vaisala com support www vaisala com warranty M212070EN B 38...

Page 39: ......

Page 40: ...www vaisala com...

Reviews: