8
9
Installation
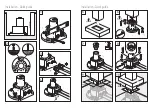
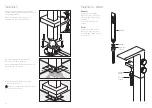
Position the base in the desired location,
mark the 3 fixing holes. Remove the base
and drill the 3 x holes to the required
diameter and depth to suit your fixings.
Fit the base in position, but do not tighten.
Use the adjusting screws to level the seat,
when satisfied with the level, finally tighten
the fixings.
Warning!
Please check for any hidden
cables and pipes before drilling holes.
The base must be recessed below the final
floor level by at least 105mm.
Connect the hot and cold supplies to the
base. The hot should be fixed to the outlet
marked
H
and the cold fixed to
C
.
There are 3 fixing positions and 3 levelling
bolts.
Use suitable fixings (not supplied) for your
substrate e.g. expansion bolts for concrete,
or coach screws for wood.
Installation
–
>
105mm
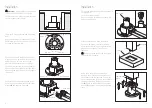
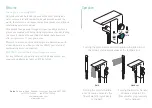
Slide the shroud onto base of upstand.
To ensure smooth movement of shroud
and prevent scratching during installation,
please use a suitable silicone based
lubricant.
Be sure to keep the shroud level, and
raise both sides equally.
Using the 4 supplied cap screws and
washers secure the base connection onto
the bottom of the tap/upstand. Ensure the
correct tap/upstand pipes are connected to
the asigned holes in the base connection -
the
H
should be connected to the hot inlet
and the
C
should be connected to the cold
inlet.
Turn on the water and check for any leaks in
the pipe work.
Turn off the water supply.
Remove the grub screw and pull the drain
valve out of the base.
Drain valve
Shroud
Tap/upstand
pipes
Upstand
Cold inlet
Hot inlet
Levelling
bolts x 3
Fixing slot x 3
Fixing slot
Levelling bolt
Cold inlet
Hot inlet


