background image

59

English

M2 USER MANUAL

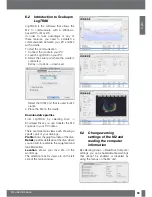
6.2  Introduction to Scubapro 

LogTRAK

LogTRAK is the software that allows the 
M2 to communicate with a Windows-
based PC or Mac OS. 
In order to take advantage of any of 
these features, you need to establish a 
communication between your PC and M2 
with a cradle.
To start the communication
1. Connect the cradle to your PC
2. Launch LogTRAK on your PC
3. Select the serial port where the cradle is 

connected

  Extras -> Options -> download

  Select the COM port that is used for M2 

cradle.

4. Place the M2 on the cradle.

Download dive profiles

From LogTRAK, by selecting Dive -> 
Download Dives you can transfer the M2 
Logbook to your PC or Mac. 

There are three main views each showing a 
specific part of your dive logs:

Profile

 shows the graphical data of the dive. 

Details

 provides details about the dive, where 

you can edit, for example, the equipment and 
tank information.

Location

, shows your dive site on the 

world map.
The selection tabs for views are on the left 
side of the main window.

6.3  Change warning 

settings of the M2 and 

reading the computer 

information

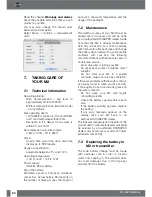
By selecting Extras -> Read Dive Computer 
settings you can enable/disable warnings 
that cannot be enabled or disabled by 
using the menus on the M2 unit.

Summary of Contents for M2

Page 1: ... M2 User Manual ...

Page 2: ...RNING The M2 is delivered in deep sleep mode where the display is off You must activate the M2 by pressing and holding the SEL button before the first dive The M2 will not start the dive mode or may show a wrong depth value if activation is not done before immersion M2 dive instrument is a personal protective equipment in compliance with the essential safety requirements of the European Union dire...

Page 3: ... 2 5 Planning a dive PLAN 20 3 2 6 Reading the logbook LOG 21 3 2 6 1 SCUBA log O2 22 3 2 6 2 APNEA log AP 23 3 2 6 3 Surface exercise logs SE 23 3 2 6 4 Sport mode exercise logs SP 23 4 The M2 as a dive computer 24 4 1 Settings in the dive mode at surface DIVE 24 4 1 1 Surface interval counter Int 26 4 2 Gas settings GAS 26 4 2 1 Set Gas 1 2 or d GAS 1 2 D 27 4 2 2 Enabling the CCR mode CCR 28 4 ...

Page 4: ...8 4 SOS 43 4 8 4 1 Desaturation reset 44 4 8 5 Diving with nitrox 44 4 9 Diving with two or more gas mixtures 45 4 9 1 Switching gas mixture during the dive 46 4 9 2 Switching back to a gas mixture with lower oxygen concentration 46 4 9 3 Gas switch not carried out at the planned depth 47 4 9 4 Delayed gas switch 47 4 9 5 Submerging below the MOD after a gas switch 47 4 9 6 Diving with CCR mode 47...

Page 5: ...r 58 5 4 Battery compartment O ring 58 5 5 Display guard 58 6 M2 PC interface 58 6 1 Cradle accessory 58 6 2 Introduction to Scubapro LogTRAK 59 6 3 Change warning settings of the M2 and reading the computer information 59 7 Taking care of your M2 60 7 1 Technical information 60 7 2 Maintenance 60 7 3 Replacing the battery in M2 or transmitter 60 7 4 Warranty 62 8 GLOSSARY 63 9 Index 64 ...

Page 6: ...strument The M2 is a technologically advanced instrument that can accompany you during yourunderwateradventureswhileprovidingyou with accurate depth time and decompression information On the surface its size makes it your ideal everyday companion With features such as wake up alarm dual time stop watch barometer altimeter SWIM and sport mode the M2 can tackle almost every possible task The buttons...

Page 7: ...APRO dive retailer See section Replacing the battery in M2 or transmitter for information on how to replace the battery 2 OPERATION MODES The reference point for any description of the M2 as a watch is the main time of day display This is the display in which the current time is shown on the middle row The upper row shows the date and the bottom row shows the day of the week The example below show...

Page 8: ...e reading when worn on the wrist against bare skin the reading is influenced by body heat The functions of the buttons on the surface are summarized in the table below and explained in detail in the following sections TIME DATE ALTI BARO meter PLANner LOG DIVE mode STOP watch function Planner pages Logbook pages Dive settings menus Watch Set Clock settings menus UP SEL ESC SEL ESC SEL ESC DOWN DOW...

Page 9: ...urn to previous menu or cancel the setting 3 1 Clock setting functions SET WATCH By pressing the DOWN button once from the main time and date display and selecting the SET menu by pressing the SEL button you will get into the clock settings See chart below SET alarm clock UTC 1 SET time SET date SET Sound off CHECK battery state Watch SET Set 24h or AM PM DOWN UP DOWN SEL DOWN UP DOWN UP DOWN UP D...

Page 10: ... other displays 3 1 2 Setting the UTC UTC 1 The UTC setting will change the shown time compared to Greenwich 0 Meridian This feature is practical when travelling through different time zones By pressing SEL the hours will start blinking You may edit them with the UP or DOWN buttons in a range of 14h 13h By pressing SEL the minutes will start blinking and you may edit them with the UP or DOWN butto...

Page 11: ...ing the UP or DOWN buttons in 15 minute intervals The UTC2 setting will be confirmed by pressing the SEL button 3 1 6 Setting the date DATE By pressing the SEL button the first two date digits start blinking In 24h mode the first digits represent days in 12h mode they represent the month You may change them by pressing the UP or DOWN buttons By pressing the SEL button the next two digits start bli...

Page 12: ...riodically measures battery status you can manually trigger a measurement by pressing the SEL button in this menu The intelligent battery algorithm will limit some functions towards the end of the battery lifetime See the table below for the status and functions Indicator in battery status display At other displays Battery status Function limitations 00000 Fresh battery none 0000_ Battery ok for d...

Page 13: ...g any new dives WARNING When battery is critically low the watch and dive settings are disabled menu off 3 2 Menus and functions at the surface By simply pressing the UP or DOWN buttons from the time of day display you can scroll through the M2 s various menus The diagram below shows the sequence of the menus Note that when you first reach a menu you are not yet inside it you must press the SEL bu...

Page 14: ...P DOWN UP SEL ESC SEL ESC 3 2 1 Using the stopwatch STOP By pressing the SEL button the stopwatch will be activated In the first display the stopwatch shows the status which can be stop run or lap When first activating the stopwatch the time display is as shown above Press the UP button and the stopwatch starts counting and shows the actual state which is run By pressing the UP button again the st...

Page 15: ...leave the stopped time on the display The status will be stored in memory that allows you to continue from the same display at a future time F NOTE The stopwatch has a 30 minute timeout before reverting to normal watch display However the timeout does not stop the stopwatch function You can return to the stopwatch menu and continue with the time taking task just as you did before the timeout happe...

Page 16: ...e middle row The current temperature is shown on the top row The current altitude class is shown on the bottom row F NOTE Barometric pressure is a variable changing with weather and atmospheric pressure at that particular elevation The Dive algorithm uses Altitude Classes which are directly derived from the barometric pressure Altitude is counted from the current barometric pressure and is therefo...

Page 17: ...ation value starts blinking By pressing the UP or DOWN buttons you can select the value from 90 90 in 1 increments By pressing SEL the value will be confirmed 3 2 4 2 Timeout TIMEOUT Compass timeout is the amount of time the compass is displayed when activated Compass timeout is valid for the display of the compass in all modes Dive Sport etc You can adjust the timeout setting by pressing SEL butt...

Page 18: ...s the SEL button BEARING COMPASS DECLINATION TIMEOUT CALIBRATION DOWN UP DOWN UP DOWN UP UP SEL 1 START HORIZONTAL 2 ROTATE HORIZONTAL 3 START VERTICAL SEL SEL 4 ROTATE VERTICAL 5 READY SEL SEL SEL DOWN SEL By pressing the SEL button the recalibration process will start ...

Page 19: ...e the M2 at least 180 horizontally Press the SEL button Hold the M2 so that its display points sideways Press the SEL button Rotate the M2 at least 180 horizontally Press the SEL button The M2 3D compass recalibration is now complete ...

Page 20: ...wing OFF in this menu By pressing the SEL button in the planner menu you will get into the planner directly or after a repetitive dive into the surface interval setting In case you plan to make a second dive during the desaturation phase you must start the planner by inputting the time you would still stay at the surface By pressing the UP or DOWN buttons you can set the time in 15 minute incremen...

Page 21: ...394ft Air nitrox dives with high ppO2 are extremely dangerous and can lead to fatal injury Be aware that exposures to high ppO2 will lead the CNS clock value to exceed the maximum recommended 100 F NOTE If MOD is shallower than 9m 30ft planning is not allowed and LO MOD is shown By pressing SEL for a planned depth the dive time starts blinking The start point minimum now is the no decompression ti...

Page 22: ...30 dive log number 1 and used oxygen content 21 In this display a too fast ascent used MB level or desaturation reset can also be shown F NOTE If the dive has been done in GAUGE or APNEA modes or exercises in Surface or Sport modes have been logged then the main page will show GA AP SE or SP instead of O2 on the top row By pressing SEL you will select the dive and get to the sub display which show...

Page 23: ...nds On the top row the APNEA dive number of that session is shown By pressing the UP or DOWN buttons the dives in the current session can be scrolled 3 2 6 3 Surface exercise logs SE The M2 has a SWIM mode The log appears as SE Surface Exercise for exercises done on the surface The logbook will present the start time and date on the main page By pressing the SEL button you can review see display b...

Page 24: ... dive time decompression status water temperature and much more On the surface after a dive remaining desaturation time NO FLY time surface interval and prohibited altitude classes are shown in addition to the watch functions 4 1 Settings in the dive mode at surface DIVE When the M2 is in Surface mode you can access various menus dedicated to diving and customize various settings to your liking Th...

Page 25: ...mode Compass 3D Compass settings DOWN UP DOWN UP DOWN UP DOWN UP SEL ESC SEL ESC When you have not been diving with your M2 for a while no desaturation time left the SCUBA mode may appear as shown below with actual time of day displayed on the middle row However in SCUBA mode after a dive the display may appear as shown below Remaining desaturation time on the middle row no repetitive dive time an...

Page 26: ...UP DOWN UP UP SEL DOWN USER SET SWIM MODE SET DOWN UP DOWN UP DOWN UP 4 1 1 Surface interval counter Int After a dive the M2 shows the surface interval from the latest dive The surface interval counter counts until desaturation is complete After desaturation is complete this menu disappears The remaining CNS is shown on the top row and the NO FLY time is shown in hours on the bottom row until this...

Page 27: ...from air to pure oxygen By pressing the SEL button in this display the oxygen content of the gas starts blinking By pressing the UP or DOWN buttons you may scroll the value from 21 up to 100 By pressing SEL the content is confirmed and the ppO2 starts blinking By pressing the UP or DOWN buttons you may select the value from 1 00bar up to 1 60bar It is possible to disable the MOD setting for Gas 1 ...

Page 28: ...th CCR mode to learn more about diving in CCR mode So when the CCR has been enabled by pressing the SEL button in this display the oxygen content of the diluent tank starts blinking By pressing the UP or DOWN buttons you may scroll the value from 21 up to 40 By pressing the SEL button the tank content is confirmed and the setpoint 1 SP1 ppO2 starts blinking By pressing the UP or DOWN buttons you m...

Page 29: ...starts blinking and you may set a value from 50 to 200bar in 5 bar increments 749 2999psi in 50 psi increments by pressing the UP or DOWN buttons By pressing SEL you confirm the settings 4 2 5 Setting the tank reserve TANK RESERVE By pressing SEL the pressure value starts blinking and you may set a value from 20 to 120bar in 5 bar increments 299 1749psi in 50 psi increments by pressing the UP or D...

Page 30: ...nsmitter as described in the pictures below Position of the transmitter for left handers Position of the transmitter for right handers Position of the transmitter for left handers if there is no connection possible on the left hand side Position of the transmitter for right handers if there is no connection possible on the right hand side ...

Page 31: ...surized for at least 40 seconds prior to the pairing operation otherwise it will not transmit the pairing sequence A transmitter can only be paired to one tank designation If you pair the same transmitter to a second tank designation the first one will be erased After a successful pairing of T1 to the M2 the SCUBA mode display will show the tank pressure in either BAR or PSI If T1 has been paired ...

Page 32: ...ons By pressing the SEL button in this menu the depth value starts blinking By pressing the UP or DOWN buttons the value can be selected from 5 to 100m 20 330ft in 1m 5ft increments The selection is confirmed by pressing the SEL button 4 3 2 Maximum dive time alarm MAX TIME WARNING By pressing the SEL button the function starts blinking and you may select on or off by pressing the UP or DOWN butto...

Page 33: ...salt water corresponds approximately to 10 3m 34ft in fresh water F NOTE This setting will adjust the depth on all modes SCUBA GAUGE and APNEA By pressing the SEL button in this menu the fresh or salt setting on the bottom row of the display starts blinking You may scroll between these two settings by pressing the UP or DOWN buttons and confirm your selection by pressing the SEL button 4 4 APNEA s...

Page 34: ... counter which employs simple multiplication for determining the surface interval in seconds The M2 uses the following formula to make this calculation Surface interval before the next dive pressure depth square root of dive time SIF As a reference a few values are listed in the following table Dive depth Dive time Surface Interval m ft seconds seconds SIF 5 seconds SIF 20 10 30 40 63 253 10 30 60...

Page 35: ...able it with the following selections off dn down up or both After confirming the selection with the SEL button the depth alarm starts blinking By pressing the UP or DOWN buttons you may select the alarm value from 5 to 100m 20 330ft By pressing the SEL button the alarm value will be confirmed 4 4 5 Setting the dive time interval alarm DIVEINT By pressing the SEL button in this menu the function s...

Page 36: ... blinking and by pressing UP or DOWN you may select between enabling or disabling the alarm with the on off setting After confirming your selection by pressing the SEL button the ascent speed starts blinking By pressing the UP or DOWN buttons you may select the value from 0 1 to 5 0 meters second 1 15 feet second By pressing the SEL button the selection will be confirmed 4 5 User settings USER Use...

Page 37: ...s menu the pressure unit starts blinking and the value can be changed between BAR PSI by pressing the UP or DOWN buttons By pressing SEL the temperature units start blinking and the value can be changed between C F by pressing the UP or DOWN buttons By pressing the SEL button the depth field starts blinking and the value can be changed between meters feet by pressing the UP or DOWN buttons By pres...

Page 38: ...lustration shows the parameters By pressing SEL on the SWIM menu you reach the SWIM mode settings By pressing SEL again the SWIM mode activation starts blinking and you may scroll between off on pulse with pulse the mode is enabled with heart rate by pressing the UP or DOWN buttons By pressing SEL the selection is confirmed and the count stroke threshold starts blinking A big threshold setting wil...

Page 39: ... the desaturation reset menu and perform a manual desaturation reset By pressing the SEL button in this menu the mode starts blinking By pressing the UP or DOWN buttons you may select between SCUBA GAUGE or APNEA modes By pressing the SEL button the selection will be confirmed 4 8 Diving with the M2 SCUBA The functions of the buttons during diving are summarized in the table below Note that the M2...

Page 40: ...subsequent immersion will cause the dive time to start again from zero Maximum displayed dive time is 999 minutes For dives longer than that the dive time starts again from 0 minutes Depth the depth is given in 10cm resolution when in metric mode When the depth is displayed in feet the resolution is always 1ft At a depth shallower than 0 8m 3ft the display shows Maximum operating depth is 120m 394...

Page 41: ...layer Skin temperature is measured inside the SCUBAPRO heart rate belt The heart rate belt is located at the mid torso which is the ideal location for estimating skin temperature independent of the type of dive suit being worn The temperature is modulated to the belt transmission signal and the dive computer shows and uses this information in SCUBAPRO s adaptive dive algorithm The temperature meas...

Page 42: ... the surface after a dive Dives within no stop times or that observe decompression stops do not prevent the formation of microbubbles in the venous blood circulation The M2 is equipped with an enhanced SCUBAPRO algorithm named ZH L8 ADT MB that has been designed to reduce the formation of these microbubbles This enhanced algorithm allows you to choose a level of conservatism that exceeds the world...

Page 43: ... the 2 minutes that are recommended for staying in the PDIS zone WARNING Even when performing a PDI Stop you still MUST perform a safety stop at 5m 15ft for 3 to 5 minutes Performing a 3 to 5 minute stop at 5m 15ft at the end of any dive is still the best thing you can do for your safety 4 8 3 No dive warning after a dive If the M2 detects a situation of increased risk due to the potential microbu...

Page 44: ...ikely to cause serious injury or a fatal issue Do not reset the desaturation unless you have a valid reason to do so F NOTE Removing and replacing the battery will not reset the desaturation The M2 stores tissue saturation information in a non volatile memory For the time that the computer is without a battery the desaturation calculation is frozen and it picks up from where it left off as soon as...

Page 45: ...ry Toxicity effects that can be tracked with OTUs SCUBAPRO recommends the model Galileo TMx for completing such dives 4 9 Diving with two or more gas mixtures The M2 is equipped with the ZH L8 ADT MB PMG algorithm PMG stands for Predictive Multi Gas meaning that when you program more than one gas mixture the M2 will predict the switch to the higher oxygen concentration gas at the depth that you sp...

Page 46: ...gas mixture before confirming a switch Always make sure you are switching to the intended gas Failure to do so may result in serious injury or death 4 9 1 Switching gas mixture during the dive During the ascent phase when you reach a depth corresponding to the MOD of Gas d the M2 will suggest that you perform the switch An audible sequence goes off and the text Gas d starts flashing on the display...

Page 47: ...thout flashing and adapt the decompression schedule accordingly 4 9 5 Submerging below the MOD after a gas switch If after having switched to Gas d or Gas 2 you inadvertently drop again below the MOD for that mixture the MOD alarm will immediately be activated In this case you would either switch back to Gas 1 or ascend above the MOD for Gas d or Gas 2 4 9 6 Diving with CCR mode The CCR Closed Cir...

Page 48: ...erwise negligible altitude can potentially cause decompression sickness Consequently the M2 constantly monitors the ambient pressure and uses it to evaluate your nitrogen loading and off gassing If the M2 notices a drop in ambient pressure not compatible with your current nitrogen loading it will activate a warning to alert you of the potentially dangerous situation If you have remaining desaturat...

Page 49: ... and temperature values on how to do so F NOTE The M2 deals with altitude automatically it monitors the atmospheric pressure every 60 seconds and if it detects a sufficient drop in pressure it does the following it indicates the new altitude range and if applicable the prohibited altitude range it indicates the desaturation time which in this case is an adaptation time to the new ambient pressure ...

Page 50: ... altitudes the 3m 10ft decompression stage is divided into a 2m 7ft stage and a 4m 13ft stage in altitude ranges 1 2 and 3 If atmospheric pressure is below 610mbar altitude higher than 4000m 13300ft no decompression calculation is carried out by the M2 automatic GAUGE mode In addition the dive planner is not available in this altitude class 4 11 Warnings and alarms The M2 can alert you of potentia...

Page 51: ...level time will blink for 12 seconds Alarms cannot be turned off because they represent situations that do require immediate action by the diver Alarms are described in the following sections WARNING When in GAUGE mode all warnings and all alarms are off except for the low battery alarm When the M2 is set to sound off all audible alarms and warnings are switched off 4 11 5 Ascent rate As you ascen...

Page 52: ...d lead to microbubbles in the arterial circulation which could cause serious injury or fatal issue The alarm persists for as long as the ascent rate is 110 or more of the ideal ascent rate 4 11 6 MOD ppO2 WARNING The MOD should not be exceeded Disregarding the alarm can lead to oxygen poisoning Exceeding a ppO2 of 1 6bar can lead to sudden convulsions resulting in serious injury or fatal issue If ...

Page 53: ...fficient increase in workload no stop times may shorten and decompression stops can increase The M2 warns you of this situation with audible beeps and shows the heart symbol F NOTE The M2 analyzes your heart rate pattern over time to determine workload and make any adjustments in the algorithm The heart rate shown on the display is not indicative of the workload itself Near a decompression stop th...

Page 54: ...ace with the tank reserve The RBT calculation is based on your current breathing rate and it accounts for any existing and upcoming decompression obligation as well as for any temperature gradient in the water It assumes an ascent at the ideal ascent rate defined in chapter 4 11 5 When the RBT reaches 3 minutes a warning is shown When 0 minutes RBT is reached an alarm is triggered the M2 has compu...

Page 55: ...re if transmitter paired 4 Max depth after a 1m 3feet ascent is detected 5 Average depth 6 Temperature 7 Heart rate 8 Skin temperature if SCUBAPRO belt is used 9 Current time of the day After a dive the GAUGE mode surface display shows the dive time on the middle row On the bottom row the stopwatch is running from the dive start or the last manual restart On the top row the maximum depth of the di...

Page 56: ... the bottom row the surface interval counter counts to 15 minutes If no repetitive dive is done the M2 reverts to the APNEA mode menu display When the SIF is enabled the no dive symbol will be shown at the surface until this period has elapsed An audible signal is given after this When the total session depth is enabled and the limit is reached the blinking no dive symbol is shown and an audible s...

Page 57: ...rate setting on your M2 Refer to the section Heart rate limits and Skin temperature to learn how to do this After a dive rinse the heart rate belt in fresh water dry it and store in a dry place For HR belts with a battery cap we recommend having the battery changed by an authorized SCUBAPRO dealer With completely sealed HR belts the battery cannot be changed Check the operation conditions and dept...

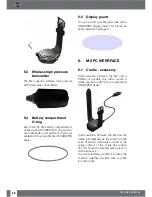
Page 58: ...e with a SCUBAPRO display guard This foil can be easily replaced if damaged 6 M2 PC INTERFACE 6 1 Cradle accessory Communication between the M2 and a PC Mac is possible only with a cradle A cradle can be bought from your authorized SCUBAPRO dealer Communication between the M2 and the cradle is established via the contact on the case Therefore if the water contact or the spring contact of the cradl...

Page 59: ...the M2 on the cradle Download dive profiles From LogTRAK by selecting Dive Download Dives you can transfer the M2 Logbook to your PC or Mac There are three main views each showing a specific part of your dive logs Profile shows the graphical data of the dive Details provides details about the dive where you can edit for example the equipment and tank information Location shows your dive site on th...

Page 60: ... and can be done by an authorized SCUBAPRO dealer Aside from that the M2 is virtually maintenance free All you need to do is rinse it carefully with fresh water after each dive and change the battery when needed To avoid possible problems with your M2 the following recommendations will help ensure years of trouble free service Avoid dropping or jarring your M2 Do not expose your M2 to intense dire...

Page 61: ...acement of the battery or the incorrect closing of the battery cap The M2 stores the tissue saturation information in a non volatile memory so the battery can be replaced at any time between dives without the loss of information F NOTE After a dive while on the surface the M2 stores tissue desaturation data once every hour until desaturation is complete If a battery is changed while the M2 has rem...

Page 62: ...urer Pressure tests which do not take place in water Diving accidents Improper placement of the battery cap For European Union markets the warranty of this product is governed by European legislation in force in each EU member state All warranty claims must be returned with dated proof of purchase to an authorized SCUBAPRO dealer Visit www scubapro com for the dealer nearest you Your dive instrume...

Page 63: ... higher In this manual air is considered as a particular type of nitrox NO FLY Minimum amount of time the diver should wait before taking a plane No stop time This is the time that a diver can stay at the current depth and still make a direct ascent to the surface without having to perform decompression stops O2 Oxygen O2 Oxygen concentration used by the dive computer in all calculations PDIS Prof...

Page 64: ...ter diving 49 Gauge mode 54 Logbook 21 6 59 Maintenance 60 MB levels 42 63 Microbubbles 42 63 MOD 27 52 64 Mountain lakes 50 No dive warning 43 Nitrox 29 44 63 Nitrox reset 29 NO FLY time 26 48 63 Oxygen concentration 44 Oxygen partial pressure 44 PC interface 58 ppO2max 63 Safety stop timer 42 LogTRAK 59 SOS mode 43 63 Stopwatch 14 Surface interval 26 34 35 63 Technical information 60 Time of day...

Reviews: