background image

DigiDoc-It Imaging System 


Camera Assembly 


The camera will be installed in the DigiDoc-It hood at the UVP factory.   


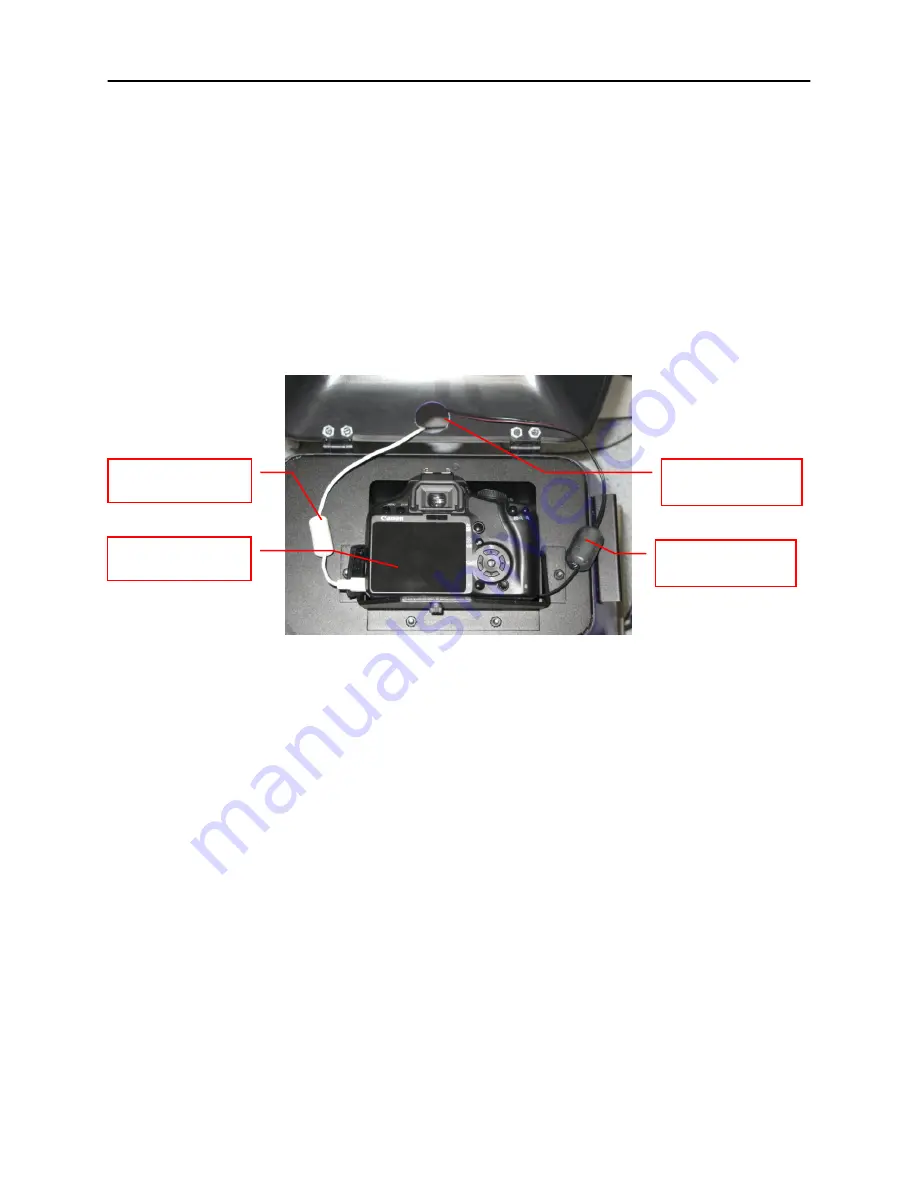
To connect the power cable to the camera, 

thread the camera’s power cable through the round 

notched hole from the back of the camera cap and plug it into the camera as shown.  


To connect the USB cable to the camera, 

thread the camera’s USB cable through the round 

notched hole from the back of the camera cap and plug into the camera.  Leave the other end 
unplugged until ready to load the software. 


Plug the camera’s power supply into a wall outlet or surge-protector receptacle.  


Note: 

The Ethidium Bromide filter is installed inside the hood enclosure at the UVP factory. If the filter needs 

to be replaced, turn the hood upside down. Loosen screws and slide the filter into the filter tray. Retighten 
screws and place the hood upright. 


Install the Doc-ItLS Acquisition Software  

Note:

 The following provides a brief instruction for installing the software. For additional instruction on using the 

software, refer to the Doc-ItLS help files. 


Insert the CD into the CD-ROM drive. The installation program should automatically start. If the 
installation program fails to start, navigate to the CD-ROM drive and double-click setup.exe to launch 
Doc-It. 


Follow instructions from the Wizard screens as they appear, clicking Next, Accept or Finish as 
appropriate. 


If prompted to restart the computer, click No. 


Restart the computer by choosing Restart from the Windows Start menu. 


Double click onto the UVP icon on the desktop. 


Activate the software by choosing 

On the fly activation

 if connected to the internet.  Complete all the 

required information on the form and fill in the Serial Number (located on the CD).  Click onto Get 
Activation No. and then click onto Activate when the Activation Number appears in the box.   


Close the software. 


Note

:  If not connected to the internet, call technical services at (800) 452-6788 / (909) 946-3197, to complete 

the activation process. 

Hole in DigiDoc-It 
hood for cables 

Power supply cable, 
plug into wall outlet 

USB cable, plug into 
computer 

DigiCam 120 camera 

Summary of Contents for DigiDoc-It

Page 1: ...P LLC Ultra Violet Products Ltd 2066 W 11th Street Unit 1 Trinity Hall Farm Estate Upland CA 91786 Nuffield Road Cambridge CB4 1TG UK Phone 800 452 6788 909 946 3197 Phone 44 0 1223 420022 Fax 909 946 3597 Fax 44 0 1223 420561 Web Site www uvp com 81 0218 01 Rev K ...

Page 2: ... enclosure includes a cap to reduce ambient and reflective light when taking pictures The soft rubber viewport window allows researchers to view samples prior to capturing images The slide closure under the viewport minimizes ambient light when taking pictures The lightweight door provides access to the enclosure interior for placement of samples on the transilluminator surface The DigiDoc It draw...

Page 3: ...ansilluminator may be shipped with the system The transilluminator includes an ultraviolet blocking cover and the cover should be removed when the transilluminator is used with the system Refer to the Transilluminator manual for separate instructions Operating System requirements Windows XP Professional 32 bit only with Service Pack 2 Internet Explorer 6 0 or higher To locate the version of Intern...

Page 4: ...se damage to unprotected eyes and skin Before operating any unit be sure all personnel in the area are properly protected UV Blocking Eyewear is highly recommended and should be worn Refer to the Accessories section of this manual for UV Blocking Eyewear High Performance Transilluminator Remove the UV blocking clear cover from the Transilluminator Position the transilluminator so the switch is fac...

Page 5: ...or installing the software For additional instruction on using the software refer to the Doc ItLS help files Insert the CD into the CD ROM drive The installation program should automatically start If the installation program fails to start navigate to the CD ROM drive and double click setup exe to launch Doc It Follow instructions from the Wizard screens as they appear clicking Next Accept or Fini...

Page 6: ...capture images System Operation Loading Gels into the Darkroom Hood Turn Off the UV Transilluminator Place the gels onto the UV Transilluminator Place the DigiDoc It hood over the UV Transilluminator Turn On the UV Transilluminator Use the Gel Viewport Window to view the positioning of the gels Slide away the Viewport cover to view the gel and then replace the cover when ready to capture the image...

Page 7: ...tating that the application cannot find a camera will appear To remedy this turn the camera on and click Retry Software Operation Ensure that the camera mode is set to A DEP for automated capture Open the Doc It LS software A window displaying the camera options should appear as pictured below If not click on View Plugins Camera Plugin Camera Control Window To take images in color click the Color ...

Page 8: ...tion If operating the camera in automatic mode is not sufficient for the application try utilizing the manual mode to gain additional camera control To access the camera dial open the camera cap on top of the hood Set the camera mode dial button to M Camera set to M Close and secure the camera cap on the hood A new camera window appears with additional options like the one below ...

Page 9: ...ent For transilluminator replacement parts refer to the separate manual for the transilluminators included with your shipment Description Part Numbers Drawer for Benchtop Transilluminators 98 0068 01 Doc ItLS Analysis Software 97 0185 02 Thermal Printer Digital 115 230V 89 0069 06 Thermal Printer Digital 230V 89 0069 07 Thermal Printer Digital 230V for Europe 98 0069 15 Thermal Paper 4 rolls 800 i...

Page 10: ...ee from defects in manufacture and materials for ninety 90 days from date of purchase Transilluminators carry a two 2 year warranty from date of purchase If equipment failure or malfunction occurs during the warranty period UVP shall examine the inoperative equipment and have the option of repairing or replacing any part s which in the judgment of UVP were originally defective or became so under c...

Reviews: