background image

17

liGHtiNG iNstrUctioNs

liGHtiNG ProceDUre For Boiler WitH 

coNtiNUoUs Pilot

For Your safety, read Before lighting!!

Read the warning at the beginning of "

1. 

lighting instruc-

tions

."

This appliance has a pilot which must be lighted by hand. 

2. 

When lighting the pilot, follow these instructions exactly.

Before lighting, smell all around the appliance area for 

3. 

gas. Be sure to smell next to the floor because some gas 

is heavier than air and will settle on the floor. See section 

"

What to Do if You smell Gas

."

Use only your hand to push in or turn gas control knob or 

4. 

reset button. Never use tools. If the knob or reset button 

will not push in or turn by hand, don’t try to repair it, call 

a qualified service technician. Force or attempted repair 

may result in a fire or explosion.

Do not use this appliance if any part has been under wa

-

5. 

ter. Immediately call a qualified service technician to in

-

spect the appliance and to replace any part of the control 

system and any gas control which has been under water.

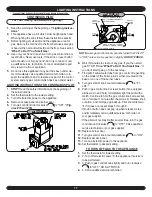
liGHtiNG iNstrUctioNs For coNtiNUoUs Pilot

stoP!

1. 

 Read the safety information at the beginning of 

these instructions.

Set the thermostat to the lowest setting.

2. 

Turn off all electric power to the appliance.

3. 

Remove access panel and burner door.

4. 

Turn gas control knob clockwise 

5. 

 to "OFF." 

(Fig-

ures #15 and #16)

INL

ET

Figure #15

GAS CONTROL KNOB

PRESSURE REGULATOR 
ADJUSTMENT BENEATH 
COVER SCREW 

PILOT FLOW ADJ. SCREW
BENEATH COVER SCREW

OUTLET 

PRESSURE 

TAP 

TAP 

PRESSURE 

INLET 

GAS

INLET

GAS

OUTLET

TH/TR

ON

OFF

PILOT

Figure #16

Note: 

Some gas control knobs cannot be turned from "PILOT" 

to "OFF" unless knob is pushed in slightly.

 DO NOT FORCE.

Wait (5) minutes to clear out any gas. If you then smell 

6. 

gas, STOP! Follow "

What to Do if You smell Gas

." If 

you don't smell gas, go to the next step.

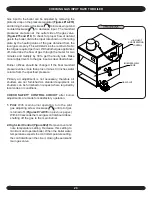
Find pilot. Follow metal tube from gas control. Depending 

7. 

on the model of the boiler, pilot is either mounted on the 

base or on one of the burner tubes.

Turn gas control knob counterclockwise 

8. 

 to "PI-

LOT."

Push in gas control knob or reset button if so equipped, 

9. 

all the way in and hold. Immediately light the pilot with a 

match. Continue to hold the gas control knob or reset but

-

ton in for about 1 minute after the pilot is lit. Release knob 

or button, and it will pop up back up. Pilot should remain 

lit. If it goes out, repeat steps 5 through 9.
If knob or button does not pop up when released, stop 

• 

and immediately call a qualified service  technician or 

your gas supplier.
If the pilot will not stay lit after several tries, turn the gas 

• 

control knob clockwise 

 to "OFF." Call a qualified 

service technician or your gas supplier.
Replace burner door.

10. 

Turn gas control knob counterclockwise 

11. 

  to "ON."

Replace access panel.

12. 

Turn on all electric power to the appliance.

13. 

Set thermostat to desired setting.

14. 

 to tUrN oFF Gas to tHe aPPliaNce

Set the thermostat to lowest setting.

1. 

2. Turn off all electric power to the appliance if service is 

2. 

to be performed.

3. Push in gas control knob slightly and turn clockwise  

3. 

 to "OFF." DO NOT FORCE.

4. Call a qualified service technician.

4. 

Summary of Contents for MGB 100

Page 1: ...9001 2000 Certified Company Utica Boilers P O Box 4729 Utica NY 13504 4729 www uticaboilers com SERIES MGB CAST IRON GAS FIRED BOILERS FOR FORCED HOT WATER P N 37611601 Rev A 07 08 MODEL NUMBERS MGB50 MGB75 MGB100 MGB125 MGB150 MGB175 MGB200 MGB250 MGB300 ...

Page 2: ...quipped supplied or specified components may result in property damage personal injury or the loss of life 4 TO THE OWNER Installation and service of this boiler must be performed by a qualified installer 5 TO THE INSTALLER Leave all instructions with the boiler for future reference 6 When this product is installed in the Common wealth of Massachusetts the installation must be performed by a Licen...

Page 3: ...20 feet In special cases where conditions permit chimney height may be reduced to 10 feet Refer to the latest revision of NFGC part 11 Electric service to be 120 Volts 15 Amps 60 Hz The MEA number for the this boiler is 19 79 E 1 For elevations above 2000 feet ratings should be reduced at a rate of 4 for each 1000 feet above sea level 2 Base on 170 temperature in radiators 3 Tank sized for non fer...

Page 4: ...e lighting and other performance 4 criteria with the gas manifold and control assembly on the boiler per the latest revision of ANSI Z21 13 CGA 4 9 The boiler shall be installed such that the gas ignition 5 system components are protected from water drip ping spraying rain etc during appliance operation and service circulator replacement condensate trap control replacement etc Locate boiler on lev...

Page 5: ...Gas Code When a boiler is installed in an unconfined space in a 3 building of tight construction air for combustion and ven tilation must be obtained from outdoors or from spaces freely communicating with the outdoors A permanent opening or openings having a total free area of not less than 1 square inch per 5000 Btu per hour of total input rating of all appliances shall be provided Ducts may be u...

Page 6: ...inch from the back and 6 inches from the front of the boiler The opening shall directly communicate with the outdoors or shall communicate through a verti cal or horizontal duct to the outdoors or spaces crawl or attic that freely communicate with the outdoors The openings must have a minimum free area of 1 square inch per 3000 Btu per hour of the total input rating of all equipment located in the...

Page 7: ...eating boiler During heating cycle open valves A and B close valves C and D During cooling cycle open valves C and D close valves A and B Maintain a minimum clearance of one inch to hot water C pipes When the boiler is connected to heating coils located in air 2 handling units where they may be exposed to refrigerated air circulation the boiler piping system MUST BE sup plied with flow control val...

Page 8: ...ation This method of piping however is not typically required for baseboard heat ing systems Typical installations where bypass piping is used are as follows This method is used to protect boilers from condensation A forming due to low temperature return water Generally noticed in large converted gravity systems or other large water volume systems Figure 6 These methods are used to protect systems...

Page 9: ...ALVE HOSE BIB FLOW CONTROL VALVE EXPANSION TANK BOILER DHW CIRCULATOR CH CIRCULATOR PRIORITY ZONE CIRCULATOR EXPANSION TANK WATER INLET FLOW CONTROL VAVLE SHUT OFF VALVE PRESSURE REDUCER VALVE CHECK VALVE BALL VALVE AIR SEPARATOR ZONE VALVE HOSE BIB SINGLE ZONE SYSTEM WITH DHW PRIORITY MULTIZONE SYSTEM WITH CIRCU LATORS AND DHW PRIORITY CONNECTING SUPPLY AND RETURN PIPING Figure 7 Figure 8 ...

Page 10: ...PRIORITY ZONE BOILER WATER INLET CH DHW SYSTEM CIRCULATOR USE FULL PORT ZONE VALVE FOR OPTIMUM TANK PERFORMANCE CONSIDER USING ZONE CIRCULATOR SEE FIGURE 5 ZONE 4 CIRCULATOR SHUT OFF VALVE PRESSURE REDUCER VALVE CHECK VALVE EXPANSION TANK AIR SEPARATOR ZONE VALVE HOSE BIB FLOW CONTROL VALVE Figure 9 Figure 10 CONNECTING SUPPLY AND RETURN PIPING MULTIZONE SYSTEM WITH ZONE VALVES AND DHW PRIORITY WI...

Page 11: ...turn doors win dows exhaust fans fireplace dampers and any other gas burning appliances to their previous condition of use Any improper operation of the common venting system 7 All installations of boilers and venting should be done only by a qualified expert and in accordance with the appropriate manual Installing or venting a boiler or any other gas appliance with improper methods or materials m...

Page 12: ...3 hole on Damper Motor frame Tighten locknut onto Damper wire harness connector 4 Plug Damper connector into socket on Damper Motor 5 frame Replace Damper Motor cover and wire Damper in accor 6 dance with Figure 11 DAMPER INSTRUCTIONS Ensure that only the boiler is serviced by the Vent Damp 1 er Figure 12 ACCEPTABLE VENT DAMPER LOCATIONS UN ACCEPTABLE DAMPER LOCATIONS BOILER HOT WATER HEATER CHIMN...

Page 13: ...y piping system during 4 any pressure testing of the gas piping After reconnecting leak test gas connection and boiler piping before placing boiler back into operation Natural Gas Propane Min Supply Pressure 5 w c 11 w c Max Supply Pressure 14 w c 14 w c Manifold Pressure 3 5 w c 10 5 w c ELECTRICAL WIRING See wiring diagrams on the following two pages for details Electrical wiring must conform wi...

Page 14: ...14 Wiring Diagram 24V Standing Pilot VR8200 OR VR8300 ...

Page 15: ...15 Wiring Diagram Intermittent Ignition ...

Page 16: ...call your gas supplier from a neighbor s phone Follow the gas supplier s instructions If you cannot reach your gas supplier call the fire department CAUTION C Use only your hand to push in or turn the gas control knob Never use tools If the knob will not push in or turn by hand don t try to repair it Call a qualified service technician Force or attempted repair may result in a fire or explosion D ...

Page 17: ...H COVER SCREW OUTLET PRESSURE TAP TAP PRESSURE INLET GAS INLET GAS OUTLET TH TR ON OFF PILOT Figure 16 NOTE Somegascontrolknobscannotbeturnedfrom PILOT to OFF unless knob is pushed in slightly DO NOT FORCE Wait 5 minutes to clear out any gas If you then smell 6 gas STOP Follow What To Do If You Smell Gas If you don t smell gas go to the next step Find pilot Follow metal tube from gas control Depen...

Page 18: ...g errors can cause improper and dangerous operation CAUTION Verify proper operation after service The service agency or owner should make certain the system is filled with water to minimum pressure and open air vents if used to expel any air that may have accumulated in the sys tem Check the entire piping system and if any leaks appear have them repaired Circulators need to be checked and maintain...

Page 19: ...h of the tip of the pilot thermocouple ignition sensing electrode or mercury sen sor Figure 21 IGNITION ELECTRODE 3 8 TO 1 2 IN FLAME Figure 21 To adjust the pilot flame remove the pilot adjustment cover screw Figures 14 16 on previous pages and turn the inner adjustment screw counterclockwise to increase or clockwise to decrease pilot flame Be sure to replace cover screw after adjustment to preve...

Page 20: ... be changed if the final manifold pressure varies more than plus or minus 0 3 inches water column from the specified pressure Primary air adjustment is not necessary therefore air shutters are not furnished as standard equipment Air shutters can be furnished on request where required by local codes or conditions Check Safety Control Circuit after burner adjustments are made for satisfactory operat...

Page 21: ...21 ...

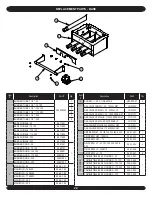
Page 22: ...05 MANIFOLD 300 356 2 1 06 Item Description Part Qty 5 SCREW 20 X SELF TAP HW 005 01 4 6 GAS VALVE VR8200H 50 150 24V NAT VG 003 05 1 GAS VALVE VR8200H 50 300 24V LP VG00307 GAS VALVE VR8204H 50 150 SPARK NAT VG01101 GAS VALVE VR8304H4 175 300 SPARK NAT VG01103 GAS VALVE VR8304 50 300 SPARK LP VG01104 GAS VALVE VR8300H4 250 300 24V NAT VG01201 GAS VALVE VR8300H4 175 200 24V NAT VG01202 7 ORIFICE 3...

Page 23: ...100 1 Center Section 125 150 2 Center Section 175 200 3 Center Section 250 4 Center Section 300 6 Item Part No Description Qty 7 100 2 2 01 Left Hand Section 1 8 43300976 Push Nipple 2 Mach 050 2 Push Nipple 2 Mach 075 100 4 Push Nipple 2 Mach 125 150 6 Push Nipple 2 Mach 175 200 8 Push Nipple 2 Mach 250 10 Push Nipple 2 Mach 300 12 9 3461601 Baffle 075 175 Only 2 Fully Assembled Heat Exchangers 1...

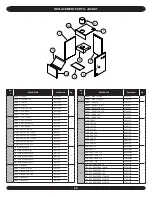
Page 24: ...1201 1 PANEL BASE 75 100 3161202 PANEL BASE 125 150 3161203 PANEL BASE 175 200 3161204 PANEL BASE 250 3161205 PANEL BASE 300 3161206 Item DESCRIPTION Part Number Qty 6 PANEL RIGHT 50 200 3162705 1 PANEL RIGHT 225 300 3162703 7 PANEL REAR 50 3162601 1 PANEL REAR 75 100 3162602 PANEL REAR 125 150 3162603 PANEL REAR 175 200 3162604 PANEL REAR 250 3162605 PANEL REAR 300 3162606 8 FLUE COL 50 3462101 1...

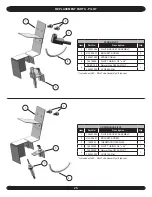
Page 25: ... 02 Natural Gas Q345A PILOT 1 240007096 LP Q345A Pilot Included with 3 Pilot Tube Assembly Kit above CONTINUOUS PILOT Item Part No Description Qty 1 109007296 PILOT BRACKET ASSEMBLY 1 2 HW 005 01 BRACKET SCREW 2 3 1520001 THERMOCOUPLE Q309 1 4 14615005 PILOT TUBING 1 8 x 24 1 5 14662098 Natural Gas Q314A PILOT 1 240007285 LP Q314A Pilot Included with 3 Pilot Tube Assembly Kit above 1 1 5 5 3 4 4 2...

Page 26: ...6 07 1 5 DRAIN SHORT HW 016 03 1 6 PIPE TEE 1 1 4X3 4X1 1 4 PF 008 03 1 7 PIPE 1 1 4 CLOSE NPL PF 006 01 1 8 WIRE LOW VOLTAGE DAMPER 375 1 14 01 1 9 HARNESS CIRCULATOR 72 37519501 1 10 CONTROL L8148E1257 AQUASTAT 1010002 1 11 RELIEF VALVE 30 VR 001 01 1 12 WELL 3 4 X3 AQ 020 01 1 13 GAUGE THERALTIMETER GA 001 00 1 14 PIPE NPL 3 4 X4 PF 005 11 1 15 PIPE ELBOW 3 4 90 PF 002 04 1 16 CLAMP 3600 WHITE ...

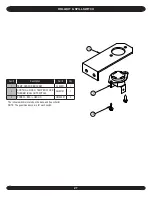
Page 27: ...ption Part Qty 1 TEMP SENSOR BRACKET 3262001 1 2 CONTROL FIXED TEMPERATURE THERMO ROLLOUT SWITCH AQ02101 1 3 SCREW 6 X HEX HD HW06501 2 The rollout switch is located on the base and flue collector NOTE The quantities above are for each switch ...

Page 28: ...P O Box 4729 Utica NY 13504 4729 ...

Reviews: