Operators Manual
2320 124th Road Sabetha, Kansas 66534 www.uscllc.com Phone: (785)431
-
7900 Revision Effective 01/2020
Document: TD
09
06
1064
Revision: A
LPV100 SEED TREATER
FOR LOSS
IN
WEIGHT TREATERS.
Page 1: ...Operators Manual 2320 124th Road Sabetha Kansas 66534 www uscllc com Phone 785 431 7900 Revision Effective 01 2020 Document TD 09 06 1064 Revision A LPV100 SEED TREATER FOR LOSS IN WEIGHT TREATERS...
Page 2: ...chemical products and changes in seed size or variety may all effect the accuracy of application and seed coverage Periodically check the equipment calibration while treating and make adjustments as r...
Page 3: ...l Operation 22 LPV Treater with Loss in Weight Box 2 Box Overview 22 LPV Treater for Batch Hopper Overview 24 Rotating Drum Overview 27 Section D Electrical Operation 28 Section E Troubleshooting 30 S...
Page 4: ...should always wear protective gloves safety glasses and follow the companies safety precautions in the case of any spillage or operator contamination SAFETY WORDS AND SYMBOLS It is very important tha...
Page 5: ...with an established procedure When taking equipment out of service to perform maintenance or repair work always follow the lockout tagout procedures as outlined in ANSI Z344 1 and or OSHA Standard 191...
Page 6: ...the electrical system or when working on or near exposed high volt age wiring This hazard does not exist when the electrical power has been disconnected properly locked and tagged out Automatic Start...
Page 7: ...g instructions to operators or employees before allowing them to operate the machine and at least annually thereafter per OSHA Occupational Safety and Health Administration regulation 1928 57 and 1910...
Page 8: ...y with all personnel who will be operating or maintaining the equipment OPERATING SAFETY 1 Read and understand the Operator s Manual and all safety labels before using 2 Disconnect and disable electri...
Page 9: ...e power source and wait for all moving parts to stop before servicing adjusting repairing or unplugging 3 Follow good shop practices Keep service area clean and dry Be sure electrical outlets and tool...
Page 10: ...o F 10o C Decide on the exact position before you remove the backing paper Remove the smallest portion of the split backing paper Align the sign over the specified area and carefully press the small p...
Page 11: ...SAFETY Work SAFELY REMEMBER If Safety Labels have been damaged removed become illegible or parts replaced without safety labels new labels must be applied New safety labels are available through your...
Page 12: ...Page 12 TD 09 06 1064 LPV 100 SEED TREATER Part 09 02 0001 Part 09 02 0002...
Page 13: ...Page 13 TD 09 06 1064 LPV 100 SEED TREATER Part 09 02 0002 Part 09 02 0001...
Page 14: ...ing or any covered structure to protect the machine from weathering 4 Remove any boxes and cords from the drum of the treater NOTICE HIGH VOLTAGE Always disconnect the power source before working on o...
Page 15: ...lowly until the drum frame is resting on the dead stop pins on both sides of the treater frame STEP A Support the discharge end of the treater drum using the lift ring at the top of the discharge asse...
Page 16: ...otate The actuator was installed and tested at the factory so the shaft is in the correct position before it was disassembled prior to shipping STEP E Insert the second clevis pin 06 09 0058 and the t...
Page 17: ...seed treater in position to prevent the machine from moving during operation 7 Inspect machine thoroughly for screws bolts fittings etc which may have come loose during shipping 8 The pump stand s sh...
Page 18: ...lt on the top assembly leg in the top hole on the leg ex tension The hole alignment controls the height 4 Replace the bolt in each leg and tighten the nut 5 Place the adjusted unit over the treater su...
Page 19: ...hopper with LIW gate 6 Connect inlet conveyor 7 Connect outlet conveyor 8 Connect the red cable to the PJESTOPA on the Main Control Panel MCP and then to the PJESTOPB on the next panel that is closest...
Page 20: ...eder manual pump stands etc 11 Connect the flow meters from up to 4 pump stands 12 Connect cable from actuator power on LIW gate located on either the box dump hopper or batch hopper with LIW gate 13...
Page 21: ...nded and bonded The USC system must be connected to the same electrical requirements as specified in the main control panel on the power requirement tag or the electrical schematic shipped with the pi...
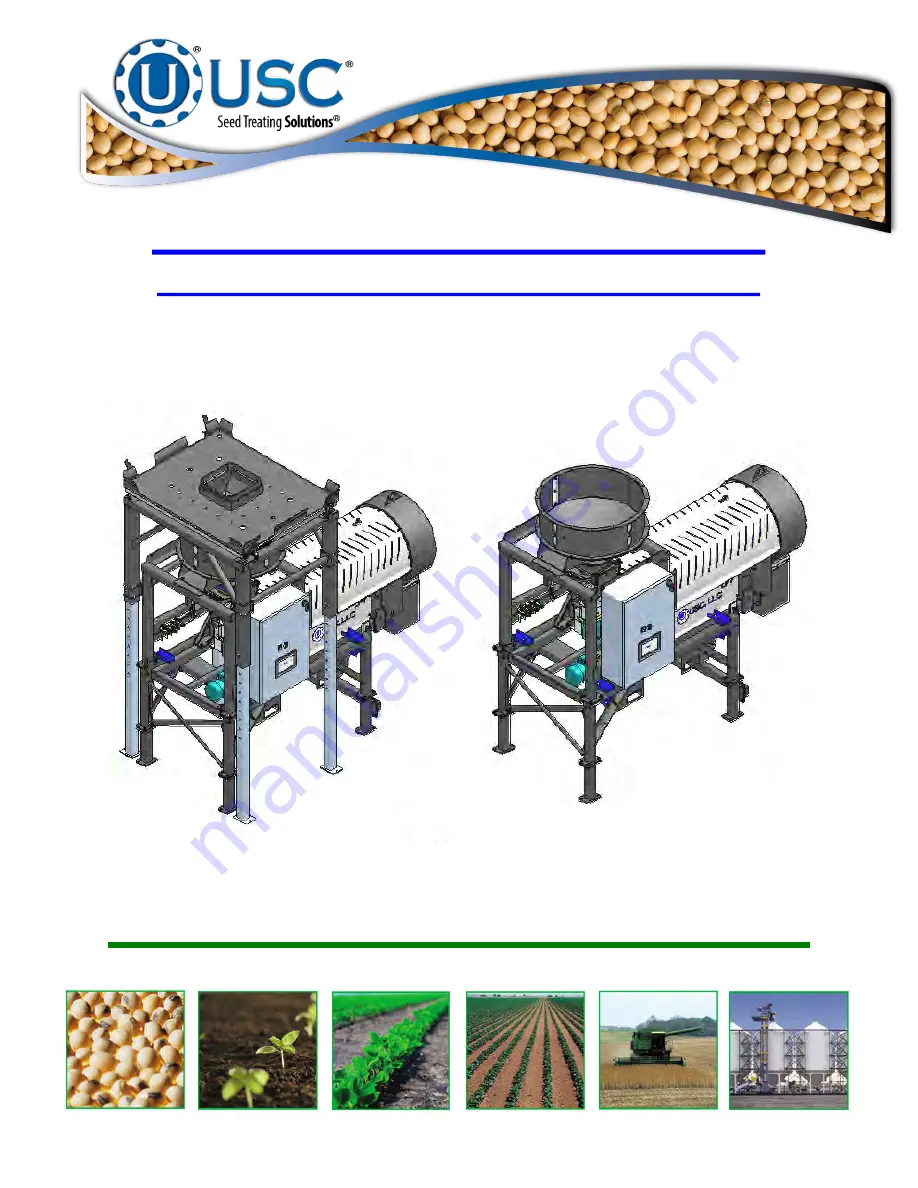
Page 22: ...100 SEED TREATER Mechanical Operation Section C LPV TREATER WITH LOSS IN WEIGHT BOX 2 BOX OVERVIEW Pro Box Platform Scale Rotating Drum Discharge Chute Quick Release Atomizer Chamber Handle Plumbing...
Page 23: ...e Chute Scale Lock Lever 4 Prior to running the system to treat seed ensure that all 4 of these 1 at each corner are in the unlocked position Failure to do this will cause inaccurate readings from the...
Page 24: ...TREATER OVERVIEW Rotating Drum Discharge Chute Extension ring 6 9 12 Plumbing To Atomizer Control Panel NOTE Scale and LIW gate are located on Batch Weigh Hopper either Floor Mounted or Stacked Over...
Page 25: ...ne Flow Chamber Atomizer Motor The Illustration below shows how seed passes through the atomizing chamber The red represents treatment being dispensed to the seed as it passes through the chamber Afte...
Page 26: ...y the U Treat Lite automation software to determine the flow rate of the seed flowing down on top of the distribution cone which disperses the seed down around the atomizer head The atomizer can be ea...
Page 27: ...treater out the discharge end of the machine Never allow exposure of persons or clothing to the drive shaft idler wheels or the drum during operation Always have the safety shields in place during ope...
Page 28: ...lated tools when making adjustments while the controls are under power AUTHORIZED PERSONNEL only shall work on the control panel Never allow anyone who has not read and familiarized themselves with th...
Page 29: ...nd Before operating the drum tilt verify the treaters drum path is clear of all obstructions and that the actuator moves freely STEP 3 Turn the UP OFF DOWN switch to the indicated position to change t...
Page 30: ...page 31 3 Make sure inlet conveyor is plugged inlet conveyor receptacle 4 Connect hopper proximity switch Pump will not turn on in AUTO 1 Proximity switch is not staying covered 2 Atomizer is not on...
Page 31: ...eed treater is set too level 3 Chains are too loose 1 Dry off any moisture that may have collected on the outside of the drum 2 Adjust the slope of the seed treater to at least a 3 drop from front to...
Page 32: ...rained alert operator Do not put this unit into operation with any questionably maintained parts Poor performance or a hazard may occur Do not use compressed air or water under pressure to clean any o...
Page 33: ...urs of operation Adjust tension as required Wipe down the motor casing with a damp cloth making sure to remove all dust that may have collected since the last maintenance date Record the cleaning on t...
Page 34: ...ivity of the proximity switch The LED lights indicates the power status If they are active the device is powered The center LED is when the switch closes Using the small screwdriver you can adjust the...
Page 35: ...d reconnect the motor power cord Quick Release Handle Atomizer Head Set Screw Bearing 1 Slide out atomizer housing and grease bearing inside Bearing needs just one pump of grease every 40 hours of ope...
Page 36: ...with a damp cloth making sure to remove all dust that may have collected since the last maintenance date Record the cleaning on the company required documents LOSS IN WEIGHT GATE Use a vacuum cleaner...
Page 37: ...be used when cleaning the machine TREATER 1 Turn power off to the treater and treater components and lockout 2 Inspect all welds and structural components for bends cracks and damage 3 Use a vacuum t...
Page 38: ...y residue left on the inside of the drum and around the seed lifters 3 Lubricate the chain to keep from corroding in storage ATOMIZER CHAMBER 1 Remove and clean the atomizer housing 2 Remove the atomi...
Page 39: ...Page 39 TD 09 06 1064 LPV 100 SEED TREATER NOTES...
Page 40: ...ducts or components This warranty also does not apply to Products upon which repairs and or modifications have been effected or attempted by persons other than pursuant to written authorization by Man...
Page 41: ...Page 41 TD 09 06 1064 LPV 100 SEED TREATER USC LLC 2320 124th road Sabetha KS 66534 Phone 785 431 7900 EMAIL sales team uscllc com WEB www uscllc com...